Chapter 5 Tissue Sampling, Specimen Handling, and Chromoendoscopy
Biopsy
Pinch Biopsy Forceps
Larger Capacity Forceps
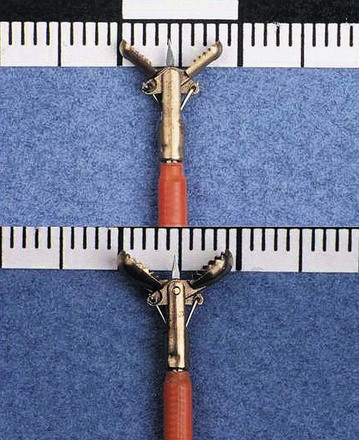
The large-cup (“jumbo” or “max capacity”) forceps requires a large channel, a so-called therapeutic endoscope (biopsy channel 3.6 to 3.7 mm). Some newer designs are intended to provide larger biopsy specimens with the conventional 2.8-mm channels and intermediate-sized channels such as pediatric colonoscopes.1 Larger capacity biopsy forceps are highly desirable to optimize the diagnostic yield. Part of the reason that only a few endoscopists have used the large-cup forceps is the reluctance to use larger capacity forceps that require the larger channel. There is also a puzzling antipathy toward the use of a larger forceps that obtains superior sized specimens. Studies have been done to show that a larger forceps is unnecessary, as if the larger forceps represented a serious threat or a “ploy.”2
Larger capacity forceps biopsies yield two to three times the surface area but are not generally much deeper (Fig. 5.1).The main objective with biopsy is not to obtain more representative sampling of a whole organ but to enable the histotechnologist to see the biopsy specimens to orient them (see Fig. 5.1). Histotechnologists cannot orient small to tiny specimens. The resultant sections with larger capacity forceps are infinitely superior. Proper orientation during paraffin embedding is impossible with often delivered “fleabite”-sized specimens as part of a group of biopsies in a tissue block.
Cold Snare Biopsy
Cold snare biopsy is advocated instead of hot biopsy to remove diminutive polyps from the colon and submit them all to the pathology laboratory.3 A larger capacity biopsy forceps is just as effective for small polyps. In the absence of a cold snare, cold forceps is still preferable to hot biopsy.3 Fundic gland polyps have a characteristic appearance and location, and cold snare or any kind of snare is not generally required. However, in the case of larger fundic gland polyps, especially in the setting of familial polyposis, removing some may be done to rule out dysplastic change in them. The polyps almost always come off easily without bleeding. If the endoscopist is uncertain that a polyp is fundic gland type, a cautery forceps should be used. The endoscopist should always be prepared to apply a hemostasis technique if bleeding is excessive after a cold snare biopsy. Cold snare biopsy of gastric polyps less than 7 mm to distinguish hyperplastic from adenomatous polyps is useful in the appropriate clinical circumstances.
Laparoscopic Biopsy
Laparoscopic full-thickness gut biopsies are useful when diagnosis and type classification of intestinal pseudoobstruction is required.4,5
Improving the Quality of Forceps Pinch Biopsy Specimens
Double Bites
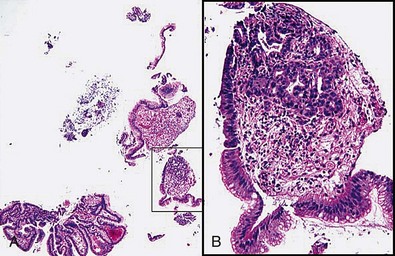
The term double bites refers to taking two specimens with a single pass of the biopsy forceps. With conventional-sized forceps, this double-bite technique often yields a tiny second biopsy specimen, or a “macrocytology” (Fig. 5.2). However, the double-bite technique may be used successfully in the colon in ulcerative colitis biopsy surveillance and in the small bowel using a larger capacity forceps. In the esophagus, the double-bite technique is difficult because of the need for angulation and risk of loss of the first biopsy specimen obtained. In the stomach, the size of the specimens is often so generous with the first pass that there is scant room for a second biopsy.
6 O’clock Position and Biopsies of Gastroesophageal Junction (Cardia) Lesions
When areas are difficult to get at, rotation of the endoscope to the 6 o’clock position makes it infinitely easier to obtain biopsy specimens and to target more accurately (Fig. 5.3). This position is especially invaluable in biopsy surveillance of Barrett’s esophagus where the 12 o’clock position tends to be ignored for visualization and biopsy targeting. The endoscope is rotated so that what was at 12 o’clock is now at 6 o’clock.
For lesions at the gastroesophageal (GE) junction, it is often invaluable to visualize the area on turnaround in the stomach and target biopsy or endoscopic resection from this perspective (see Fig. 5.3C). This maneuver works only if the patient has a hiatal hernia. After the turnaround is done in the stomach, air insufflation is set on high. The endoscope is advanced by slowly withdrawing until the endoscope tip advances right to the GE junction. In this way, there is end-on visualization of a lesion. Additionally, the endoscope can often be torqued slightly to place the lesion in or near the favored 6 o’clock position (see Fig. 5.3). If torque is required for biopsy positioning, the endoscopy assistant maintains it while the biopsy forceps is targeted to the lesion. In the turnaround position from the stomach, some lesions cannot be accessed despite torquing or twisting.
Tissue Handling
Transferring Biopsy Specimens from Forceps to Fixative
Orientation of biopsy specimens on support materials in the endoscopy unit is not required in clinical practice and in inexperienced hands may lead to more tissue trauma. The key to having well-oriented, high-quality biopsy specimens for histologic examination rests with the pathology histotechnologist’s ability and motivation to embed the tissue “on its edge” in paraffin and obtain sections through the central core of the specimens.6 That depends on providing the histotechnologist with specimens of adequate size.
Number of Biopsy Specimens in a Fixative Bottle
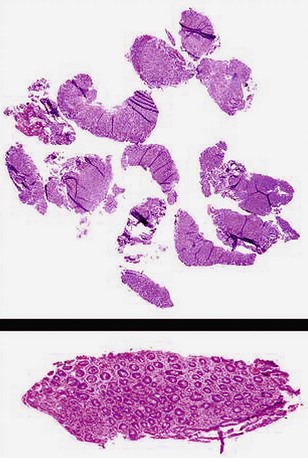
Most histotechnologists cannot line up more than four biopsy specimens in a tissue block during embedding and section them so that all are represented in optimal orientation for interpretation (Fig. 5.4). Endoscopists claim that they put 10 or more specimens in a single bottle to reduce the costs. They do not usually get feedback, however, and if they did, they would learn that only half or less of those 10 specimens may be fully interpretable (see Fig. 5.4). In one regional community pathology laboratory, the pathologists separate the biopsy specimens themselves for embedding at four or five per cassette.
Polyps: Identifying the Stalk Region
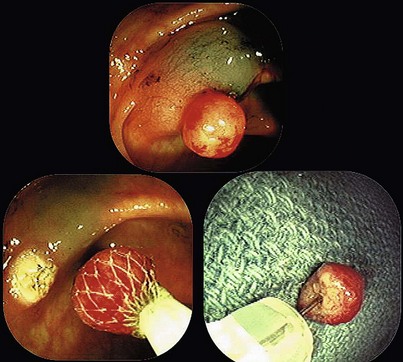
When snare polypectomy is used for the removal of pedunculated or sessile polyps, the key part of the specimen for cancer diagnosis is in the stalk region or the base in the case of sessile polyps (Fig. 5.5). Stalks retract right after removal of the polyp and often shrink further and disappear after fixation. The best way to identify the stalk is to impale it with a short (1-inch) 25-gauge needle, right to the hub with the needle point emerging at the most convex part of the tip of the polyp (see Fig. 5.5). An alternative is to ink the polyp stalk after removal. After fixation for a few hours, the polyp is bisected with a scalpel or razor blade in the pathology laboratory. The two bisected halves are embedded facedown, and this way the first sections to come off are those that show the stalk region in its best orientation.6 Larger specimens should go right to the pathology laboratory to be assessed as gross specimens.
Endoscopic Mucosal Resection and Endoscopic Resection
It is preferable not to remove the lesions in pieces for the reasons discussed previously. The lesions should be oriented in such a way that there is no doubt about how to handle them. Handling these specimens requires a protocol worked out in advance with the pathologists. The best scheme is to deliver the unfixed specimen to the pathology laboratory so that the pathologist examines it grossly and pins it out before placement in fixative. After fixation, the specimen should be cut into strips and each embedded so that the whole specimen is represented in histologic slides.7 In this way, the patient and the endoscopist can be reassured that the focal or early lesion was analyzed optimally with respect to maximal invasion.


