Fig. 12.1
Important venous anatomy of the pancreas, including the first jejunal vein
Preoperative Preparation
All patients undergo a bowel prep the day before surgery and are nil per os (NPO) after midnight. Patients are considered for paravertebral blocks for postoperative pain control in the preoperative holding area. Preoperative prophylaxis includes sequential compression stockings, subcutaneous heparin 5,000 units, and intravenous antibiotics that are administered within 1 h of skin incision and re-dosed throughout the operation as indicated. After induction of general anesthesia, all patients undergo arterial line placement and central line placement in addition to a Foley catheter and a nasogastric tube (NGT).
Operative Positioning
The patient is placed supine on a split-leg table with the right arm tucked and left arm extended 60° on an arm board (Fig. 12.2a). The bed, arm board, and leg components are all padded with Pigazzi pink pad (Xodus Medical, New Kensington, PA) or crate sponges (Table 12.1). All pressure points are protected with sponge rolls and a Velcro chest strap is used to secure the patient to the bed. The legs are abducted to the “B” notch setting, and secured in place with padding under the knee to avoid leg hyperextension. Footboards are used to secure patients on the bed since the patient will be in reverse Trendelenburg for the procedure. The patient is also secured to the table with blankets, sheets, and overlying tape at the shin and feet for additional padding anteriorly. An upper-body warming blanket is used to keep patient warm. The operating table is repositioned at a 90° angle from the anesthesia machine to allow for future robot docking over the head (Fig. 12.2b).

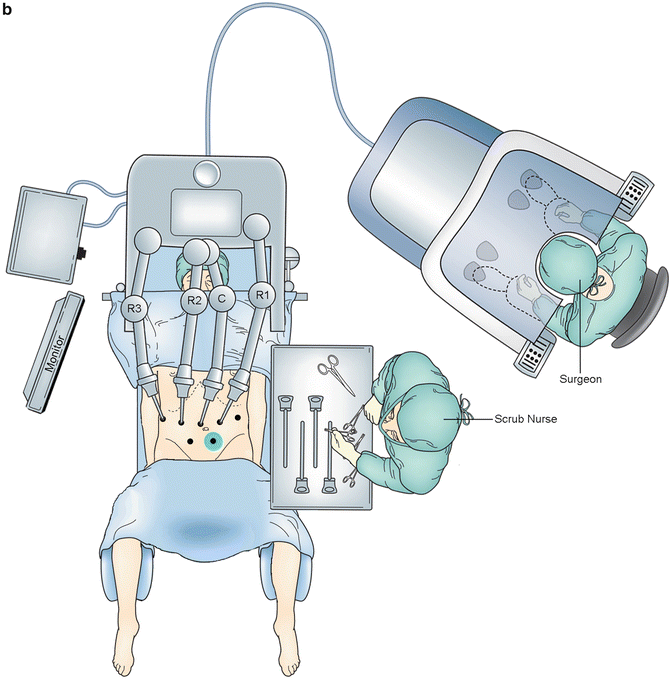
Fig. 12.2
(a) Patient positioning for laparoscopic mobilization and (b) patient positioning for robotic pancreatectomy
Table 12.1
Equipment table
Positioning | General laparoscopic | Specific laparoscopic | Robotici | Open |
|---|---|---|---|---|
3″ silk tape | 0, 30° cameras, 5 mmd | 2-0 Ticron Endo Stitchc | 4-Arm da Vinci drape kit | 19-Fr Round Blake × 2l |
Blue foam rolls | 0, 30° cameras, 10 mmd | Battery powered suction irrigatorg | 8 mm disposable obturator | Boviec |
Egg crate | 5, 10 mm Endoclip appliersc | Bulldogsh | 8 mm ports × 3 | Pancreatic stents (sizes 4, 5, or 7)n |
Foot boards | 5, 12 mm bladeless Versaportsc | Carter Thomasonm | Cadiere forceps | Slush drape for sterile cover |
Left arm board | Alligator × 2 | DHELPe | Disposable bipolar cord | Closesure |
Pigazzi Pink Pada | Camera, light cordd | Endo-GIA Staplerc | Disposable monopolar cord | Surgicel, Nu-Knit, Gelfoaml |
Pillowcases × 4 | Duckbill × 4 (2 short, 2 long) | Endocatch 10 mm × 2c | Fenestrated bipolar | Thompson retractorj |
Velcro chest strap | Insufflators × 2 | Endocatch 15 mmc | Hook cautery | Triadc |
Split-leg bed | LigaSure 5 mm blunt tipc | Endo Stitchc | Large needle driver × 2 | Ultrasound machinek |
Upper body bare huggero | Mediflex retractorf | Gelpoint gelportb | Prograsp × 2 | Umbilical tapes cut to 6″c |
Warm blankets × 2 | Optical separatorb | Hemolok appliersh | Scissor cautery | Yellow vessel loops cut to 6″ |
General laparoscopic instruments | Lapra-Ty (Applier-KA200/Clips-XC200)l | Suture cut needle driver | General open instrument | |
Stapler loads angled tip Gold 45 and 60c | General robotic instrument | |||
Stapler loads purple 45 and 60c |
Port Placement
Port placement is a key component to a successful RPD. Standard laparoscopic ports including a 5-mm optical separator, two 12-mm ports, four 5-mm ports, and a GelPOINT (Applied Medical, Rancho Santa Margarita, CA) are used for initial dissection. The left upper quadrant (LUQ) optical separator and the two RUQ 5-mm trocars are replaced with 8-mm robotic ports prior to docking (Fig. 12.3). In general, all ports should be a hands breadth apart from each other. Also, the camera port should be 2–3 fingers breadth to the patient’s right of the umbilicus to allow best visualization of the PV during the uncinate dissection. The ports may need to be shifted higher or lower depending on patient size, which can be best assessed by evaluating the distance from the xiphoid to the umbilicus. The location and size of the gel port should take into account the location of the inferior epigastric vessels. We make sure the location of the port is low so the LUQ robot arm does not conflict with it, but not too low to prevent the stapler, clip-applier, etc. from reaching the porta hepatis. For smaller patients, the GelPOINT Mini (Applied Medical, Rancho Santa Margarita, CA) is better. This can be placed at the beginning of the case with a 12-mm trocar through it or later in the case after the specimen is removed to prevent air leak from the extraction site.
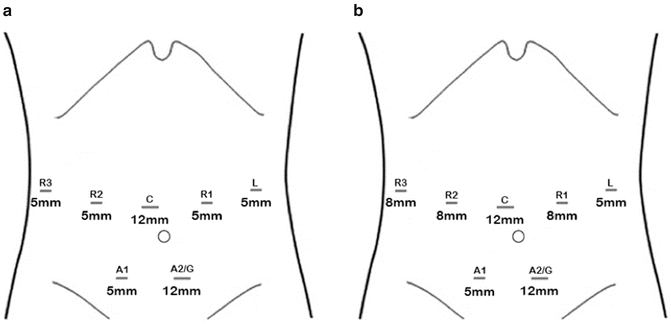
Fig. 12.3
(a) Port placement for laparoscopic mobilization and (b) port placement for robotic pancreatectomy indicating the position of the assistant ports (A), robotic ports (R), camera port (C), and gel port (G)
Operative Procedure
Laparoscopic Mobilization and Assessment of Resectability
The roles of the surgeon and assistant are summarized in Table 12.1. A 1-cm incision is made through the left rectus muscle one hands breadth to the left and 1 in. above the level of the umbilicus. A 0°, 5-mm camera is placed through an optical separator trocar and inserted under direct visualization in the left upper abdomen. This trocar will be converted to the R1 trocar (Fig. 12.3). After diagnostic laparoscopy we place other ports under direct visualization. A total of seven ports are placed with the camera port placed 2–3 cm to the right and above the level of the umbilicus. Then a 5-mm port is placed a hands breadth to the right of the camera. Another 5-mm port is placed a hands breadth lateral to this port. These will be exchanged later with robot ports R2 and R3, respectively. The first assistant port is placed a hands breadth below the camera port and splits the distance between the camera and R2 port. For the left lower quadrant assistant port, it can be approached in two ways. One method is to make an extraction incision (3–4 cm) medial to the epigastric vessels through the rectus muscle low enough that the gel port does not conflict with arm R1. Once the gel port is placed, the insufflation tubing is connected to it and a 12-mm trocar is placed through it. The second method is to place a 12-mm port and make an extraction incision when the specimen is removed and place the gel port prior to reconstruction.
A stitch is placed laparoscopically to retract the falciform ligament superiorly with the Carter-Thomason CloseSure System (Cooper Surgical, Trumbull, CT) suture-passing device. This aids liver retraction and provides better exposure. If liver retraction is inadequate, a 5-mm port is placed laterally in the LUQ anterior axillary line through which a Mediflex liver retractor (Mediflex® Surgical Products, Islandia, NY) is placed. The Mediflex retractor has several moving parts and requires trial and error to place and use effectively. It may require readjustment throughout the case.
The lesser sac is entered through the gastrocolic omentum using a blunt tip 5-mm LigaSure device (Covidien, Mansfield, MA) below the gastroepiploic vessels and extending halfway up the greater curvature. All posterior adhesions from the stomach to the pancreas are ligated and upon retraction of the stomach cranially, the left gastric pedicle and GDA are identified. Careful dissection is used to separate the transverse mesocolon from the gastroepiploic vein pedicle as the dissection heads toward the hepatic flexure. Care should be taken not to avulse the middle colic or gastroepiploic veins.
Cattell-Braasch maneuver is performed and the entire right colon is mobilized along the white line of Toldt to the appendix, which aids in duodenal exposure especially in obese patients. Once this is done, the duodenum is in full view. Kocherization of the duodenum is completed to expose the foramen of Winslow, the inferior vena cava (IVC), left renal vein, SMA, and the ligament of Treitz. This is the point at which resectability is assessed.
Fibers attaching the posterior duodenum to the retroperitoneum are taken with the LigaSure device. The pancreatic head and uncinate are dissected from the retroperitoneal attachments up to the SMA origin. An extended Kocher maneuver is performed to release the ligament of Treitz from the right side and release the first part of jejunum. Next, the proximal jejunal loop is pulled into the right supracolic compartment through the ligament of Treitz. A window through the mesentery is created and the proximal jejunum is divided using a laparoscopic linear stapler with a 60-mm gold load (Covidien) with a tip about 10 cm from the duodenojejunal ligament.
The mesentery of the transected jejunum is ligated serially with the LigaSure until the level of the uncinate process. It is critical to complete this step as it sets up the later portions of the venous dissection. The duodenum is rolled to expose the pancreas posteriorly and the soft tissue fibers directly attaching the duodenum to the pancreatic head are ligated, allowing the duodenum to be “rolled off” the pancreas.
The gastrohepatic ligament is inspected for a replaced left hepatic artery and then divided through the pars flaccida avascular plane. The right gastric artery (RGA) is ligated flush with the lesser curvature to clear an area on the lesser curvature for the linear stapler. A corresponding area is chosen on the greater curvature where the gastrocolic omentum is further dissected towards the stomach. The area of transection of the stomach or proximal duodenum is defined depending on the type of procedure planned (pylorus-preserving or classic pancreaticoduodenectomy). It is critical to have anesthesia withdraw the NGT back into the esophagus prior to firing the stapler across the stomach. We divide the stomach with a linear stapler with a 60-mm purple load.
Attention then turns to the jejunum in the RUQ. Jejunum (50 cm) is pulled into the RUQ and labeled with proximal and distal seromuscular Endo Stitch 2–0 ticron suture (Covidien) placement. The transverse colon is then retracted cranially to identify the ligament of Treitz from the left infracolic side of the patient. The jejunum is pulled back through the ligament of Treitz to identify the marking stitches. Once identified, the bowel is grasped and pulled antecolic in isoperistaltic fashion with two duckbill graspers. This loop is positioned in left upper abdomen and sutured to the stomach with an Endo Stitch to keep the isoperistaltic orientation. This allows for quick and easy identification for the gastrojejunostomy (GJ) reconstruction. The 12-mm camera port is closed using the Carter Thomason suture-passing device with 0-vicryl sutures. The two RUQ and one LUQ 5-mm ports are exchanged for 8-mm robot ports.
Robotic Resection
The Da Vinci Robotic system (Intuitive Surgical, Sunnyvale, CA) is docked as shown in Fig. 12.4 with the robot positioned over the head of the patient with two robotic arms on the right side, one arm on the left, and the camera port in the same location as the laparoscopic procedure. The robotic surgeon sits at the console while the laparoscopic assistant stands between the patient’s legs and operates using ports A1 and A2. The camera holder is no longer needed. Dissection starts with a monopolar hook in R1, the fenestrated bipolar in R2, and a ProGrasp (Intuitive) in R3. A 30° camera (facing down) is used. The assistant starts with the LigaSure and suction irrigator.

Fig. 12.4
Intraoperative photo of a docked robot during pancreaticoduodenectomy
The first step is identification and dissection of the hepatic artery lymph node. This lymph node is dissected using the robotic hook with monopolar cautery and divided with the LigaSure and removed as the first step to expose the porta hepatis. The lymph node is placed into a 10-mm specimen bag and sent off to pathology. Removal of this node creates a window for exposure of the CHA.
The “no touch” technique is used when dissecting vasculature. The vessels are retracted without grabbing the vessel or just by grasping the soft tissue lymphatic network that encases the vessels. R3 is used to grasp the specimen side of the gastric/duodenal staple line, which is pulled to the left. The CHA is lifted by the closed bipolar (R2) and the hook (R1) is used to dissect the artery off the portal vein (PV). Once the PV is identified, the lymphatic soft tissue is dissected off the pancreas neck creating a cranial landing zone on the neck for subsequent pancreatic transection.
The CHA is followed distally to identify the RGA, GDA, and the right and left branches of the hepatic artery (RHA and LHA, respectively). The RGA is always in a plane anterior to the CHA and GDA and can be found near the origin of the GDA or often traced back from the specimen. This is typically clipped proximally with a 5-mm clip and then divided with an energy sealant device. The GDA is circumferentially dissected but not ligated. R1 is switched to a bipolar dissector to pass a vessel loop around the GDA. Of note, bipolar cautery will not work when two bipolar instruments are used simultaneously. The vessel loop is clipped at its end to hold it in place.
R3 is moved off the specimen side of the staple line and used to retract the gallbladder cranially to better expose the porta hepatis. The assistant rolls the specimen medially to the patient’s left to aid in exposure of the lateral porta hepatis as well. The lateral aspect of the CBD is mobilized and the peri-portal lymph nodes are dissected with the duct. Careful inspection for a replaced RHA is mandatory here. The CBD is carefully skeletonized off the PV in preparation for ligation of the CBD.
The specimen is rolled back to its native position and R3 retracts the stomach/duodenum staple line for retraction. Prior to ligation of the GDA, and if there is doubt about the presence of a replaced RHA, we use intraoperative laparoscopic/robotic ultrasound with Doppler flow to confirm pulsatile flow in hepatic arteries after clamping the GDA. The GDA is transected with a 45-mm gold stapler load with an angled tip. A 10-mm clip is placed on the GDA stump to mark its location.
< div class='tao-gold-member'>
Only gold members can continue reading. Log In or Register to continue
Related posts:


Stay updated, free articles. Join our Telegram channel

Full access? Get Clinical Tree


