Fig. 5.1
The patient is positioned on the operating table in the supine position with both arms tucked at the side. Tape is used around the chest and the legs to ensure that the patient stays on the table in the extremes of bed tilt
The exact routing of the camera cord, the fiberoptic light cord, and the insufflation tube will vary based on the arrangement of the operating room. The energy sources are brought onto the field at the patient’s right shoulder. Typically, no suction is set up for this operation, as it is rarely used. If need be, it is brought on to the field at the foot of the bed. One or two video monitors will be placed along the right side of the patient, and the entire team focuses on these monitors. Additional monitors are really not needed for the illustrated procedure.
Port Placement
For the hand-assisted laparoscopic right colectomy, the ports and the hand-assist device are placed as follows. The hand-assist device is placed in the midline. One should center this midline wound based upon palpable skeletal landmarks. The center of the hand port incision should be at the midpoint of a line drawn from the costal margin to the anterior superior iliac spine (Fig. 5.2). This will center the hand properly on the anatomy, independent of the location of the umbilicus, the location of which will vary based on the body habitus of the patient. In obese patients, the entire hand port incision may be well above the umbilicus, while in average weight patients, the incision is generally centered on the umbilicus. The midline wound is optimal, based upon surgeon ergonomics, consideration of extracorporeal anastomosis, and maintenance of videoscopic perspective of the relevant anatomy for right colectomy. Generally speaking, the size of the incision for the device will be the size of the surgeon’s glove in centimeters. However, in practicality, one can usually cheat this size by a centimeter or so.
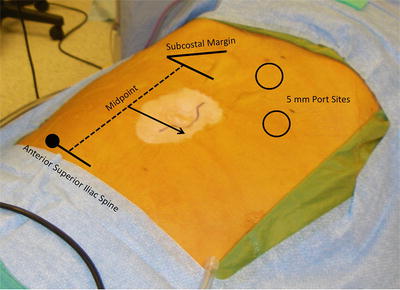
Fig. 5.2
The midpoint of the hand-assist incision is at the midpoint of a line drawn from the anterior superior iliac spine to the costal margin. For most patients, the incision will be centered on the umbilicus. For obese patients, it may be well above the umbilicus
The authors use the GelPort™ device. It is easy to use and it provides the advantage of being able to place ports, instruments, or staplers right through the device even with the hand in place. Also, the surgeon’s hand can be brought in and out of the abdomen without losing pneumoperitoneum. This feature helps for teaching purposes, as it is easy to go from the surgeon’s to the assistant’s hand in the abdomen.
Pneumoperitoneum is then established through a 5 or 12 mm port placed through the hand-assist device. The laparoscope is passed into the abdomen through this port. Two 5 mm ports are then placed in the left upper abdomen: one in the subxiphoid region and one in the left upper quadrant. The subxiphoid port will be for the 5 mm 30 degree laparoscope, and the left upper quadrant port will be for a 5 mm sealing/cutting device.
The position of the subxiphoid port will vary, some depending on the patient and what is being done. It will usually be placed at least a few centimeters to the left of midline. The further over to the left on the transverse colon one plans to go, the further to the left one should place this port. Generally, the port will be placed just to the left of the falciform ligament. At times, the falciform ligament is very large and long, it gets in the way, and it will need to be removed. This is easy to do working through the left upper quadrant ports, with or without the use of the hand in the hand port. The left upper quadrant port should not be placed too high on the costal margin; otherwise, getting to the right lower quadrant can be difficult. Also, it should not be placed too low, since the hand and the energy source will get in each other’s way during dissection in the right lower quadrant. Placement in the midclavicular line, about halfway between the costal margin and the upper aspect of the hand-assist incision, will be about right.
In the patient who has had previous abdominal surgery, the hand-assist incision can be used initially to lyse adhesions. If there are more adhesions than can be reached by operating through the incision, the GelPort™ can be placed, the additional ports can be placed, and adhesiolysis can be carried out with or without the hand being placed through the device. If adhesions in the left abdomen interfere with placing the left upper quadrant ports, one can simply place 5 mm ports and instruments through the GelPort™, and it can be used as a working port for this activity.
Using this hand-assisted right colectomy approach, 5 mm ports can be used exclusively. If a stapling device is needed, it is inserted through a 12 mm port placed directly through the GelPort™ hand-assist device (Applied Medical, Rancho Santa Margarita, CA). A 5 mm, 30 degree laparoscope is used since this provides maximum flexibility as the scope can be moved to any port and the 30 degree angle allows the surgeon the best view in tight spaces.
There are a number of 5 mm energy sources that seal and cut well. With these tools, the surgeon has a 5 mm instrument that can be used to dissect bloodlessly and take any of the named mesenteric vessels.
Operative Technique
It is important again to note that this is a single-surgeon operation. There is no need for a trained assistant to help with exposure. With the ports and the hand-assist device in position, the camera holder will be positioned at the patient’s left shoulder and the surgeon will be on the patient’s left side (Fig. 5.3). Both focus their attention on the monitor at the patient’s right. The patient is placed in strong reverse Trendelenburg position and is tilted to the left. This brings the hepatic flexure down. The abdomen is explored with the laparoscope and the surgeon’s hand.
Fig. 5.3
The position of the surgeon, camera holder, and monitor at the operating table
An important aspect of hand-assisted laparoscopic surgery that is not often discussed is the use of the hand itself. The surgeon should keep in mind a couple of important points. First of all, the surgeon and the camera holder should work to keep the hand out of view of the laparoscope. The amount of the hand inside should be minimized: the hand is almost never put in to a point proximal to the wrist. At almost all points in the case, the scope should see not much more than a finger or two. The hand should be, for the most part, kept outside the field of vision. There should be parts of the case where it may not even appear that the hand is inside the abdomen.
Secondly, the hand should not be used as a substitute for a large laparoscopic clamp. The hand is a much more versatile instrument. There are but a very few points in the operation where the hand is actually used to “grasp” tissue. Rather the hand is used to expose anatomy. In this regard, the hand can take the place of multiple instruments. Often the third, fourth, and fifth digits are pushing back towards the palm to move tissue out of the field, usually out of view of the laparoscope, the index finger is being used to expose the anatomic feature that is being addressed with the cutting and sealing device, and the thumb is being used to counter the index finger so as to provide the classic “traction and countertraction.” The index finger and the cutting and sealing device are at the point of action and the laparoscope will follow them. Much of the cutting done with the cutting and sealing device will use the index finger as a “backstop” to protect the surrounding tissue. The finger then is used as a gentle guide for cutting, not as an anvil.
The surgical dissection described is unique and proceeds in a counterclockwise, top-down fashion beginning at the gastrocolic ligament. As opposed to other techniques described for laparoscopic right colectomy, this operative approach has the dissection and mobilization of all the important anatomy starting and ending in a single plane. There is no need to change orientations or connect tissue planes as one mobilizes certain parts of the right colon anatomy. The right colon, in essence, is lifted off the retroperitoneum and swept up and out of the right abdomen, moving from the right upper quadrant to the right lower quadrant. The surgical dissection described is unique and proceeds in a counterclockwise, top-down fashion beginning at the gastrocolic ligament. The procedure can be viewed in five steps as follows:
Step 1: Hepatic Flexure Takedown
The surgeon uses his/her left hand to grasp the greater omentum along the greater curve of the stomach, and he/she makes a defect in it, just off of the gastroepiploic vessels. This puts the surgeon into the lesser sac, and the smooth, shiny ventral surface of the transverse mesocolon can be seen. Whether moving from left to right or right to left, it does not matter, as this space is developed by taking the greater omentum off the stomach. As one moves to the right, the anterior surface of the duodenum is exposed and the hepatic flexure comes into view. The hepatic flexure is taken down and Gerota’s fascia comes into view. Alternatively, if the lesser sac cannot be well developed as an initial maneuver, the dissection can be started up at the hepatic flexure, and as soon as the proper plane is recognized on Gerota’s fascia and the duodenum, the dissection can come from right to left back into the lesser sac, which will be very important later in the operation for managing the middle colic vessels.
Step 2: Retroperitoneal Dissection and Takedown of Lateral Attachments
The surgeon then mobilizes the right colon mesentery up off of the retroperitoneum. Lifting the colon and ileum up off of the retroperitoneum is accomplished by gentle lifting off the bowel and mesentery and pushing back towards the retroperitoneum, just inside the white line, with the cutting and sealing device. As one starts to lift the bowel off of the retroperitoneum, oftentimes the bowel will be lying on the back of the hand, and the palm will be facing the smooth surface of the retroperitoneum. The temptation during this part of the operation is to go directly to the lateral attachments. One should fight this temptation. It is much easier to mobilize medially first, leaving the lateral attachments for later. These lateral attachments act as natural retractors fixing the bowel in place and providing a natural point of countertraction that makes lifting the colon off the retroperitoneal structures easier. The filmy attachments between the third part of the duodenum and the ileal and right colon mesentery should be completely divided. This will expose the duodenum completely, essentially over to the ligament of Treitz. This extensive mobilization will help later when taking the mesentery, and it will make extraction easy, even in the obese patient. After the right colon and ileal mesentery are lifted completely, the lateral attachments are easily seen and then divided from the right upper quadrant down to the right lower quadrant.
Related posts:


Stay updated, free articles. Join our Telegram channel

Full access? Get Clinical Tree


