J. Stuart Wolf, Jr., MD, FACS
History and Introduction
Commonly ascribed to Goodwin and colleagues (1955), the first therapeutic percutaneous nephrostomy actually was performed by Thomas Hillier in 1865 (Bloom et al, 1989). Hillier, at the Hospital for Sick Children at Great Ormond Street, repeatedly aspirated the hydronephrotic kidney of a young boy for symptom relief over a 4-year period until his death at 8 years of age. Subsequently there were a few reports of diagnostic percutaneous renal aspirations, but it was not until Goodwin and colleagues published their landmark report in 1955 that therapeutic percutaneous nephrostomy was rediscovered. Even then, the utility of percutaneous access to the upper urinary tract collecting system was limited to drainage of obstructed kidneys until Fernström and Johansson (1976) reported the percutaneous removal of renal calculi, termed “percutaneous pyelolithotomy.”
In the 30-plus years since that report, a number of procedures have been performed using the convenient and safe percutaneous route to accessing the upper urinary tract collecting system including drainage of an obstructed kidney, nephrolithotomy, endopyelotomy, and resection of urothelial tumors. More recently, percutaneous access to portions of the kidney other than the collecting system has expanded the diagnostic and therapeutic choices for patients with renal diseases. Other chapters in this book address these indications, including Chapters 49 and 56. This chapter addresses only percutaneous access to the upper urinary tract collecting system, focusing on the creation, maintenance, and postprocedure management of the percutaneous tract. The final section of the chapter reviews the general complications of percutaneous access to the upper urinary tract collecting system. Specific aspects of the procedures performed through the percutaneous access are covered in Chapters 7, 41, 48, and 53.
Indications for Percutaneous Access
Simple Drainage or Access
Percutaneous drainage of the upper urinary tract collecting system can be for diagnostic or therapeutic indications. The only remaining popular indication for diagnostic percutaneous nephrostomy is to perform a Whitaker test, which requires placement of a small-caliber nephrostomy tube through which contrast material is instilled at specific flow rates while pressures are measured to assess for ureteral obstruction (see more detailed description in Chapter 41). In other cases, diagnostic nephrostography is performed as an adjunct to therapeutic percutaneous nephrostomy.
Therapeutic percutaneous nephrostomy tubes can be placed to drain the kidney (see Chapter 7) and access the upper urinary tract for direct instillation of therapeutic agents (see Chapter 53) or to perform a surgical procedure. Percutaneous nephrostomy is indicated to drain the upper urinary tract collecting system in cases of obstruction at an intrarenal location, at the ureteropelvic junction, or anywhere in the ureter. Obstruction of the lower urinary tract is best treated by drainage of the bladder rather than the kidney, unless secondary obstruction of the upper tract has developed that is refractory to vesical drainage. An alternative to percutaneous drainage is drainage through a ureteral catheter or stent placed in a retrograde fashion (cephalad from the bladder to the kidney, as opposed to antegrade, which is placement from the kidney toward the bladder). The choice of antegrade or retrograde drainage of the upper urinary tract collecting system depends on the indication for the procedure, patient’s medical condition, particular anatomy of the patient, and preferences of both the patient and the physician.
All things being equal, a retrograde route to drainage is preferred over the antegrade route. This includes most cases of acute and chronic ureteral obstruction without infection (Rosevear et al, 2007; Wenzler et al, 2008). In the setting of upper urinary tract collecting system obstruction complicated by infection, however, drainage is an emergency and in many such cases percutaneous rather than retrograde drainage may be best (Ng et al, 2002), unless retrograde drainage can be obtained expeditiously and assuredly. Percutaneous nephrostomy tubes and retrograde ureteral stents are generally equivalent in their capacity to resolve fever in patients with upper urinary tract obstruction and fever (Pearle et al, 1998), but in a given patient circumstances may dictate preference for one access over the other. Retrograde placement of a ureteral stent generally requires regional or general anesthesia, whereas a percutaneous nephrostomy tube can be inserted under local anesthesia; this is an important consideration in an ill patient. Because the percutaneous route has a greater initial success rate than the retrograde one in cases in which the collecting system is dilated, it might be preferred in a patient who needs rapid intervention. This is especially true when the ureteral obstruction is long, severe, or involving the ureteral orifice—all of which can make retrograde stent placement more difficult. Conversely, untreated coagulopathy is a contraindication to percutaneous access, but internal ureteral stents can be placed safely in an anticoagulated patient. A final consideration is patient preference. Although the health-related quality of life for patients with percutaneous nephrostomy tubes and those with internal ureteral stents is similar, a given patient may prefer one route over the other (Joshi et al, 2001). For additional discussion of percutaneous nephrostomy versus internal ureteral stent for drainage of the upper urinary tract, see Chapter 7.
Percutaneous Surgery
An important indication for percutaneous access into the upper urinary tract collecting system is for intrarenal or intraureteral surgery. This includes percutaneous endopyelotomy and endoureterotomy (see Chapter 41), nephrolithotomy, treatment of calyceal diverticula and hydrocalyces, and antegrade ureteroscopic treatment of large ureteral stones (see Chapter 48); percutaneous resection of urothelial tumors (see Chapter 53); and less common procedures such as management of fungal bezoars. For all of these procedures skillfully attaining access, properly managing postoperative drainage, and preventing and treating complications related to the percutaneous access are major components of the procedure. The remainder of this chapter centers on these topics.
Anatomic Considerations
Perirenal Anatomy
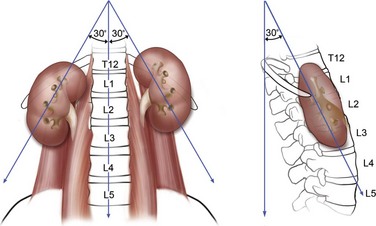
The kidneys lie adjacent to the vertebral bodies, usually extending from the 11th or 12th thoracic to the 2nd or 3rd lumbar vertebrae (Fig. 47–1). The right kidney is displaced a few centimeters inferior to the left kidney. The longitudinal axis of the kidneys parallels the lateral edges of the psoas muscles, about 30 degrees from vertical, with the lower poles lateral to the upper poles. The kidneys are also tilted 30 degrees off the frontal plane, with the lower poles anterior to the upper poles. Finally, the kidneys are rotated out of the frontal plane as well, with the lateral aspect of the kidney posterior to the medial aspect, such that each kidney is rotated 30 degrees posteriorly from the renal hilum.
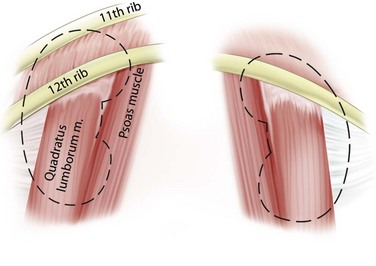
Immediately posterior to the kidneys are the quadratus lumborum and psoas muscles, except at the upper poles where the diaphragm is posterior (Fig. 47–2). The pleura can be violated during percutaneous entry into the upper pole of the kidney. This risk is greater as the access to the kidney is moved cephalad. The lung itself lies above the 11th rib, so direct lung injury is unlikely unless the 10th intercostal space (superior to the 11th rib) is used as the entry site. The ribs curve inferiorly from medial to lateral, such that more portions of the kidney can be approached subcostally with a medial as opposed to lateral access site.
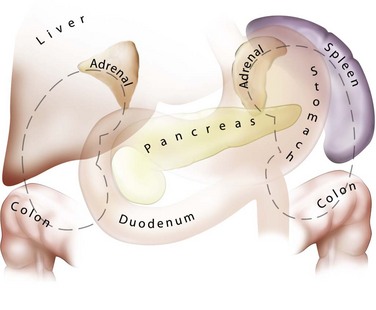
The lateral, anterior, and medial perirenal relationships are more varied than the posterior ones (Fig. 47–3). On the right side, the liver is anterior to the upper pole of the kidney and can extend in some individuals to cover the entire anterior surface. On the left, the spleen covers less of the kidney anteriorly. Both the liver and spleen can extend lateral to the kidneys and are therefore at risk of injury with a lateral puncture into the kidney. The ascending and descending colon can be lateral or even posterior to the right and left kidneys, respectively. The apposition of the colon to the kidney varies with location; it is greatest on the left side and at the lower pole. In one study of computed tomograms the left colon was posterior in 16.1% of cases, and the right colon was posterior in 9% of cases at the level of the lower pole. At the midaspect of the kidney the colon was posterior in 5.2% and 2.8%, respectively, and at the upper pole 1.1% and 0.4%, respectively (Boon et al, 2001). Additional visceral relations to the kidney include the adrenal glands (medial to the upper pole of both kidneys), the duodenum and gallbladder (anterior and medial to the right kidney), and the tail of the pancreas (anterior and medial to the left kidney). These structures can be injured with a misdirected or excessively deep puncture.
Renal Parenchyma and Collecting System
The renal papillae drain into the minor calyces, which are the most peripheral portions of the intrarenal collecting system. If only one papilla drains into a minor calyx, it is described as a simple calyx. When there are two or more papillae entering the calyx, it is termed a compound calyx. The outermost wall of the calyx, into which the papilla is set, is the calyceal fornix. There are 5 to 14 minor calyces in each kidney (mean of 8, with 70% of kidneys having 7 to 9 minor calyces) (Sampaio and Mandarim-de-Lacerda, 1988). There are three drainage zones: the upper pole, the middle region, and the lower pole. Compound calyces are the rule in the upper pole, are common in the lower pole, and are rare among the middle calyces. The minor calyces, either directly or after coalescing into major calyces, drain by infundibula into the renal pelvis (Fig. 47–4). Occasionally a minor calyx will open directly into the renal pelvis without an intervening infundibulum. Some infundibula are unusually narrow, even if they drain adequately, and can present an obstacle to endoscopy, especially with the relatively large rigid nephroscope.

The compound calyces of the poles of the kidney are oriented facing their respective poles. The simple calyces usually come in pairs, one facing anteriorly and one facing posteriorly (Fig. 47–5). The upper pole calyceal system almost always contains at least one compound calyx, and in some cases this is the only calyx in the system. Drainage of the upper pole into the renal pelvis is by a single midline infundibulum in the majority of kidneys. The lower pole system often contains a compound calyx as well. The calyceal drainage from the lower pole is via a single infundibulum in about half of kidneys and through a series of paired anterior and posterior calyces in approximately half of kidneys. With compound calyces rare in the middle calyceal system, the middle calyces are typically arranged in a series of paired anterior and posterior calyces. In about two thirds of kidneys, there are two major calyceal systems—an upper and lower one—and the middle calyces drain into either or both systems. In the other third of kidneys, the middle calyceal system is distinct from the upper and lower systems, either coalescing into a middle major calyx before emptying into the renal pelvis or with drainage of the middle minor calyces directly into the renal pelvis through short infundibula.
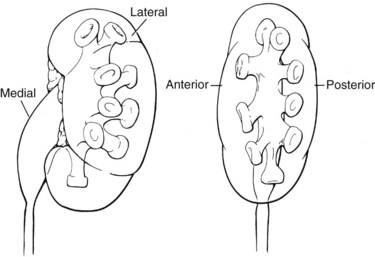
Figure 47–5 Calyceal orientation of polar and middle calyces.
(From Smith AD, editor. Controversies in endourology. Philadelphia: WB Saunders; 1995.)
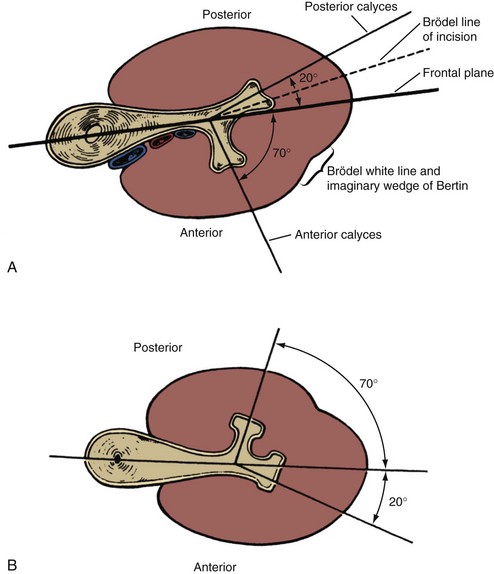
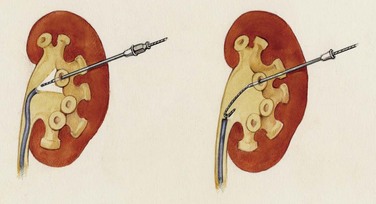
An important consideration for percutaneous renal surgery is determining the anterior-posterior orientation of the calyces because access (from the typical posterior or posterolateral approach) into a posterior calyx allows relatively straight entry into the rest of the kidney, whereas percutaneous puncture of an anterior calyx requires an acute angulation to enter the renal pelvis, which may not be possible with rigid instrumentation (Fig. 47–6). Efforts have been made to determine which calyces are likely to be anterior and which are likely to be posterior, solely on the basis of their medial-lateral position on anterior-posterior radiography. The distinction pertains to the middle and lower calyceal system, which contains (in almost all middle systems and approximately half of the lower system) paired anterior and posterior minor calyces. The upper pole system, with its almost uniformly compound calyceal system, is less problematic in this regard. Paired anterior and posterior calyces usually enter about 90 degrees from each other. As such, the relative medial-lateral orientation (on anterior-posterior radiography) is determined by the relationship of this 90-degree unit to the frontal plane of the kidney. In a Brödel-type kidney this unit is rotated anteriorly, such that the posterior calyces are about 20 degrees behind the frontal plane and the anterior calyces are 70 degrees in front of the frontal plane. The posterior calyces are lateral, and the anterior calyces are medial in this case. The Hodson-type kidney is the opposite; the calyceal pairs are rotated posteriorly, with the posterior calyces 70 degrees behind the frontal plane and appearing medial and the anterior calyces 20 degrees in front of the frontal plane and appearing lateral (see Fig. 47–6). Most right kidneys have a Brödel-type orientation (posterior calyces are lateral), and most left kidneys have a Hodson-type orientation (posterior calyces are medial). Because variation is considerable, the lateral-medial orientation of the calyces on antero-posterior radiography cannot be used to reliably determine the optimal calyx for entry and additional maneuvers are required to determine the exact calyceal anatomy.
(From Smith AD, editor. Controversies in endourology. Philadelphia: WB Saunders; 1995.)
Intrarenal Vasculature
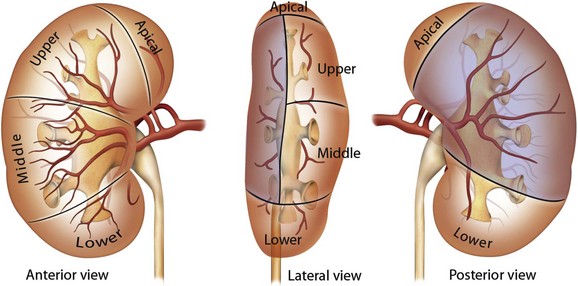
Although the renal arterial anatomy is variable, in general the main renal artery divides into an anterior and a posterior branch. The former then divides within or before the renal sinus into four anterior segmental arteries: the apical and lower segmental arteries (which supply the tip of the upper pole and the entire lower pole, respectively), and the upper and middle segmental arteries (which supply the remainder of the anterior half of the kidney). The posterior branch of the renal artery supplies the remainder of the posterior half of the kidney (Fig. 47–7). Once the anterior segmental arteries and the posterior branch of the renal artery enter the renal parenchyma, they divide into interlobar arteries, which are also called infundibular arteries owing to their course adjacent to the calyceal infundibula of the renal collecting system. At the cortico-medullary junction, near the base of the renal pyramids, each interlobar artery usually divides into two arcuate arteries that run along the renal pyramid. The next division is into the interlobular arteries, which run along the outer surface of the renal pyramids and are derived at right angles from the arcuate arteries. The final divisions, the afferent arterioles of the glomeruli, come off the interlobular arteries in the peripheral renal cortex. Each renal arteriole is an “end-artery,” meaning that each cell in the kidney derives blood supply from one arteriole. For this reason renal arterial vascular injury must be avoided in order to prevent loss of renal function. The potential for arterial injury is least in Brödel’s line, an avascular plane approximately at the lateral margin of the kidney, extending from the superior apex of the kidney (limited by the circulation of the apical anterior segmental artery) to the lower pole of the kidney (limited by the circulation of the lower anterior segmental artery). Additionally, the safest place to percutaneously access the collecting system is directly into the calyceal fornix because this will avoid the interlobar (infundibular) arteries adjacent to the calyceal infundibula and the arcuate arteries that skirt the renal pyramid (Sampaio et al, 1992).
Key Points: Anatomic Considerations
Obtaining Percutaneous Access
Adequate percutaneous access to the upper urinary tract collecting system is a critical part of the percutaneous procedure. Over time more urologists are being trained to attain percutaneous access, but only a minority of urologists maintains this skill in practice (Bird et al, 2003; Lee et al, 2004a). Although there is some controversy regarding the success and complications associated with percutaneous access attained by urologists versus radiologists (Watterson et al, 2006; El-Assmy et al, 2007), the critical distinction in ensuring effective access for a subsequent percutaneous procedure is not who obtains access but rather that the access for urologic surgery is directed by a urologist. The optimal situation is for the urologist to be present at the time access is attained, either performing the access procedure or actively directing the radiologist as to which calyx to enter and at what angle. If that is not possible, then the urologist should discuss beforehand with the radiologist attaining access the pertinent considerations in that particular patient.
Periprocedural Antimicrobials
The American Urological Association recommends periprocedural antimicrobial prophylaxis for all cases of percutaneous renal surgery (Wolf et al, 2008). Although there are no randomized, controlled trials to support this recommendation, nonrandomized data suggest a postprocedure urinary infection rate of 35% to 40% if antimicrobial prophylaxis is not used compared with 0% to 17% if prophylaxis is used (Charton et al, 1986; Darenkov et al, 1994). The need for antimicrobial coverage for simple percutaneous drainage of the upper urinary tract collecting system is not certain.
Antimicrobial coverage should include organisms common to the urinary tract (Escherichia coli, Proteus sp., Klebsiella sp., Enterococcus sp.) and the skin (Staphylococcus aureus, coagulase-negative Staphylococcus sp., group A Streptococcus sp.). Recommended agents include first- and second-generation cephalosporins; aminoglycosides (or aztreonam in patients with renal insufficiency) plus either metronidazole or clindamycin; ampicillin/sulbactam; or a fluoroquinolone. When the antimicrobial is being administered only for prophylaxis (i.e., not treatment of known or presumed infection), the duration of treatment should be for 24 hours or less. A short (≤24 hours) course of antimicrobials at the time of nephrostomy tube removal also can be considered (Wolf et al, 2008).
Patient Positioning
The prone position was described by Goodwin and colleagues (1955) for percutaneous access to the upper urinary tract collecting system, and over time this position became standard. It has the advantage of presenting a large surface area (the patient’s back) that provides many choices of access sites and a stable horizontal working surface. The posterior or posterolateral approach is the most direct one to the desirable posterior calyces and comes closest to approaching the kidney through Brödel’s avascular line. Prone positioning does have some disadvantages, however. It is associated with a decrease in cardiac index (Hatada et al, 1991), and in cases where inadequate padding is provided it is associated with decreased pulmonary capacity, although if enough padded support ensures free abdominal and chest wall movement, then pulmonary capacity is greater in the prone compared with the supine position (Edgcombe et al, 2008). The anesthesiologist has poor access to the airway with the patient in the prone position. Prone positioning might not be possible in patients with morbid obesity and/or spinal concavity, and the prone position can be associated with neuromusculoskeletal complications such as nerve compression or stretch injury, ocular or facial injury, and rhabdomyolysis. Finally, the prone position requires that the surgeon stand, often holding instruments at a distance using outstretched arms, which leads to surgeon fatigue. To address these deficiencies, urologists have introduced supine and lateral decubitus positioning for percutaneous renal surgery.
Valdivia Uria and colleagues (1987) first reported the supine approach to percutaneous nephrostolithotomy, culminating in their 1998 review of 557 patients with percutaneous nephrostolithotomy performed in this position (Valdivia Uria et al, 1998). They reported few complications including no hydrothoraces or pneumothoraces, no colon injuries, and only a 0.5% rate of major hemorrhage (see later for further discussion of complications). Variations of this position include completely supine, supine with the ipsilateral side elevated, and supine combined with ipsilateral flank elevation and asymmetric lithotomy position (Falahatkar et al, 2008; Papatsoris et al, 2008; Scoffone et al, 2008; Zhou et al, 2008). In the prone position, with a posterior or posterolateral skin entry, the posterior calyces are the best to enter because they allow access to the renal pelvis and the rest of the kidney. In the supine position, the skin entry site is lateral or anterolateral so the best calyces to enter are often the anterior ones. The angle of the access sheath when doing a procedure such as percutaneous nephrostolithotomy in the supine position is angled toward horizontal (compared with vertical during percutaneous nephrostolithotomy in the prone position), which reduces the pressure in the collecting system and facilitates stone fragments washing out through the sheath. Supine positioning does not require repositioning after induction of anesthesia, and the urethra is more easily accessed than in the prone position. The supine position is a safer position with regard to neuromusculoskeletal complications. Finally, because the percutaneous entry is more lateral than during a prone procedure, the instruments are closer to the surgeon, resulting in less physical strain on the surgeon and the opportunity to sit during the procedure.
There are some disadvantages to the supine position for percutaneous renal surgery, however. First, it is not familiar to most urologists because the prone position is used in most training programs. Second, the reduced pressure in the collecting system results in a lower volume and thus less room for visualization and manipulation. Third, upper pole calyceal access is more difficult in the supine compared with prone position. Finally, with optimal placement of pads and bolsters, the prone position may provide better ventilation than the supine position (Edgcombe et al, 2008).
A systematic review including literature through 2008, which included 9 studies of supine and 25 for prone percutaneous nephrolithotomy, found that for cases involving obese patients or staghorn calculi, prone percutaneous nephrolithotomy was associated with decreased operative time, similar rate of hemorrhage, and improved stone-free rate (de la Rosette et al, 2008b). In the only randomized study, however, operative time favored the supine position without differences in other parameters (Falahatkar et al, 2008).
Less commonly used for percutaneous renal surgery is the flank (lateral decubitus) position, which was first described by Kerbl and colleagues (1994). This position allows simultaneous access to the anterior and posterior aspects of the kidney and appears to be particularly useful for morbidly obese patients or those with spinal deformities in whom both supine and prone positioning are difficult (Gofrit et al, 2002; Basiri et al, 2008b; Karami et al, 2009).
Although the supine and flank positions offer some potential benefits, overall experience is limited and the only North American report is a single case (Kerbl et al, 1994). As such, the remainder of this chapter concerns access into a posterior calyx from a posterior or posterolateral direction with the patient in the prone position, which remains the standard.
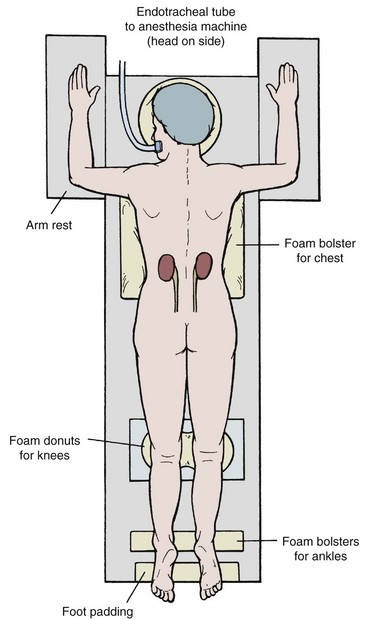
Careful placement of padding is important in the prone position (Fig. 47–8). Support the head with padding in a neutral position that allows access to the mouth. Make sure there is not undue pressure on the facial bones, nose, and ears. Place the ipsilateral arm above the head to get it out of the operative field, with the shoulder and elbow at right angles with the use of generous padding. Position the contralateral arm the same way, or leave it straight and tucked at the side. Rest the lateral aspects of the chest on rolled blankets or other bulky foam or gel bolsters to allow for chest and abdominal wall expansion. Alternatively, purpose-made pads and supports provide more assured patient positioning (Papatsoris et al, 2009). Provide support under the ankles to take pressure off the feet, and pad the knees and feet. Prepare the perineum and ipsilateral flank sterilely, and cover unsterile areas with drapes. Cover the flank with an adherent drape that incorporates a fluid collection pouch.
Choice of Access Site to the Collecting System
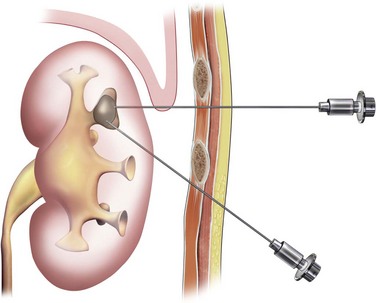
The access site into the upper urinary tract collecting system is a critical determinant of the success of the subsequent procedure. In the prone position, the preferred calyces are the posterior ones (or the posterior aspect of compound calyces), which allow better access to the remainder of the collecting system. Usually, the anterior calyces can be approached through a posterior calyx. In cases that involve a calyceal diverticulum, narrow infundibulum, or pathology in an eccentric anterior calyx, direct puncture into an anterior location might be required. The ability to access the rest of the collecting system is limited with such access. Percutaneous access should never be directly into an infundibulum or the renal pelvis, which greatly increases the risk of vascular injury (Sampaio et al, 1992). The state of the renal parenchyma overlying the intended calyx of entry also must be considered because if it is thin, the tract into the collecting system may not close well after nephrostomy tube removal.
Subcostal access is the safest route to the kidney because pleural injuries are rare with entry below the 12th rib. Nonetheless, if entry directly above the 12th rib (11th intercostal space) provides the best access to the optimal calyx, then the benefit generally exceeds the risk (Fig. 47–9). Entry above the 11th rib, however, has a greater potential for pleural and even lung injury, so when the best access calls for a direct puncture above the 11th rib, additional maneuvers should be considered to make access safer. A subcostal access sheath placed into a lower calyx can be tilted cephalad, displacing the kidney caudally to allow access to an upper pole calyx at a lower intercostal level (Karlin and Smith, 1989). Another alternative is to angle the access tract cephalad from a subcostal entry site (Liatsikos et al, 2005; Rehman et al, 2008). This approach provides limited access to the rest of the kidney. These alternatives can result in damage if the kidney is moved caudally with excessive force. Access above the 10th rib is associated with a high incidence of pleural violation and lung injury and should be avoided unless absolutely necessary. Thorascopically guided access superior to the 10th rib can be performed to reduce the risk of lung injury (Finelli and Honey, 2001).
Although standard preoperative ultrasonography or intravenous urography is sufficient in most cases for treatment planning, in complex cases cross-sectional imaging with computed tomography (CT) or magnetic resonance imaging (MRI) might be helpful. CT is a standard at many centers. For more accurate representation of the renal collecting system, three-dimensional imaging reconstructions are useful (Hubert et al, 1997; Buchholz, 2000; Ng et al, 2005; Thiruchelvam et al, 2005; Patel et al, 2009).
Retrograde Assistance for Access into the Collecting System
The simplest form of retrograde transurethral assistance is to place a 5- or 6-Fr straight ureteral catheter up into the renal pelvis (Fig. 47–10 on the Expert Consult website ). Air and/or contrast material can be injected to delineate and dilate the intrarenal collecting system anatomy (Fig. 47–11 on the Expert Consult website
 ), and a guidewire can be passed from below and grasped by the nephroscope to establish through-and-through access from the external urethral meatus to the percutaneous entry site. A dual-lumen catheter can be placed as well. The small caliber of either catheter, however, does not provide much outflow from the kidney and may not prevent stone or tumor fragments from passing into the ureter along the catheter. A ureteral occlusion balloon catheter, which incorporates an approximately 15-Fr spherical balloon on the distal tip, more consistently prevents material from migrating down the ureter. The balloon should be carefully inflated in the renal pelvis, making sure the balloon is not in the ureter—which could lead to ureteral rupture—and then gently pull down to occlude the ureteropelvic junction (Fig. 47–12). Another alternative is to place a ureteral access sheath (usually 11 to 15 Fr) over a retrograde-inserted guidewire (Landman et al, 2003). The large outer diameter of the sheath effectively prevents particles from passing around the sheath into the ureter, and the large inner diameter affords excellent outflow of small stone particles. The disadvantages of employing a ureteral access sheath include the potential ureteral trauma from passing such a large device into the ureter and clogging of the catheter lumen by oversized stone fragments.
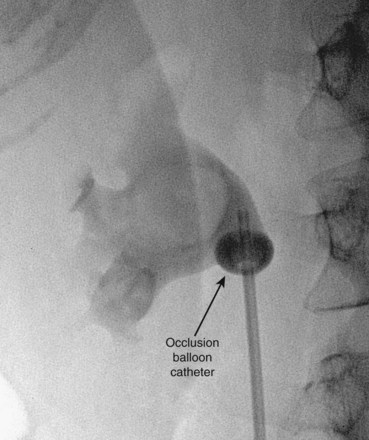
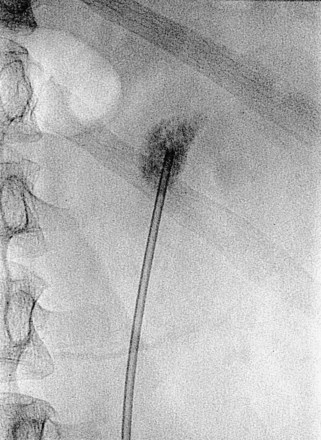

Figure 47–11 Retrogram pyelogram with air and contract reveals air in upper pole compound calyx and posterior lower pole calyx.
A ureteroscope passed retrograde can greatly facilitate percutaneous entry into the intrarenal collecting system (Grasso et al, 1995; Kidd and Conlin, 2003; Patel et al, 2008) by allowing the surgeon to observe and correct the percutaneous placement of a needle. A basket can then be passed through the ureteroscope to grasp the end of the percutaneous guidewire; pulling this out the urethra provides through-and-through access (Fig. 47–13). Even if the pathology being addressed is so large that direct visualization of the percutaneous needle is obscured (e.g., complete staghorn calculus), the ureteroscope can still be used to rapidly attain through-and-through access. Moreover, the ureteroscope may have better access to some sites in the kidney than the nephroscope and can be used to assist in the procedure (e.g., fragment or relocate stones, fulgurate small tumors).
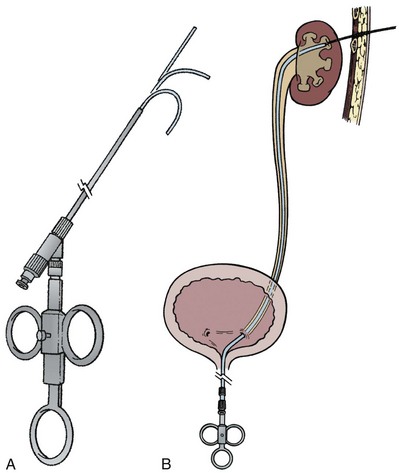
The “ultimate” retrograde assistance to percutaneous access into the upper urinary tract collecting system is the retrograde approach to percutaneous access. Although the antegrade approach is much more commonly performed, a retrograde approach may be selected when the surgeon has limited experience with antegrade percutaneous renal puncture or in situations in which there might be a technical advantage to the retrograde approach such as morbid obesity or a hypermobile or abnormally situated kidney (Mokulis and Peretsman, 1997). The Lawson Retrograde Nephrostomy Wire Puncture Set (Cook Urological; Spencer, IN) is the device commercially available for this use. After retrograde placement of a guidewire into the renal pelvis, pass the 7-Fr Torcon catheter—which is actively deflectable from 0 to 140 degrees (Fig. 47–14A)—over the guidewire and into the desired calyx. Insert the 3-Fr polytetrafluoroethylene (PTFE) sheath containing the 0.017-inch stainless steel puncture wire through the Torcon catheter. Advance the puncture wire through the kidney and body wall under fluoroscopic control, withdrawing and repositioning it if any obstacles such as a rib are encountered (Fig. 47–14B). Make a small skin incision and grasp the wire externally. Use the fascial dilators in an antegrade fashion until the Torcon catheter can be advanced through the tract. Once the end of the catheter exits the skin, exchange the puncture wire for a standard 0.035 inch guidewire, thus attaining through-and-through access.
Antegrade Approach to Access into the Collecting System: Needles and Guidewires
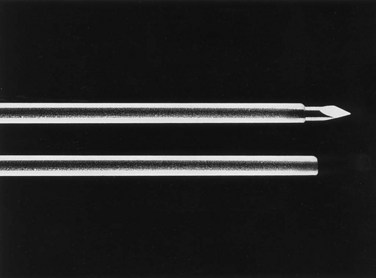
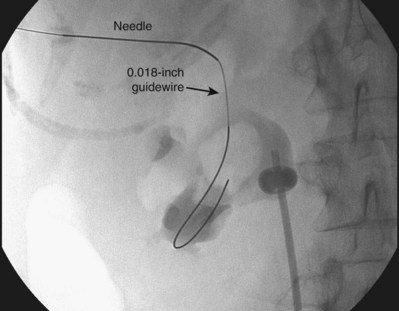
The general scheme of antegrade access is to place a needle through the skin into the upper urinary tract collecting system. Through the needle a guidewire is placed and then over the guidewire are placed catheters and other devices, eventually enlarging the tract until the desired lumen is reached for the purpose of the procedure. This is the Seldinger technique, described (for vascular access) by Sven-Ivar Seldinger (1953). The standard choices for the needle are a 21-gauge needle through which is passed a 0.018-inch guidewire or an 18-gauge needle through which is passed a standard 0.035-inch guidewire. Both needles have a blunt sheath and a sharp obturator (Fig. 47–15). The 21-gauge needle has the advantage of causing relatively minor injury as it is passed through tissue. Multiple passes can generally be made with little risk of hemorrhage from the needle itself; the option to place and replace the needle multiple times is advantageous because getting the tip of the needle into the right spot in the kidney is the most difficult aspect of percutaneous access into the upper urinary tract collecting system. The 18-gauge needle is more traumatic, and multiple passes should be avoided. The advantage of the 18-gauge needle is that it is stiffer. In a number of circumstances the 21-gauge needle does not maintain trajectory adequately (e.g., scarred kidney, obese patient) and the 18-gauge needle is more effective. In addition, the 0.018-inch guidewire that passes through the 21-gauge needle (Fig. 47–16) must be exchanged for a standard 0.035-inch guidewire for subsequent tract dilation or catheter placement. This requires an extra step, which adds to the complexity of the procedure and increases the risk of loss of access. Balancing the reduced efficacy of the 21-gauge needle and its increased potential for loss of access, versus the increased risk of trauma with the 18-gauge needle, it is recommend that the 21-gauge needle be used when the operator is less experienced or if minimizing trauma is paramount. The 18-gauge needle should be used when an experienced operator is confident that the tip of the needle can be placed within the desired calyx with just a few attempts.
Antegrade Approach to Access into the Collecting System: Technique of Initial Access
The initial percutaneous access to the upper urinary tract collecting system described by Goodwin and colleagues (1955) was “blind.” In 1974 Pedersen first reported ultrasonographic guidance (Pedersen, 1974). Although “blind” access is still occasionally reported and in expert hands can be successful, in most cases the initial antegrade percutaneous access into the upper urinary tract collecting system is obtained with real-time imaging guidance. Ultrasonography and fluoroscopy are most commonly employed, with the choice based on patient characteristics and physician preference (Basiri et al, 2008a).
Ultrasonographic Guidance
Using a hand-held 3.5- or 5-MHz ultrasound transducer, inspect the kidney and select a calyx for percutaneous entry. Needle guides can be placed on the transducer to direct the needle in the plane of visualization of the probe. Some prefer to place the needle freehand instead, moving the transducer around to gain different views of the kidney and needle. Observe the needle as it is advanced until it appears that the tip is within the collecting system (Fig. 47–17). Removing the obturator and aspirating urine confirms entry.

Fluoroscopic Guidance
Fluoroscopic guidance is more commonly employed for gaining antegrade access to the upper urinary tract collecting system for percutaneous renal surgery. Although retrograde instillation of air and/or contrast material is not absolutely essential (Tabibi et al, 2007), most urologists find that it enhances fluoroscopically guided percutaneous access (Fig. 47–18). Fluoroscopy provides excellent delineation of the intrarenal collecting system anatomy and pathology, a wide field of view (that can be collimated down to reduce radiation exposure), and the ability to monitor all steps of the procedure. In some cases combining the techniques is an excellent approach, using ultrasonography to guide the initial needle placement and then using fluoroscopy (after injection of air and contrast through the sonographically guided needle) to confirm that the desired calyx has been accessed and to monitor the subsequent steps of the procedure (Osman et al, 2005). If the entry site is incorrect, then fluoroscopy of the air-and-contrast filled collecting system can be used to guide another needle into the desired calyx. With this combination, retrograde assistance is not necessary. This technique is especially useful in accessing nondilated systems without retrograde assistance (Patel and Hussain, 2004).
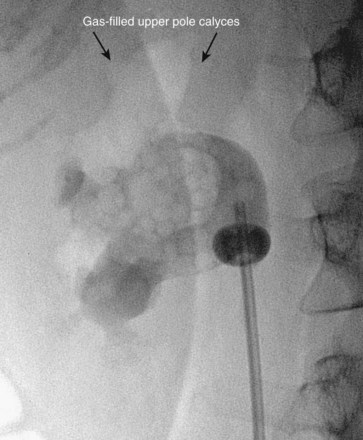
Figure 47–18 Injection of air into contrast-filled upper tract collecting system reveals posterior calyces, in this case most clearly the upper pole calyces. Compare with Figure 47–12, before injection of air.
There are two well-described methods of fluoroscopic guidance for antegrade percutaneous access into the upper urinary tract collecting system: the “eye-of-the-needle” technique and the “triangulation” technique (Miller et al, 2007). Both have their proponents, and there is no clear advantage of one over the other. Through the retrograde device, inject contrast material to delineate the collecting system after first taking note of any radiopaque pathology for later reference. Comparing a spot film of the unopacified collecting system with the opacified view is useful in this regard. Once the options for the calyces of entry are identified, inject air to define which calyces are posterior. In the prone position, air rises up the posterior calyces. The “double-contrast” pyelogram (both contrast material and air) provides the best determination of the pertinent intrarenal anatomy.
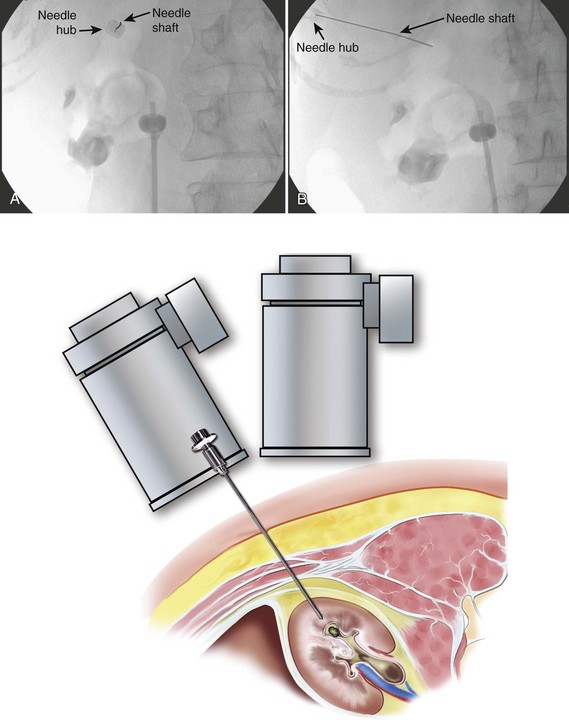
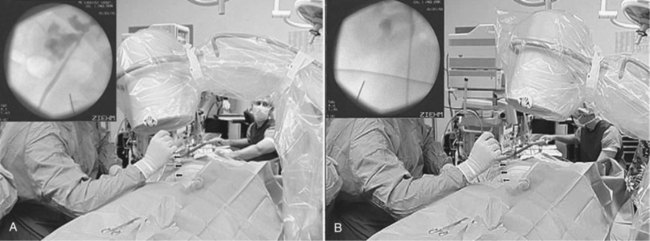
To perform the “eye-of-the-needle” technique, first inspect the kidney with the fluoroscopy unit directly above the patient (directed vertically) and select the desired calyx. Next, rotate the top of the fluoroscopic unit 30 degrees toward the operator, which brings the fluoroscopic view more or less end-on with the posterior calyces. The unit can be additionally rotated slightly cephalad or caudad to line it up more exactly with the axis of the calyx. Place the tip of a hemostat on the skin and move it until it is directly over the desired calyx. Mark this site and make an incision large enough to accept the needle and initial dilators. Place the tip of the access needle into this incision, and then move the shaft of the needle while keeping the tip in place until the needle is directly in line with the axis of the fluoroscopy unit; doing so gives the appearance of a “bull’s eye” with the hub of the needle (appearing as a circle) around the shaft (which appears as a dot). The fluoroscopic view is as if the operator is looking down the shaft of the needle at the targeted calyx—thus the term “eye of the needle” (Fig. 47–19A). Advance the needle straight in, while checking with fluoroscopy and adjusting the angle of the needle as needed to maintain the “bull’s-eye” appearance. If the needle is more than a few centimeters deep and readjustment is necessary, the needle may have to be withdrawn before a new trajectory can be followed. The 21-gauge needle can be difficult to control during this step. If this occurs, substitute the more easily passed 18-gauge needle. Once the needle’s axis is fixed and it is thought that the needle is approaching or is in the kidney (typically a “pop” can be felt when the renal capsule is punctured), then rotate the fluoroscopy unit away from the operator, back to vertical or even 10 to 15 degrees beyond vertical. Now the needle appears “in profile” as a straight line. With the cephalo-caudad and medial-lateral axes of the needle now fixed, advance or withdraw the needle to change its anterior-posterior position (depth) to get the tip of the needle into the desired calyx (Fig. 47–19B). Aspiration of urine or air after removing the obturator confirms entry. Instillation of contrast material can be used to confirm entry as well, but if the needle is misplaced, the extravasated contrast material can obscure subsequent fluoroscopic visualization. If a gently passed guidewire stays within the contours of the collecting system, then this confirms proper entry with risking troublesome extravasation of contrast material.
It should be remembered that the ionizing radiation presents a small but real risk. When the operator must grasp the access needle within the fluoroscopy field, it is best to hold the needle with a hemostat, sponge forceps, or purpose-built needle holder to reduce radiation exposure to the operator’s hand. Collimating the field down as much as possible while still maintaining an adequate field of view reduces radiation exposure to the patient and all personnel in the room. Moving a collimated field around to maintain the object of interest in the field is preferable to maintaining a wide field that includes the operator’s hands and unnecessary body parts of the patient. For additional information about radiation safety, see Chapter 4.
To use the “triangulation” technique, inspect the kidney with the fluoroscopy unit directly above the patient to select the desired calyx and hold the needle in the approximate position of the desired angle of entry. Rotate the top of the fluoroscopy unit cephalad and lateral, and widen the field of view with the collimator such that medial-lateral (left-right) movements of the needle are apparent. Move the shaft of the needle while keeping its tip in place until the needle is aimed toward the desired calyx (Fig. 47–20A). Then rotate the top of the fluoroscopy unit medially 45 degrees. While keeping the medial-lateral orientation of the needle constant, move the needle in the cephalo-caudad (up-down) plane until the needle is again aimed toward the desired calyx (Fig. 47–20B). Resting the forearm on the patient’s back will help stabilize the needle in one plane while moving in the other. Move the fluoroscopy unit back and forth between these two positions until the needle remains aimed at the desired calyx on both views. Advance the needle under fluoroscopic guidance while monitoring the anterior-posterior direction (depth) of the needle tip. If the needle position in the medial-lateral and cephalo-caudad planes is maintained, the needle should enter the targeted calyx.
(From Miller NL, Matlaga BR, Lingeman JE. Techniques for fluoroscopic percutaneous renal access. J Urol 2007;178:15–23.)
With the “eye-of-the-needle” technique, the proper cephalo-caudad and medial-lateral axes of the needle are verified and maintained on a single fluoroscopic view and the confirmatory view is necessary only to confirm the depth of the needle tip. For the “triangulation” technique, one fluoroscopic view is used to assess the medial-lateral axis and another is used to assess the cephalo-caudad axis, with the depth of the needle tip being assessed on both views (Miller et al, 2007). The advantage of the triangulation technique over the “eye-of-the-needle” technique is that the needle cannot be passed too deeply because the depth of advancement is monitored continuously. The disadvantage of the “triangulation” technique is that maintaining both the medial-lateral and cephalo-caudad planes is difficult because both are not being monitored at the same time as in the “eye-of-the-needle” technique. Use of the 18-gauge rather than a 21-gauge needle is recommended with the “triangulation” technique to help maintain angle of entry.
Advanced Guidance
In some complex cases, percutaneous access into the kidney guided by CT or MRI might be considered. The initial access is obtained into the desired calyx with the patient on the CT or MRI table, similar to the techniques used for needle biopsy (Barbaric et al, 1997; Hagspiel et al, 1998; Thanos et al, 2006). Bowel and other viscera can be imaged to protect against their injury, and this approach is especially useful in cases of anatomic abnormalities (LeMaitre et al, 2000; Matlaga et al, 2003) and for nondilated collecting systems (Merkle et al, 1999; Egilmez et al, 2007).
Three-dimensional fluoroscopy has the potential to provide images with a level of quality equivalent to CT. This modality has proven useful in other disciplines such as orthopedic surgery (Kendoff et al, 2009). In a study of this technology applied to percutaneous access of porcine kidneys, it appeared to be effective (Soria et al, 2009), although simultaneous retrograde access and injection of contrast material was still helpful. Clinical application of three-dimensional fluoroscopy to percutaneous renal collecting system access has not yet been reported.
Three-dimensional ultrasonography accurately represents the renal collecting system (Ghani et al, 2008) and appears useful for renal imaging (Kim et al, 2008) and for teaching percutaneous access into an in vitro renal model (John et al, 2009). Given that three-dimensional ultrasonography has been applied to other therapeutic urologic applications (such as percutaneous drainage of prostatic abscesses) (Varkarakis et al, 2004), investigation of its use for clinical percutaneous access of the collecting system is anticipated.
There has been one report of a novel image localization system that projects the ultrasonographic puncture tract onto the fluoroscopy screen, which incorporates some of the advantages of both modalities (Mozer et al, 2007).
In addition to advanced image guidance of percutaneous access to the intrarenal collecting system, technologic enhancements have been applied to the initial needle puncture. The Urorobotics Laboratory at Johns Hopkins University has developed the robotic percutaneous access to the kidney with remote center of motion device (PAKY-RCM) (Cadeddu et al, 1997b). This is a robotic arm with 7 degrees of freedom that places a needle into the intrarenal collecting system as directed by the control device that pivots the tip of the needle about a fixed point on the skin. In a nonrandomized clinical trial, the PAKY-RCM system was equivalent to an expert physician in gaining access to the collecting system in terms of time and accuracy (Su et al, 2002). In a randomized trial in an in vitro kidney model, the PAKY-RCM took slightly more time but was more accurate than manual needle insertion (Challacombe et al, 2005b). This device can also be controlled at distance with telepresence technology (Bove et al, 2003; Netto et al, 2003). A percutaneous access needle with an impedance-based sensing system to detect entry into the collecting system has also been developed, but clinical use has not been reported (Hernandez et al, 2001; Roberts et al, 2002).
“Blind” Access
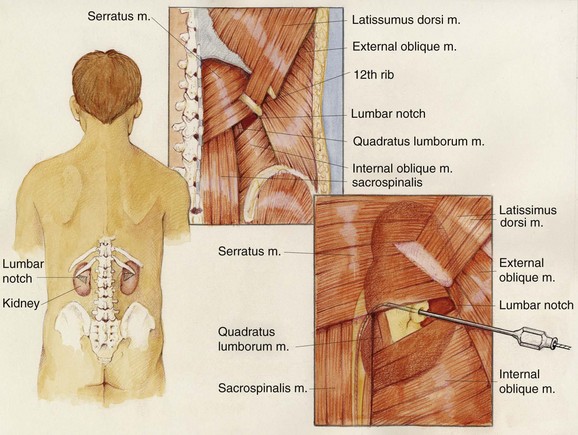
The upper urinary tract collecting system can also be accessed “blindly,” without any imaging guidance (Chien and Bellman, 2002). The only situation in which this should be considered is if sonography is not available and there is complete ureteral obstruction (precluding retrograde instillation of contrast material or opacification of the collecting system with intravenous contrast). The lumbar notch, also known as the superior lumbar triangle or Grynfeltt lumbar triangle, has been reported to be a reliable landmark for blind percutaneous renal access (Fig. 47–21). The lumbar notch is an area of muscular insufficiency through which hernias can occur. It is located posteriorly below the 12th rib. The superior border is the 12th rib and latissimus dorsi muscle, the lateral border is the transversus abdominis and external oblique muscles, the medial border is the quadratus lumborum and sacrospinalis muscles, and the inferior border is the internal oblique muscle. Insert a needle 3 to 4 cm deep into the notch at a 30-degree cephalad angle to enter the collecting system. Another blind approach to the collecting system is to insert a needle directly perpendicular to the body surface 1 to 1.5 cm lateral to the L1 vertebral body, which will lead directly to the renal pelvis if anatomy is normal. If fluoroscopy is available, then air and contrast material can be injected through a blindly placed needle to fluoroscopically assess its position and guide another needle if needed. In the only randomized clinical trial comparing “blind” access to image-guided access, entry into the collecting system was successful in 50% and 90% of cases, respectively (Basiri et al, 2007). Use of the technique is not recommended in most settings.
Working Access
Safety Wire
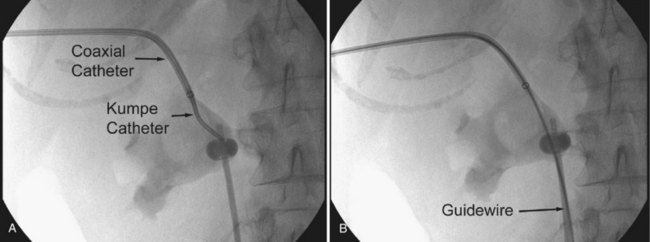
There are several techniques for getting a guidewire down the ureter. The safest maneuver is to place a stiff angled-tip hydrophilic guidewire adjacent to the initial stiff angled-tip hydrophilic guidewire using a coaxial or dual-lumen catheter. Remove the coaxial or dual-lumen catheter and place an angled tip catheter (Kumpe, Cobra, or coudé tip) over the angled-tip hydrophilic guidewire to help direct it down the ureter. Once the stiff angled-tip hydrophilic guidewire is down the ureter, optimally all the way into the bladder, use the coaxial or dual-lumen catheter to place a second guidewire down the ureter. In cases of secure access, the initial wire can be exchanged for a stiff angled-tip hydrophilic guidewire through an angled tip catheter to get down the ureter right away (Fig. 47–22); alternatively, the surgeon can use a stiff angled-tip hydrophilic guidewire as the initial wire.
Dilation of Tract
In the early years of therapeutic percutaneous renal procedures, the tract was dilated gradually over the course of many days by placing sequentially larger tubes. Acute dilation of the tract was first reported by Castañeda-Zúñiga and associates in 1982 (Castañeda-Zúñiga et al, 1982). There are several dilator systems available. Regardless of the method used, is it imperative that the dilator does not pass too far into the collecting system.
Related posts:
 Definitive Therapy for Localized Prostate Cancer: An Overview
 Tuberculosis and Other Opportunistic Infections of the Genitourinary System
 Surgical Procedures for Sphincteric Incontinence in the Male: The Artificial Genitourinary Sphincter and Perineal Sling Procedures
 Prosthetic Surgery for Erectile Dysfunction
 Minimally Invasive and Endoscopic Management of Benign Prostatic Hyperplasia
 Hypospadias
Stay updated, free articles. Join our Telegram channel

Full access? Get Clinical Tree


