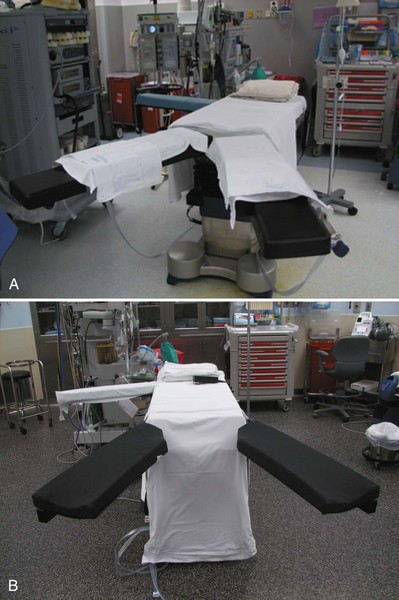
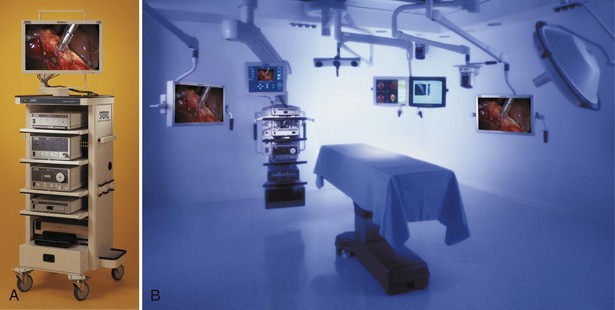
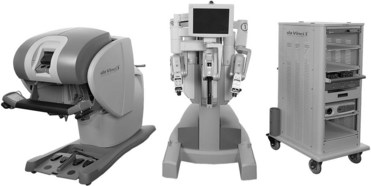
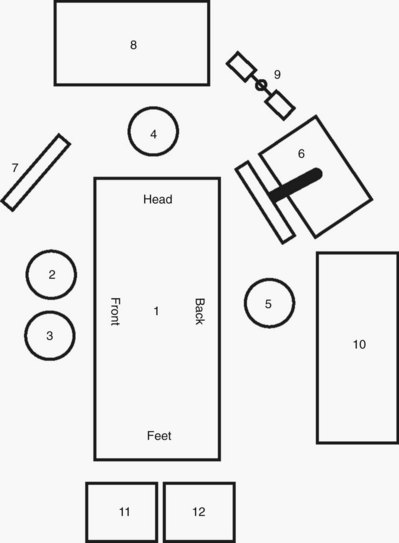
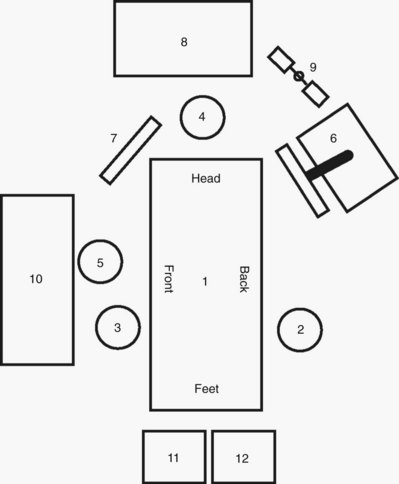
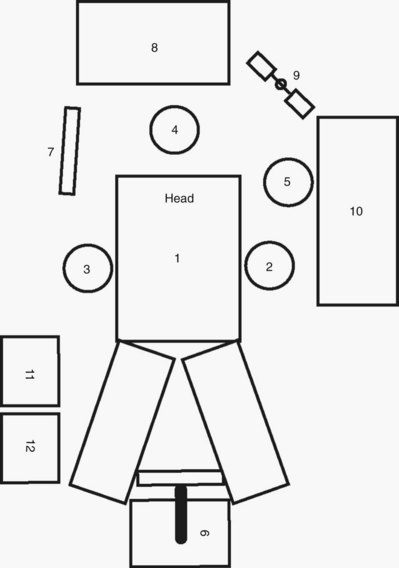
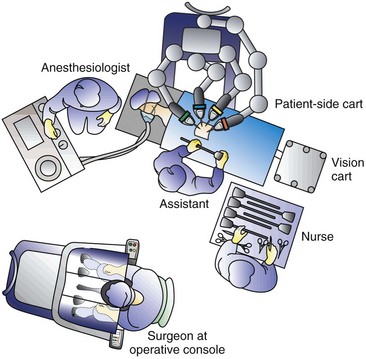
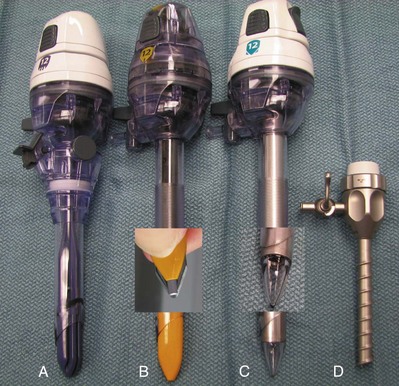
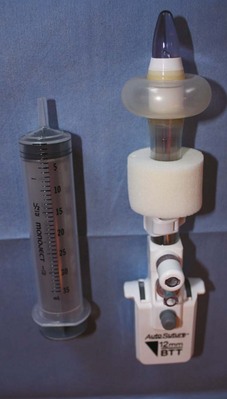
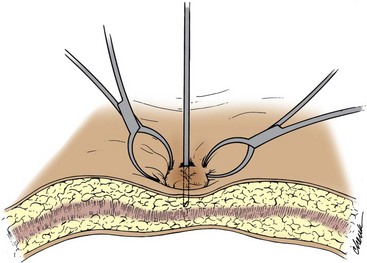
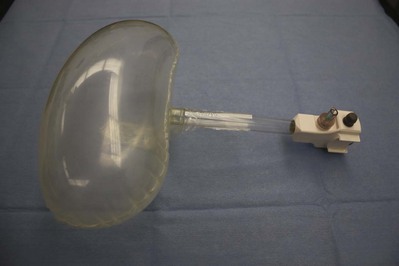
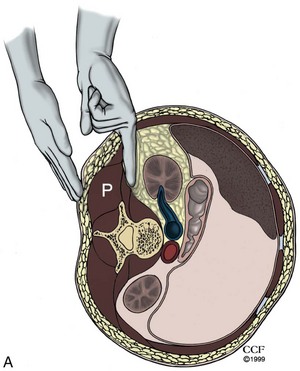
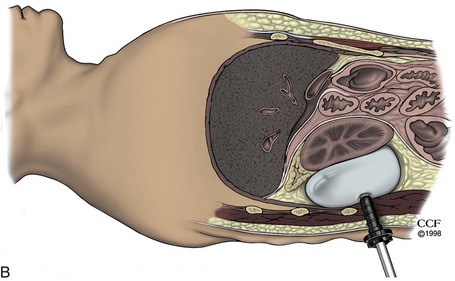
Louis Eichel, MD, Ralph V. Clayman, MD Laparoscopic procedures in morbidly obese patients are technically challenging. Difficulties may include inadequate length of instruments, decreased range of motion of trocars and instruments, need for higher pneumoperitoneum pressures to elevate the abdominal wall, and poor anatomic orientation owing to excessive amounts of adipose tissue. Traditionally, these difficulties translated into a higher rate of associated complications; in a multi-institutional review of laparoscopy in 125 morbidly obese individuals, one or more intraoperative or postoperative complications occurred in 30% (Mendoza et al, 1996). In comparison to open surgery, however, it has been found that the laparoscopic approach to renal and adrenal procedures actually has a lower complication rate than the open approach. In a comparison of major laparoscopic renal and adrenal procedures (N = 21) versus similar open procedures (N = 21) in obese patients (body mass index [BMI] ≥ 30), although operative time was longer in the former group (210 minutes vs. 185 minutes; P = .16), the laparoscopic group had significantly superior outcomes regarding blood loss (100 mL vs. 350 mL; P = .001), resumption of oral intake and ambulation (<1 day vs. 5 days; P = .001), narcotic analgesic requirements (12 mg vs. 279 mg; P = .001), median hospital stay (<1 day vs. 5 days; P = .001), and convalescence (3 weeks vs. 9 weeks; P = .001). The overall complication rate in the laparoscopic group was 29% (19% major, 10% minor) versus 67% in the open group (33% major, 33% minor) (P = .16) (Fazeli-Matin et al, 1999). These findings have been further confirmed at several other centers (Fugita et al, 2004; Kapoor et al, 2004) even for complicated procedures such as partial nephrectomy (Colombo et al, 2007; Romero et al, 2008) and nephroureterectomy (Brown et al, 2008). With regard to laparoscopic and robotic radical prostatectomy in obese men, it has been found that although the operation can be performed without compromising pathologic outcomes, obese patients have a greater risk of perioperative complications (26% vs. 5%) (Ahlering et al, 2005). Obese patients had a higher rate of deep vein thrombosis and pulmonary embolism (10%). Additionally, obese patients were less likely to achieve continence and more likely to have higher urinary bother scores at 3-, 6-, and 9-month follow-up. When extensive intra-abdominal or pelvic adhesions are suspected, careful consideration must be given to the possible site of Veress needle insertion as well as to obtaining open access with a Hasson-style cannula. The surgeon needs to understand the five potential points of Veress needle access to the abdomen (umbilicus and at the Palmer point—midclavicular line subcostal on either side, and just off the iliac crest—two fingerbreadths up and two fingerbreadths medial) as well as have knowledge regarding open (e.g., Hasson type) access. Alternatively, in these patients a retroperitoneal approach may be preferable to a transperitoneal approach or the procedure can be initiated retroperitoneally and the peritoneum then entered (Cadeddu et al, 1999). Pelvic fibrosis owing to previous peritonitis, pelvic surgery, or extensive endometriosis may constitute a severe technical challenge to the laparoscopic surgeon when surgery of the lower urinary tract is indicated. Similar problems may be encountered when trying to perform pelvic lymph node dissection in patients who have a hip prosthesis; leakage of the polymethylmethacrylate cement can create a dense inflammatory reaction and fibrosis in the adjacent pelvis (Cooper et al, 1997). As pregnancy progresses beyond the 20th week the technical possibility of performing laparoscopic procedures decreases significantly, correlating with the increasing size of the gravid uterus. Both laparoscopic nephrectomy and adrenalectomy have been successfully accomplished in the pregnant female (Nezhat et al, 1997; O’Connor, et al, 2004; Sainsbury et al, 2004). A diaphragmatic hernia may result in leakage of a significant amount of CO2 into the mediastinum, which, although rarely noted, may eventually result in clinical problems such as respiratory compromise or cardiac tamponade (e.g., pneumopericardium) (Knos et al, 1991). For extraperitoneoscopy and retroperitoneoscopy, no bowel preparation is necessary, but it may help with postoperative constipation. For transperitoneal laparoscopic/robotic procedures not involving the use of bowel segments for urinary tract reconstruction, a light mechanical bowel preparation can be given in an effort to decompress the bowel. A traditional example of such a prep would consist of a clear liquid diet and a Dulcolax suppository or half a bottle of magnesium citrate the day before the procedure. More recently, emphasis has been placed on “fast tracking” patients in an effort to streamline care and decrease length of hospital stay. Breda and associates (2007) found that a modified bowel prep and avoidance of narcotic analgesics postoperatively (with routine administration of ketorolac) was instrumental in achieving a hospital stay of 1.1 days for patients undergoing laparoscopic donor nephrectomy. The bowel prep consists of clear liquids for 2 days before surgery, two bottles of magnesium citrate the day before surgery, an enema the night before surgery, and nothing to eat after midnight (Breda et al, 2007). Serum type and screen are sufficient for diagnostic laparoscopy or procedures associated with a low chance of major hemorrhage. More extensive laparoscopic/robotic procedures (e.g., nephrectomy, partial nephrectomy, adrenalectomy), especially early in one’s experience, should be managed like any other major open surgical procedure, with packed red blood cells available before surgery. This is most important during one’s initial major laparoscopic/robotic cases; with experience, a “type and hold” suffices because the need for transfusion among patients undergoing major procedures, such as radical nephrectomy or radical nephroureterectomy, is quite low (3% to 12%), with an estimated average blood loss in the range of 106 to 255 mL (Ono 1999; Dunn et al, 2000; Jeschke et al, 2000; Shalhav et al, 2000). Similarly, the transfusion rate with laparoscopic/robotic radical prostatectomy is low (2.5% at experienced centers) such that a “type and hold” is sufficient (Guillonneau and Vallancien 2000; Ahlering et al, 2004). The operating room has to provide enough space to accommodate all necessary personnel and the equipment required by both the surgeon and the anesthesiologist. Positioning of equipment, surgeon, assistants, nurses, anesthesiologist, and other support staff should be clearly defined and established for each laparoscopic or robotic case. All equipment must be fully functional and in operating condition before any laparoscopic procedure is started (Table 9–1). A separate tray with open laparotomy instruments must be ready for immediate use in the event of complications or problems necessitating emergent open incisional surgery. Table 9–1 Instrumentation Checklist for Making a Skin Incision for Obtaining the Pneumoperitoneum A host of new advances in padding and table mounted accessories are now available but none has been conclusively demonstrated to significantly reduce pressure on the patient’s flank in the lateral position. Researchers at the University of California, Irvine, showed that women have significantly lower interface pressures than men (Deane et al, 2008). A BMI greater than or equal to 25, use of a kidney rest, and full table flexion as opposed to half-table flexion were all associated with increases in interface pressures; of these, use of the kidney rest was believed to be the most detrimental and its use beyond 20 to 30 minutes was disparaged. Therefore, male patients with a BMI of 25 or higher undergoing laparoscopic surgery in the lateral position with the kidney rest elevated and the table completely flexed are at highest risk of developing rhabdomyolysis from flank pressure. In this study the unaugmented operating table mattress was superior to egg crate or gel padding as an augmenting surface material; of note, egg crate padding was equal or superior to the more expensive gel padding. Table-mounted accessories for all major commercial operating room tables now exist that aid in safely and effectively positioning patients in the lateral decubitus position and in the prone position. Specifically, for lateral decubitus positioning the buttock and upper back can be supported by padded reinforced stabilizer bars that mount on the side rails of the table. The entire bed and especially the kidney rest can also be padded and the upper arm can be supported on a table-mounted adjustable armboard. Special head supports for the lateral decubitus position are also available. For laparoscopic or robotic procedures on the pelvis, the patient can be placed in Trendelenburg position with the legs on split-leg positioners. Shoulder supports or braces should never be used in this position owing to the risk of brachial nerve injury. Allen stirrups have fallen out of favor because of the risk of calf neuropraxia. Split-leg positioners are available as built-in table features (Fig. 9–1A on the Expert Consult website Traditionally, the mandatory hardware for laparoscopic procedures (monitor, light source, insufflator) is located on carts or “towers” that can be rolled around the operating room and be adapted to various types of surgical procedures and approaches (Fig. 9–2A on the Expert Consult website More recently, most major manufacturers of endoscopy equipment offer “integrated” systems that consist of flat panel displays and equipment towers that are mounted on adjustable ceiling booms (see Fig. 9–2B on the Expert Consult website Currently, the only robotic surgical system in widespread use for laparoscopic surgery is the da Vinci Robotic System (Intuitive Surgical, Sunnyvale, CA). In its current state this system can be used in almost any modern operating room. The three major components of the system are the robotic tower to which the instruments attach and are mechanically manipulated within the patient, a surgeon’s console that is the workstation at which the surgeon sits to manipulate the robotic instruments, and finally the ancillary vision cart that supports a flat screen monitor, an insufflator, light source, and components of the camera system (Fig. 9–3 on the Expert Consult website For laparoscopic procedures such as nephrectomy the patient is positioned in a modified lateral decubitus position for transperitoneal laparoscopic renal surgery procedures. This is at approximately a 30-degree angle to the table and allows for more effective lateral retraction of the kidney and exposure of the renal vessels during the hilar dissection. The kidney rest may be elevated at the outset and the table slightly flexed if necessary to provide adequate exposure for port placement; after port placement, the kidney rest should be completely lowered. The surgeon and assistant usually stand opposite the area of surgical interest (i.e., for a left nephrectomy the surgeon and assistant stand on the patient’s right side). The instrument table and the scrub nurse are best located on the opposite side of the patient such that instruments can be handed to the surgeon over the table (Fig. 9–4). Incoming lines from insufflators, suction/irrigation, and electrosurgical devices enter from the contralateral side of the table. Optional technology (e.g., harmonic scalpel, argon beam coagulator) must be arranged in an orderly fashion using either preexisting or improvised pockets of the surgical drape. Again, these lines ideally should enter the field from the contralateral side of the table or from the ipsilateral head of the table. Additional technology (e.g., laparoscopic ultrasound probe) may be moved to the operating table depending on the surgeon’s needs as well as on the availability of space. For retroperitoneal procedures the patient is placed in the true, 90-degree lateral decubitus position with the body at a right angle to the table. All of the proper steps for padding in this position should be followed (see earlier). The table is angled at the hip to accentuate and increase the distance between the 12th rib and the iliac crest. Maximizing this distance is paramount with regard to port placement. If necessary, the kidney rest can be raised; however, the surgeon must keep in mind that this causes increased pressure on the tableside hip and may increase the risk of pressure necrosis if left elevated for prolonged periods of time. Most experts recommend lowering the kidney rest except when it is needed for key portions of a case. The operative field should include the space between the costal margin and the iliac crest and from the umbilicus to the spine. Both the primary surgeon and the camera assistant stand facing the patient’s back (Fig. 9–5). The scrub nurse/technician stands facing the patient’s front, and instruments are handed across the patient accordingly. The patient is positioned in the supine position with the legs on split-leg positioners or elevated in stirrups that have knee and leg supports to avoid perineal nerve injury. The table is angled (flexed) slightly at the hip to accentuate the pelvis. The patient’s arms are tucked at the sides; plastic sleds can be used to support the arms. Adequate padding should be applied to the arms and legs. A slightly snug chest strap should be placed directly across the patient’s chest. The table is placed in the 30-degree Trendelenburg position. Genitalia are draped into the operative field, which extends from the mid chest to thighs and from midaxillary line to midaxillary line. The surgeon stands on the side of the table where he or she is comfortable, and the assistant stands on the side of the table opposite the surgeon (Fig. 9–6). For robotic procedures involving the kidney and adrenal gland the patient is positioned exactly as described for transperitoneal upper abdominal surgery as described earlier. The surgeon and assistant stand on the side opposite the pathologic process. The robotic tower is positioned on the ipsilateral side of the pathology such that the robotic arms stretch over the patient and can then be docked to the preplaced ports. In general it is best to angle the robot slightly such that the lens is pointing directly toward the site of interest (Fig. 9–7 on the Expert Consult website A checklist ensuring that all essential equipment is present and operational should be completed just before initiating the pneumoperitoneum (see Table 9–1). For laparoscopic surgery this list should include (1) light cable on the table, connected to the light source and operational; (2) laparoscope connected to the light cable and to the camera, with an image that has been white balanced and focused using a white gauze sponge; (3) operational irrigator/aspirator; (4) insufflator tubing connected to the insufflator, which is turned on to allow the surgeon to see that there is proper flow of CO2 through the tubing; kinking of the tubing should result in an immediate increase in the pressure recorded by the insufflator, with concomitant cessation of CO2 flow; (5) an extra tank of CO2 in the room; and (6) a Veress needle, checked to ensure that its tip retracts properly and that, when it is connected to the insufflator tubing, the pressure recorded with 2 L/min CO2 flow through the needle is less than 2 mm Hg. Most commonly, CO2 is used as the insufflant because it does not support combustion and is very soluble in blood (LD50 for CO2 is 1750 mL) (air = 357 mL) (Bordelon and Hunter, 1994). However, in patients with chronic respiratory disease, CO2 may accumulate in the bloodstream to dangerous levels. Accordingly, in these patients, helium may be used for insufflation once the initial pneumoperitoneum has been established with CO2 (Leighton et al, 1993). The drawback of helium is that it is much less soluble in blood than CO2; however, its use precludes problems of hypercarbia. For this reason, even in patients with chronic respiratory disease, the procedure is initiated with CO2 and then the change is made during the case to helium if necessary. Other gases that were once used as insufflants (room air, oxygen, nitrous oxide) are no longer routinely used because of their potential side effects (e.g., air embolus, intra-abdominal explosion, potential to support combustion). “Noble gases” such as xenon or argon are inert and nonflammable but are not routinely used for insufflation because of their high cost and poor solubility in blood. With the patient in the supine position, the head of the bed is lowered 10 to 20 degrees; insertion of the Veress needle is commonly accomplished at the superior border of the umbilicus (Fig. 9–8). There are certain advantages to choosing the umbilical area as the site for initial trocar placement: the abdominal wall is thinnest, and postoperative cosmesis is excellent. However, this point of entry is fraught with the potential for injury to a major vessel, in particular the left common iliac vessels, aorta, or vena cava. (From Clayman RV, McDougall EM, editors. Laparoscopic urology. St. Louis: Quality Medical Publishing; 1993.) Another important factor with regard to passing the Veress needle is body habitus; in obese patients, the umbilicus tends to migrate inferiorly. In nonobese patients the umbilicus lies in its commonly described position, directly above the bifurcation of the aorta and vena cava. Thus, for umbilical access in nonobese patients the Veress needle should be passed through the abdominal wall angled toward the pelvis to avoid injury to the bowel and great vessels that lie directly beneath. In more obese patients, because the umbilicus lies more caudad, less angulation is needed and the Veress needle should be passed perpendicular to the umbilical incision (Loffer and Pent, 1976). In addition, it has also been found that pneumoperitoneum pressure and volume as well as the ease of trocar or needle insertion is not significantly affected by body habitus. In a combined human and porcine study, McDougall and associates (1994) prospectively performed pressure-volume analysis on 41 individuals undergoing transperitoneal laparoscopic procedures and found that 94% of the maximal intraperitoneal volume is achieved with an insufflation pressure of 15 mm Hg. Additional pressure (up to 30 mm Hg) did not significantly increase volume. Furthermore, in the porcine component of the study, elevation of the pneumoperitoneum pressure above 15 mm Hg did not significantly ease bladed trocar insertion. Therefore the pneumoperitoneum pressure need never be raised above 15 mm Hg unless it is done so in the setting of a vascular venous injury to control bleeding (a discussion of this technique is outlined later). Other potential insertion sites when the patient is either supine or in a lateral decubitus position are at the Palmer point (i.e., subcostal in the midclavicular line on the right side) and at the corresponding site on the left side. In this instance, stabilization or even a slight upward tension on the Allis clamps is essential; the needle if inserted too deeply will potentially hit the liver on either side or, rarely, the spleen, so care must be exercised. Chung and coworkers (2003) applied this method of laparoscopic access and trocar placement in 622 consecutive cases. Prior abdominal surgery had been performed in 192 patients (31%), and the BMI was 30 or greater in 98 patients. Blind Veress needle placement was successful in 579 (93%), and outcome was not associated with laterality, type of surgery, or prior surgery. In 34 cases (5%), a minor laceration to the liver was managed conservatively without sequelae; and in 21 cases (3%) the omentum or falciform ligament was traversed without significant injury. No major complications, such as vascular or hollow-organ perforation, were caused by either the Veress needle or trocar. Neither the spleen nor bowel was ever injured. No patient developed an incisional hernia at the upper quadrant trocar site (Chung et al, 2003). The pneumoperitoneum can be more easily, and in one’s early experience, more safely established using an open technique; however, its use involves making a larger incision and increases the chances of port-site gas leakage during the procedure. The open technique is recommended specifically when extensive adhesions are anticipated. Studies in general surgery have shown the open technique to be as efficient as the closed approach and slightly more or equally as safe (Bonjer et al, 1997). In the unscarred abdomen, a 2-cm semicircular incision is made at the lower edge or slightly below the umbilicus. The fascia and peritoneum are opened individually with a transverse incision, sufficient to accommodate the surgeon’s index finger. After visual and digital confirmation of entry into the peritoneal cavity, two 0 silk traction sutures are placed on either edge of the fascia. Next, the Hasson cannula is advanced through the incision with the blunt tip protruding (Fig. 9–9A). The funnel-shaped adapter of the Hasson cannula is advanced until it rests firmly in the incision, and it is then tightened onto the cannula with the attached screw; fixation to the abdominal wall is provided with the fascial sutures that are wrapped around the struts on the funnel-shaped adapter of the Hasson cannula, thereby anchoring it in place. After removal of the obturator, free flow of CO2 into the peritoneal cavity is achieved by attaching the CO2 tubing to the cannula. The insufflator can be set at maximum inflow, thereby creating the pneumoperitoneum quickly. A far simpler type of open cannula is a balloon retention device (e.g., Blunt Tip Trocar With Balloon Tip, US Surgical, Norwalk, CT) (Fig. 9–10 on the Expert Consult website This method is performed by means of a subumbilical 12-mm transverse incision; the rectus sheath on either side of the incision is grasped with a towel clip, and a surgeon on either side lifts the abdominal wall upward. It is claimed that this creates a distance of 6 to 8 cm between the underside of the abdominal wall and the underlying viscera. A 5-mm incision is made in the elevated rectus sheath, and a 10- to 12-mm disposable shielded or optical view trocar is passed vertically. In a prospective randomized study, comprising 578 patients, the direct insertion technique was found to be associated with fewer complications (4.2%) than a standard Veress insertion (complications of 14.6%); also of note, entry failure occurred in only 0.7% of the direct trocar insertion patients versus 4.6% of the Veress needle group (Gunenc et al, 2005). However, this complication rate for the Veress needle is distinctly higher than cited in other major series or meta-analyses in which Veress needle–associated vascular or bowel injuries were noted in 0.8% and 0.8% of patients (Bonjer et al, 1997). For this technique the abdominal wall is not tented using towel clips. It is left flat. A 5-mm incision is made in the skin at an appropriate site for a 5-mm port. The EndoTip trocar (Storz, Germany) is a 5-mm trocar with a “corkscrew”-type self advancing and self-retaining entry system and a blunt tip (see Fig. 9–9D). The trocar can be advanced through the abdominal wall while a 5-mm, 0-degree lens is positioned inside the trocar 1 cm from the advancing tip. Once the abdominal wall muscle is engaged, the EndoTip can be lifted up slightly while continuing to rotate it through the tissues; this maneuver lifts the peritoneum, and one can watch as the blunt tip works its way through the peritoneum and into the abdominal cavity. Again, this technique should be used only in patients in whom intra-abdominal adhesions are unlikely. Much the same as for hand port access the incision can be made before or after obtaining a pneumoperitoneum depending on surgeon preference. Typically, the incision is made periumbilically for cosmetic purposes. If large/intact specimen extraction is required for the procedure at hand (as in donor nephrectomy), the incision should be made just large enough to remove the specimen. If specimen removal is not necessary or the specimen is small, then the incision can be minimized to as little as 2.5 cm. Once the incision is made, several ports side by side or a single tri-port access device can be placed and a pneumoperitoneum is re-established at high flow. Thus far, LESS has been used for a variety of upper abdominal procedures including adrenalectomy (Hirano et al, 2005; Castellucci et al, 2008); renal biopsy (Kaouk et al, 2008b); renal cyst decortication; renal tumor cryoablation (Goel and Kaouk, 2008); pyeloplasty (Kaouk et al, 2008a); ileal ureter interposition; psoas hitch ureteroneocystostomy; simple, radical, and donor nephrectomy (Gill et al, 2008; Ponsky et al, 2008b; Raman et al, 2008); and partial nephrectomy (Kaouk et al, 2008b). Additionally, pelvic procedures have been performed including varicocelectomy (Kaouk and Palmer 2008), sacroculpopexy (Kaouk et al, 2008b), radical prostatectomy, and radical cystectomy with extended lymphadenectomy (Kaouk et al, 2008b). The theoretical advantages of LESS over standard multi-incision laparoscopy are improved cosmesis, decreased pain, and faster recovery time. At the present time, however, there are insufficient data regarding LESS available to either support or refute these potential benefits (Raman et al, 2008). Research in this area is ongoing, and until well established methods and results are available surgeons are urged to approach LESS in a responsible and graduated fashion. Proper training through a combination of educational courses, hands-on laboratory training, case observation, and proctoring should be undertaken by surgeons who wish to start a successful program in LESS. One method of transitioning from standard laparoscopy to LESS for selected procedures is to gradually decrease the number of ports one uses until the procedure can be performed through a single incision. Conversely, when one is having difficulty performing a procedure using LESS, the surgeon should not hesitate to place one or more extra trocars at separate incision sites to improve triangulation and thereby ensure safety and a quality result. Although the transgastric removal of an appendix in 2004 and the transvaginal removal of the gallbladder in 2007 have stimulated much interest in the realm of general surgery, natural orifice transluminal endoscopic surgery (NOTES) has remained an investigational laboratory procedure in urology. Using a transgastric and transvaginal approach, Ponsky and colleagues (2008b) have removed a porcine kidney whereas Lima and colleagues (2007) have used a transgastric and transvesical approach to excise, but not remove, the porcine kidney. These latest developments are built on the original work by Gettman and associates in 2002 in which transvaginal nephrectomies were accomplished in the pig. However, to date, there have been no NOTES procedures in clinical urology (Lima et al, 2006; Isariyawongse et al, 2008). A commercially available trocar-mounted preperitoneal balloon dissector (PDB) (Covidien Ltd., Mansfield, MA) is commonly employed. The transparent, high-tensile strength silicone balloon is inflated with a sphygmomanometer bulb insufflator using room air (Fig. 9–11). The balloon has a maximum capacity of 800 mL (40 pumps of the inflating bulb). A primary advantage is that the balloon is affixed to the end of a stiff, hollow, transparent plastic shaft. The shaft allows precisely directed placement of the balloon dilator (see later). Furthermore, because the laparoscope can actually be inserted into the shaft of the balloon dilator during the inflation process it provides the capability for endoscopic confirmation of the proper positioning of the transparent balloon and of the adequacy of the controlled radial dilation of the extraperitoneal area. Balloon dilators are commercially available in two different shapes: a round balloon for dilation of the pelvic extraperitoneal space and a horizontally oriented, oblong-shaped balloon for dilation of the retroperitoneal space. (Courtesy of Covidien Ltd., Mansfield, MA.) Gaur’s original (1992) version of the balloon dilator was a size 7 surgeon’s glove mounted on a No. 8 red rubber catheter. The external end of the catheter was connected to a sphygmomanometer bulb insufflator, and the balloon was insufflated to 110 mm Hg. After this initial description, several other self-styled dilators were described: the middle finger of a size 7 to 8 glove, two fingers of a size 7 to 8 glove tied over each other for additional strength, a sterile condom, and the cot of an O’Connor-style drape mounted on a 16- or 18-Fr red rubber or whistle-tip catheter (Webb et al, 1993; Chiu et al, 1995). For the balloons made from the middle finger of a surgeon’s glove, the finger is affixed to the rubber catheter with two 0 silk sutures. These self-styled dilators were filled with saline rather than air. The device may be backloaded into a well-lubricated (i.e., K-Y jelly) 30-Fr Amplatz sheath to facilitate introduction through a laparoscopic port. Although it is economically advantageous, drawbacks of the self-styled balloon include the lack of a stiff shaft to manually direct the balloon into a specific location for precise dilation as well as the inability to endoscopically monitor the dilation process from within the balloon. An ex-vivo laboratory study demonstrated that increasing volumes of saline induced gradual pressure increments within the middle finger of a surgeon’s glove. At a volume of 1000 mL, the average pressure was 15 mm Hg. Pressures remained 15 mm Hg at 1500 mL and increased to 17 mm Hg at 2000 mL (McDougall et al, 1994). In practice there is no need to exceed the 1000-mL limit. Also, latex balloons have less tensile strength than silicone balloons, making them more likely to rupture. Regardless, with either balloon setup, on the few occasions that either type of balloon has ruptured there has been no obvious complication. However, the latex balloon has a tendency to rupture into multiple pieces whereas the Silastic balloon usually leaves only one large fragment, making retrieval an easier task. Complications associated with balloon dilation stem from improper balloon placement or balloon rupture. Intramuscular dilation may result in hernia formation, or inadvertent peritoneal disruptions may occur (Gaur, 1992; Adams et al, 1996). Creation of a working space within the retroperitoneum may be achieved exclusively with a combination of digital and laparoscopic instrument dissection (Kerbl et al, 1993). After access to the extraperitoneal area is gained, to-and-fro movements of the laparoscope are performed to create a working space (McKernan, 1995). This technique has been employed to perform various simple and advanced procedures in the retroperitoneum (Rassweiler et al, 1998a; Abbou et al, 1999). Although it is effective, potential disadvantages of this technique include frequent cleaning of the laparoscope and the lack of clear landmarks initially due to the smaller, undeveloped working space. This is the most commonly employed technique because it affords the greatest precision during development of the retroperitoneal space (Gill, 1998). Initial access is obtained through a 2.0- to 2.5-cm transverse incision in the midaxillary line, just below the tip of 12th rib. The wound is opened with a pair of S-retractors. Under direct vision, the posterior layer of the lumbodorsal fascia is incised and muscle fibers are split or divided. The retroperitoneal space is entered, under direct vision, by making a small incision in the anterior thoracolumbar fascia with an electrocautery blade or, less commonly, by bluntly piercing the fascia digitally or with a hemostat. Care should be taken that this fascial opening is snug around the index finger and no larger, so that intraoperative air leak is minimized. Index finger palpation of the belly of the psoas muscle posteriorly and the Gerota fascia–covered inferior pole of the kidney anteriorly confirms proper entry into the retroperitoneal space (Fig. 9–12A). The index finger is employed to digitally create a space in this precise location for placement of the balloon dilator; two inflations of the balloon are then done—one directed cephalad and the second directed caudad to fully dilate the retroperitoneal space (see Fig. 9–12B). Thus, balloon dilation is performed anterior to the psoas muscle and fascia and outside and posterior to the Gerota fascia. In cases involving definitive ureteric mobilization (e.g., retroperitoneoscopic donor nephrectomy, nephroureterectomy, ureterolithotomy, pyeloplasty), an additional balloon dilation may be performed more caudad to the primary site of dilation (Gill et al, 1995). Similarly, during a retroperitoneoscopic adrenalectomy, it is helpful after the initial balloon dilation to move the balloon up higher in the retroperitoneum and perform a second even more cephalic balloon dilation along the undersurface of the diaphragm (Sung and Gill, 2000). (Reprinted with permission, Cleveland Clinic Center for Medical Art & Photography © 1998-2011. All Rights Reserved.) A 1.5- to 2-cm curvilinear incision is made along the inferior umbilical crease. The anterior rectus sheath is incised vertically for 1.5 cm, and the rectus muscle is separated in the midline to expose the posterior rectus sheath. With the surgeon’s index finger positioned posterior to the rectus muscle and anterior to the posterior rectus sheath, gentle tunneling motions are made in a caudal direction until the area of the symphysis pubis is reached. At this distal location, the fascia transversalis is punctured with the fingertip and gentle side-to-side digital dissection is performed in the prevesical space, posterior to the pubic bone. Into this predeveloped space, a balloon dilator (see earlier) is inserted and distended to create an adequate working space. Balloon dilation effectively displaces the prevesical fat and reflects the peritoneum cephalad. The balloon is initially inflated in the midline and then re-inflated on either side to further expand the working area (Meraney and Gill, 2001).
Preoperative Patient Management
Patient Selection and Contraindications
Morbid Obesity
Extensive Prior Abdominal or Pelvic Surgery
Pelvic Fibrosis
Pregnancy
Hernia
Bowel Preparation
Preparation of Blood Products
In the Operating Room
Setup of the Operating Room
Patient Positioning and Draping
![]() ) or as optional add-on features that can be used with any table (see Fig. 9–1B on the Expert Consult website
) or as optional add-on features that can be used with any table (see Fig. 9–1B on the Expert Consult website![]() ).
).
Strategic Placement of Operative Team and Equipment
Standard Laparoscopic Carts
![]() ). If only one monitor is used (as in intrapelvic procedures), it is typically placed at the foot of the table or between the legs if the patient is in stirrups or on split-leg positioners. If two monitors are used, they are positioned on both sides of the table to allow an unobstructed view for all key operative team staff.
). If only one monitor is used (as in intrapelvic procedures), it is typically placed at the foot of the table or between the legs if the patient is in stirrups or on split-leg positioners. If two monitors are used, they are positioned on both sides of the table to allow an unobstructed view for all key operative team staff.
Integrated Endoscopy Systems
![]() ). Thus, the display monitors can be suspended over the patient and placed directly in front of the surgeon at any height or angle. This feature may reduce eye and body strain. Furthermore, the tower containing the light source, camera system, and insufflator can be placed in any area around the patient depending on the operation at hand. The more sophisticated systems are frequently controlled by a touch screen display used by the surgeon or a nurse, or by voice command, or by using the controls on the camera head instead of manually adjusting instruments at the tower level. In addition to the laparoscopic equipment, other aspects of the operating room environment can be controlled from the touch screen or by voice, such as the room lighting, input from digital radiology systems, and recording devices. Although they are not a necessity, these types of systems offer unique advantages with regard to operating room efficiency and may further improve the ergonomics for the operating surgeon and staff.
). Thus, the display monitors can be suspended over the patient and placed directly in front of the surgeon at any height or angle. This feature may reduce eye and body strain. Furthermore, the tower containing the light source, camera system, and insufflator can be placed in any area around the patient depending on the operation at hand. The more sophisticated systems are frequently controlled by a touch screen display used by the surgeon or a nurse, or by voice command, or by using the controls on the camera head instead of manually adjusting instruments at the tower level. In addition to the laparoscopic equipment, other aspects of the operating room environment can be controlled from the touch screen or by voice, such as the room lighting, input from digital radiology systems, and recording devices. Although they are not a necessity, these types of systems offer unique advantages with regard to operating room efficiency and may further improve the ergonomics for the operating surgeon and staff.
Robotic Systems
![]() ). Additional monitors (either standard or boom-mounted flat screen) can be linked with the robotic system and used for the assistant and support staff image viewing.
). Additional monitors (either standard or boom-mounted flat screen) can be linked with the robotic system and used for the assistant and support staff image viewing.
Placement of the Operative Team for Laparoscopic Procedures
Transperitoneal Procedures in the Upper Abdomen
Retroperitoneal Upper Abdominal Procedures
Transperitoneal and Extraperitoneal Pelvic Procedures
Robotic Surgery
![]() ). Following this the surgeon ungowns and takes his or her place at the surgeon’s console while the assistant remains on the side of the table opposite the robotic tower.
). Following this the surgeon ungowns and takes his or her place at the surgeon’s console while the assistant remains on the side of the table opposite the robotic tower.
Performing the Procedure
Before the Initial Incision
Achieving Transperitoneal Access
Pneumoperitoneum
Closed Technique: Veress Needle
Sites for Needle Passage
Open Access Techniques
![]() ). Once the cannula is positioned in the abdominal cavity, the balloon is inflated; the cannula is pulled upward until the balloon is snug on the underside of the abdominal wall. Next, the soft foam collar on the outside surface of the cannula is slid downward until it is snug on the skin and locked in place. This process creates an excellent seal, precluding gas leakage as well as subcutaneous emphysema.
). Once the cannula is positioned in the abdominal cavity, the balloon is inflated; the cannula is pulled upward until the balloon is snug on the underside of the abdominal wall. Next, the soft foam collar on the outside surface of the cannula is slid downward until it is snug on the skin and locked in place. This process creates an excellent seal, precluding gas leakage as well as subcutaneous emphysema.
Closed Technique
Blind Trocar Insertion
EndoTip Entry
Laparoendoscopic Single-Site Surgery (LESS) and Natural Orifice Transluminal Endoscopic Surgery (NOTES)
Instrumentation for Developing the Retroperitoneal Space
Balloon Dilation
Commercially Available Balloons
Self-Styled Dilators
Manual Dilation
Technique for Balloon Placement: Open (Hasson) Technique
Instrumentation for Developing the Extraperitoneal Space
Open (Hasson) Technique
![]()
Stay updated, free articles. Join our Telegram channel

Full access? Get Clinical Tree


Fundamentals of Laparoscopic and Robotic Urologic Surgery
Limitations and Advantages of Transperitoneal versus Extraperitoneal Approach to the Flank and Pelvis

