Fig. 19.1
Operating Room Setup Schematic: (1) GU imaging capable operating table with stirrups attached, (2) Anesthesia equipment, (3) IV pole with 4 hooks, (4) Fluoroscope, (5) Laser, (6) Endoscopy tower or boom, (7) Table with ureteroscopy and cystoscopy equipment, (8) Video screens
The anesthesia setup is at the head of the bed. Our operating rooms all have a standard anesthesia setup. The anesthesia machine is typically on the patient’s right side, with the left side of the machine near the head of the patient. There is a boom positioned just behind the anesthesia machine and all anesthesia power cords are plugged into the boom, as well as the power cord to the urology fluid warming device, which is positioned on a pole beside the anesthesia machine. There is a permanent cabinet on the wall behind the anesthesiologist, containing fluids, pumps, and special monitors. The anesthesia cart is to the right of the cabinet. There are IV poles at each side of the patient, at the level of the shoulders or as close to the anesthesia machine as possible. The Bair Hugger (Arizant Healthcare, Inc., Prairie, MN) warming device (an upper body Bair Hugger is used for ureteroscopy cases) is also at the right side of the patient near the head of the bed. There is room for a chair behind the drapes, but the anesthesiologist often stands to facilitate communication during critical periods of the case. The anesthesiologist can view at least one of the video monitors in order to be aware of the progress and challenges of the case. There is sufficient space on the left side of the patient to move a bed in and out of the room even with the C-arm fluoroscope in the room, although the endoscopic boom arm is moved into final position after the patient is asleep.
An endoscopic video cart or boom arm is positioned at the lower left of the table. The C-arm fluoroscope will enter often from the left side of the patient. An adjustable IV pole with 4 hooks and either a pressure bag or a pressure machine such as the Level 1® Rapid Infuser (SIMS Level 1®, Inc., Rockland, MA) should be at the upper right (Fig. 19.2). A laser setup (if used) is placed at the lower right. The laser fiber courses from the generator, over the patient’s draped lower right leg, where a non-penetrating towel clamp is used to create a “canal” through which the fiber passes. In doing so, the fiber is secured to the drape without actually clamping the fiber itself (Fig. 19.3). When not in use, the fiber can be coiled, and placed onto the patient’s right lower leg. A damp blue towel is placed on top of the coiled fiber to prevent the fiber from unraveling or falling to the floor. The laser generator is positioned near to the patient such that it is impossible to pass between the patient and the laser. In this way, we are able to avoid inadvertent internal avulsion of the laser into the ureteroscope by pulling of the fiber at this site.
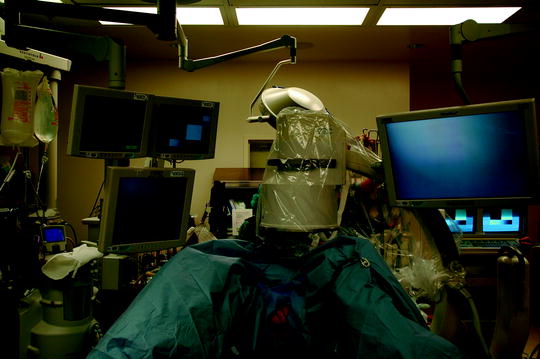
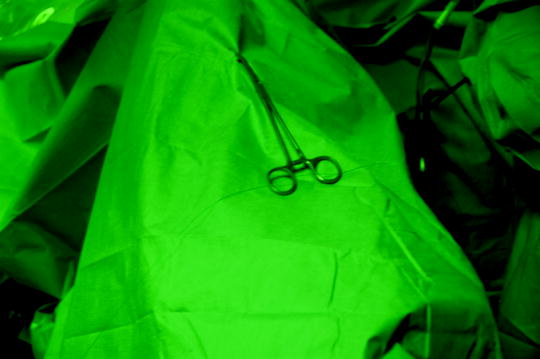
Fig. 19.2
Operating room setup. Video monitors are readily viewable and interchangeable, the C-arm is positioned from the lefts side of the patient, and the fluid and pressure bags are on the right
Fig. 19.3
The laser is positioned to the patient’s right near the foot of the bed and the fiber is secured to the drapes by passing it through a “canal” created with a non-penetrating clamp
Video screens must be positioned in clear view of the surgeon but not interfering with the fluoroscope (Figs. 19.2 and 19.4). Modern fluoroscope screens are generally of higher resolution than the typical flat screens utilized in minimally invasive suites. Occasionally when a higher resolution is necessary to complete a surgical task, we utilize the fluoroscope screen to provide an improved image. The use of booms or adjustable arms is suggested as they support the movement of a large number of energy generators, light sources, and camera hook-ups from one part of the room to another with relative ease. However, they are also a common source of “head bumping” by the operating room staff during the case, especially once the lights in the room are dimmed and the surgery is underway. The endoscopic suites are equipped with green lights. These lights are bright enough to provide adequate vision during the case, but the green color does not interfere with the surgeon’s ability to clearly see the various monitors (Fig. 19.4).
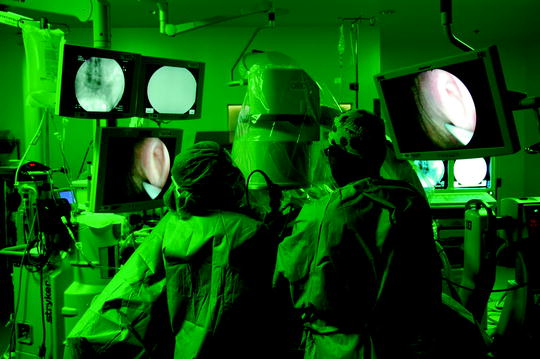
Fig. 19.4
The video screens are preferably ceiling hung so as to be easily adjustable. They are positioned in such a manner as to not interfere with the C-arm but are easily viewable by the surgeon and the surgical assistants
A back table setup at the foot of the bed should include the ureteroscopy and cystoscopy tray. The table should be large enough to support a large array of endoscopes and supporting accessories while remaining uncluttered and well organized (Fig. 19.5). A large back table will also prevent sterile items from inadvertently falling or otherwise becoming contaminated as well as damage to the more sensitive pieces of equipment such as the flexible ureteroscope and cystoscope (Fig. 19.6). X-ray gowns with thyroid shields must be available for all personnel (Fig. 19.7).

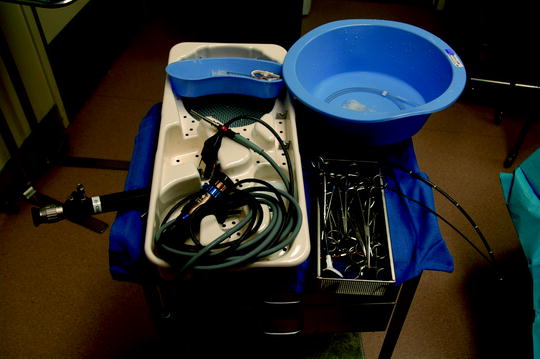
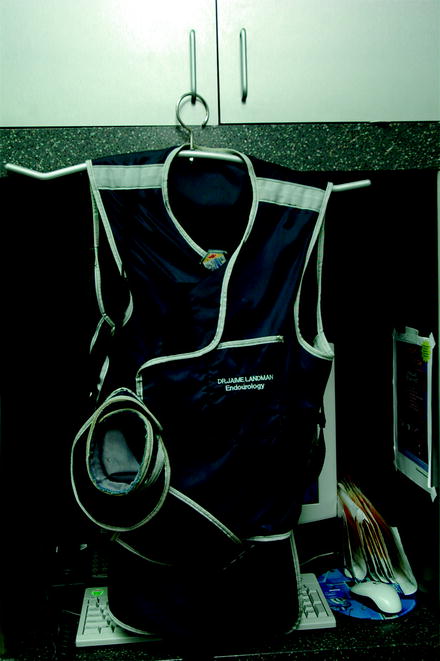
Fig. 19.5
A large, well-organized back table significantly improves efficiency and reduces the risk of inadvertent damage and contamination to the various pieces of equipment
Fig. 19.6
Too small a back table not only risks contamination of the equipment but also places the expensive endoscopes, cameras, and light cords at risk for damage
Fig. 19.7
Radiation protection, including thyroid shield should be made available for all staff in the surgical suite. Note that the equipment is stored on a hangar that is specifically designed to hold the lead apron. This is important as it reduces cracking and breaking which reduces the radiation blocking capability of the shield
Before beginning the procedure, a proper pre-check of the instruments should be performed. The lens and camera should be wiped dry, focused, and appropriately white balanced (for fiberoptic systems). It is our preference that the zoom be adjusted so that the “ring” around the image is no longer visible. Zooming beyond this point can exacerbate the “screen door” effect commonly seen with fiber-optic ureteroscopes. Similarly, zooming in less typically creates an image that is too small. Digital ureteroscopes are different in that they do not require white balancing and there is a single hook-up that provides the image and the light source. The proper function of the camera and adjunctive instruments (graspers, biopsy forceps, etc.) is essential. All instruments must be kept neatly arranged and readily available on the back table (Fig. 19.5).
The back table must be properly arranged with gowns and gloves for each surgeon, a ureteroscopy drape designed for stirrups with a collection bag for used irrigant, 12 foot suctioning tubing to be attached to the drape, Y-connecting tubing for irrigation, a camera with a cable and light cord, a sterile fluoroscopy drape, as well as gauze sponges, 2 towel clamps, 2 Kelly clamps, a Foley catheter, and a water based lubricant. A 16 Fr flexible and 22 Fr rigid cystoscope should be available, with an Albarran bridge and 2 gray nipples, and 2 Touey-Boursch or Sureseal adaptors. A large basin with sterile water (1 L) can be used to hold access wires and stents. A smaller basin should be arranged with 100 mL of a mix of 50% Hypaque (70 mL) with sterile water (30 mL), along with a 10 mL and a 20 mL syringe. Commonly used access wires can be opened, including (based on preference) a 0.035 hydrophilic Terumo glidewire, Bentson guidewire and an Amplatz Superstiff wire. Other commonly used equipment such as a 5 or 6 Fr ureteral catheter, a preferred coaxial dilator, an access sheath, ureteral balloon dilator, or dual lumen catheter should be in the room but remain unopened until just prior to use. The table should also include a semirigid ureteroscope or flexible ureteroscope of choice.
Prior to each case it is our practice to discuss with the operating room staff what equipment should be opened and placed on the back table and what equipment should be readily available in the room but unopened. The surgeon should be aware of the general cost of the equipment (capital and disposables) so as to minimize cost while optimizing outcome. While it is less expensive to having some equipment in the room but not “open,” there is also a cost of manpower associated with pulling the equipment and putting it away. Each surgeon should thoughtfully review their equipment needs and work with their OR staff to assure the patient care is optimized with the least amount of surgical waste possible.
Typically, the following pieces of equipment are routinely used in every case and should be opened and on the back table:
1.
Gowns and gloves for all members of the surgical team.
2.
Ureteroscopy drape with collection bag (i.e., Lingeman drape).
3.
12 ft suctioning tubing for drape.
4.
Y irrigation tubing.
5.
Light cable.
6.
Camera.
7.
Gauze sponges for white balance.
8.
Large basin with sterile water (1 L).
9.
Small basin containing 50% Hypaque (70 mL) + 30 mL sterile water (100 mL total).
10.
Guidewires (0.035 Terumo glidewire, Bentson Guidewire, Amplatz Superstiff wire).
11.
10 and 20 mL syringes for contrast injection in the small basin.
12.
5 or 6 Fr open ended ureteral catheter with adaptor.
13.
12 Fr Foley catheter.
14.
Two towel clamps.
15.
Two Kelly clamps.
16.
Surgilube.
17.
Ureteral access sheeth (size dependant on size and gender of patient).
18.
16 Fr Flexible cystoscope.
19.
Two gray nipples.
20.
Two Touey-Boursch or Sureseal adaptors.
21.
Semirigid or flexible ureteroscope (depending on case and surgeon preference).
22.
Surgical towels ×4.
23.
Sterile fluorscopy drape.
Equipment typically available in the room but not opened include:
1.
22 Fr Rigid cystoscope with 30° and 70° lenses.
2.
Albarrans bridge.
3.
Selection of ureteral stone baskets.
4.
Selection of laser fibers 200–1,000 μm.
5.
Ureteral balloon dilator.
The room itself should have the following basic pieces of equipment
1.
GU imaging ready table (spring board vs. lowering foot).
2.
Stirrups.
3.
X-ray gowns.
4.
Adjustable IV pole with 4 hooks and pressure bags.
5.
Endoscopic video cart or arm.
6.
Video camera.
7.
C-arm fluoroscope.
8.
Multiple 3 L bags warm saline.
9.
Anesthesia machine.
10.
Anesthesia cart.
11.
Appropriate irrigant fluids plus any medications specific to the procedure, including antibiotics, mannitol, lasix, IV blue contrast of choice, glucagon, etc.
12.
Laser.
13.
One table setup (Cysto and Ureteroscopy instruments).
X-Ray Setup
Radiography in ureteroscopy is critically important for instrument guidance, stone or tumor localization, and positioning of guidewires and catheters. The endourologist must be well acquainted with the X-ray equipment, basic principles of X-ray production, and radiation safety.
X-ray usage should comply with the “as low as reasonably achievable” (ALARA) approach. There are several key principles that can be implemented to help achieve this: decrease usage time, maximize user distance from the source, and provide adequate shielding. Usage of spot fluoroscopy instead of continuous imaging for smaller steps of the procedure can dramatically decrease radiation exposure. Increasing operator distance from the radiation source decreases X-ray exposure exponentially (doubling distance from the fluoroscope decreases X-ray exposure by one-fourth). As a rule of thumb, at 12 ft, away, X-ray exposure is immeasurable. Effective shielding with lead aprons and thyroid collars should be required of all staff (Fig. 19.7). Lead aprons should have an equivalent lead thickness of 0.5 mm to adequately attenuate the radiation. The lead aprons should be checked regularly for cracks or breaks in the radiation barrier. Additionally, every staff member exposed to ionizing radiation should be provided with badges that are closely monitored to reduce the risk of excessive exposure.
The image intensifier of a fluoroscope is lead lined to minimize scatter. The preferred configuration to minimize leakage and scatter radiation from both the X-ray and the patient is to place the image intensifier above the table.
Use of modern digital fluoroscopy equipment can aid in radiation reduction. Images can be manipulated and enhanced, obviating the need for retakes. Pulsed fluoroscopy simply means that the output of the X-ray machine is coupled with the video screen refresh rate (30 times per second), allowing for radiation reduction without compromising resolution. Reducing the pulse rate even further, to frame rates as low as four frames per second have been associated with a further reduction in radiation exposure with no effect on stone-free rates [11]. To help minimize the radiation exposure, be sure to alert all members of the team when the X-ray is active. X-ray badges should be required by the hospital or surgical facility for monthly dosimetry reports.
Choice of Irrigant
The choice of irrigant is dependent on the type of procedure to be performed [12]. For most stone and endopyelotomy procedures in which a laser or electrohydraulic lithotripter is to be used, normal saline (0.9% NaCl) is the preferred irrigant. For procedures in which monopolar current is used (resection of renal tumors, or fulguration of a renal cyst or calicyceal diverticulum) the irrigant must be changed to glycine or water. Use of saline with monopolar instruments will dissipate the current, rendering the instrument ineffective and creating the potential for thermal injury to surrounding structures.
Related posts:
 Informed Consent and Perioperative Antibiotics
Complex Anatomy: Horseshoe, Pelvic, and Malrotated Kidneys
Informed Consent and Perioperative Antibiotics
Complex Anatomy: Horseshoe, Pelvic, and Malrotated Kidneys
 Ferromagnetics in Ureteroscopy
 Flexible Ureteroscopes: Fiberoptic and Digital
 Semirigid Ureteroscopy: The Cleveland Clinic Approach
 Upper Tract Urothelial Carcinoma: Ureteroscopic Biopsy and Specimen Preparation
Stay updated, free articles. Join our Telegram channel

Full access? Get Clinical Tree


