, Min P. Kim2 , Puja Gaur2 and Shanda H. Blackmon1
(1)
Division of General Thoracic Surgery, Mayo Clinic, 200 First Street SW, Rochester, MN 55905, USA
(2)
Division of Thoracic Surgery, Department of Surgery, Weill Cornell Medical College, Houston Methodist Hospital, 6565 Fannin Street, Houston, TX 77030, USA
Keywords
Laparoscopic Dor fundoplicationLaparoscopic Toupet fundoplicationLaparoscopic hiatal hernia repairLaparoscopic Heller myotomyLaparoscopic esophagectomy (Ivor Lewis, McKeown)Open transhiatal esophagectomyLaparoscopic Fundoplication
Indication
Patients with gastroesophageal reflux disease (GERD) refractory to medical therapy are evaluated for surgical treatment of reflux. Patients typically undergo esophagram, esophagogastroduodenoscopy (EGD), pH probe study, and manometry. Patients with a diagnosis of GERD on the basis of these studies are recommended to undergo fundoplication. The degree of fundoplication is based on esophageal manometric studies. We recommend a partial, 270° posterior fundoplication (Dor or Toupet) for patients with poor esophageal motility and a full, 360° fundoplication (Nissen) for patients with normal esophageal motility.
Key Steps
1.
Closure of crus
2.
Nissen or Toupet fundoplication
Position
Supine position with a foot board to prevent migration on the operating table.
Port Placement
1.
Use 5-mm optical trocar (e.g., Ethicon XCEL® trocar or Covidien Versaport™ bladeless optical trocar) to place first port under the left costal margin lateral to the mid clavicular line (Fig. 7.1a). Insufflate the abdomen to a maximum pressure of 15 mmHg.
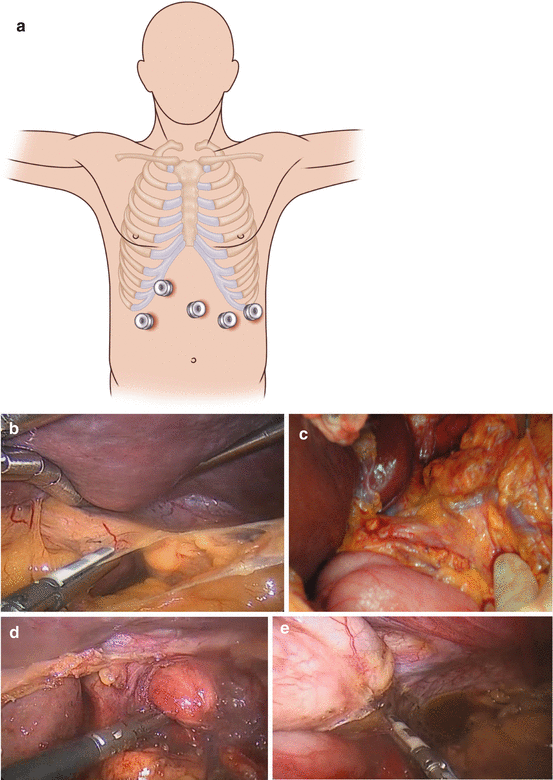
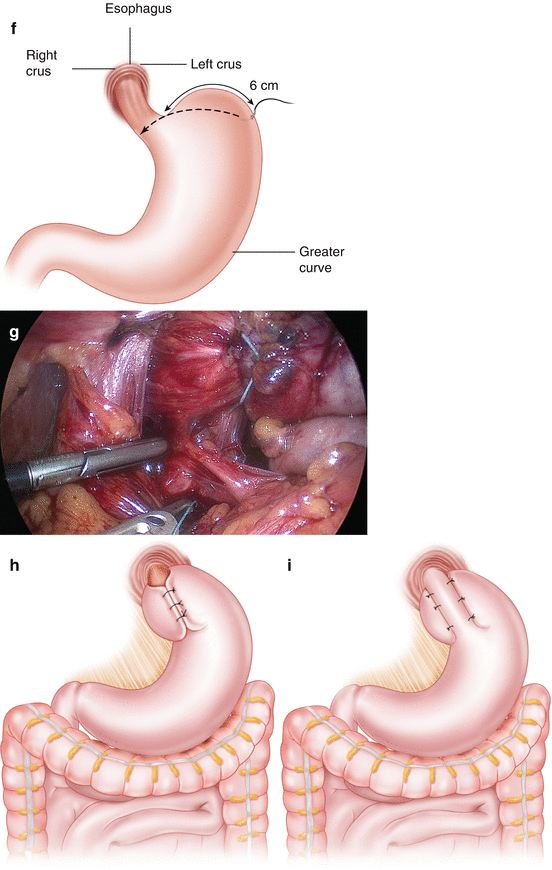
Fig. 7.1
(a) Port placement for laparoscopic fundoplication and for many foregut laparoscopic procedures. (b) Division of the gastrohepatic ligament. (c) The position of an aberrant left hepatic artery (replaced or accessory). (d) Dissection of the crura to allow mobilization of the gastroesophageal junction (GEJ). (e) Division of the short gastric arteries to allow mobilization of the fundus and dissection of the left crus. (f) A suture is placed 6 cm down the greater curve. This is used as a “passer” to allow passage of the wrap behind the GEJ (dotted line), using two graspers. (g) The shoeshine maneuver allows the wrap to be placed without tension. A tension-free wrap can be seen here, with the posterior vagus excluded from the wrap. (h) Nissen fundoplication. (i) Toupet fundoplication
2.
Place 12-mm trocar in the midline approximately 12 cm from the xiphoid process.
3.
Place a further two or three 5-mm trocars to facilitate dissection per the illustration (Fig. 7.1a). If a Nathanson liver retractor is used this is placed sub-xiphoid and the liver is retracted. Alternatively a 5-mm trocar placed laterally to the umbilicus on the right allows the use of a laparoscopic liver retractor to lift the left lobe of the liver
Left mid quadrant trocar: 8 cm left of the 12-mm port
Left upper quadrant trocar: 8 cm lateral to the left mid quadrant port
Right mid quadrant port: 8 cm away from the 12-mm port, at approximately a 30-degree angle towards the right costal margin
4.
The surgeon stands on the right side of the patient and uses the right mid quadrant 5-mm port and the 12-mm port. The assistant stands on the left side of the patient and uses the left upper and left mid quadrant ports. The camera is placed in the left mid quadrant port. (Alternatively, if the patient is in the dorsal lithotomy position, the surgeon stands between the patient’s legs.)
Operation
1.
Divide the gastrohepatic ligament (Fig. 7.1b). Evaluate the hepatic branch of the vagus nerve and any aberrant hepatic arterial anatomy (Fig. 7.1c). If an accessory left hepatic artery is identified, then perform a clamp test. If the clamp test causes ischemia of the left lobe of the liver (with or without laparoscopic ultrasound to quantify the flow), do not divide this vessel. If a replaced left hepatic artery is identified, do not divide this.
2.
Mobilize the gastroesophageal junction (GEJ) (Fig. 7.1d ). Divide the phrenoesophageal membrane, ensuring the preservation of the left anterior vagus nerve. Bluntly separate the esophagus from the right and left crus. Place a Penrose drain around the esophagus and secure the Penrose with a tie (e.g., Ethicon ENDOLOOP® or Covidien Surgitie™).
3.
Close the crura. Approximate the left and right crura using suture (e.g., Covidien Endo Stitch™), leaving only the esophagus coming through the hiatus.
4.
Divide the short gastric arteries. Use an energy device (e.g., Covidien LigaSure™ or Ethicon HARMONIC® scalpel) to divide the short gastric arteries and mobilize the fundus of the stomach (Fig. 7.1e).
5.
Wrap the fundus. Place a suture 6 cm down from the GEJ and 2 cm posterior to the greater curvature (Fig. 7.1f) Bring this suture posterior to the esophagus but anterior to the posterior vagus, to create a wrap (Fig. 7.1g). Perform the “shoeshine” technique to ensure proper placement of the fundus. The fundoplication can then be completed in two ways: Nissen or Toupet.
Nissen fundoplication (Fig. 7.1h)
(i)
Place a bougie (50 Fr) in the esophagus
(ii)
Wrap the fundus around the esophagus, using the technique described above.
(iii)
Stitch three interrupted stitches from the left side of the fundus to the right side of the fundus.
(iv)
Suture the right side of the fundus to the right crus; then suture the left side of the fundus to left crus.
Toupet fundoplication (Fig. 7.1i)
(i)
Suture three interrupted stitches from the right side of the fundus to the right side of the esophagus.
(ii)
Suture three interrupted stitches from the left side of the fundus to the left side of the esophagus, leaving a 90-degree gap.
(iii)
Suture the right side of the fundus to the right crus; then suture the left side of the fundus to the left crus (cruropexy).
6.
Perform EGD. Withdraw the bougie and perform endoscopy to ensure proper placement of the wrap. Endoscopy can also aid in identifying the location of the EGJ, to ensure that the wrap is around the esophagus, not the stomach.
Laparoscopic Hiatal Hernia Repair
Indication
Patients with large, symptomatic hiatal hernia may benefit from surgical repair. Patients typically undergo an esophagram to classify the type of hiatal hernia and to identify a shortened esophagus.
Key Steps
1.
Mobilization and resection of hiatal hernia sac
2.
Reduction of stomach
3.
Toupet fundoplication
Position
Supine position.
Operation
1.
Mobilize the hiatal hernia sac. The hernia sac is separated away from the mediastinum between the left and right crus (Fig. 7.2a). This dissection is carried out to separate the sac away from the mediastinum while keeping the peritoneum on the left and right crus and dividing the sac cephalad to the crus. The peritoneal covering provides the strength for the crural repair. This dissection allows for reduction of the stomach. Once the hernia sac is completely mobilized, resect the sac.
Fig. 7.2
(a) The hernia sac from the hiatal hernia is dissected free from the mediastinal structures, reduced from the thorax, and excised. (b) The crural repair is performed. The GEJ can be seen dissected free, and with a 3–4-cm length of intra-abdominal esophagus. The crural repair is performed with an endosuturing device (in this case, 0 Ethibond)
2.
Reduce the stomach. Reduce the stomach into the abdomen and place a Penrose drain around the esophagus at the GEJ.
3.
Close the crus (Fig. 7.2b). Place interrupted sutures to approximate the crus inferior to the esophagus. If there is tension, place a relaxing incision in the left diaphragm, place a Gore-Tex® mesh on the diaphragm, and close the crus primarily.
4.
Divide the short gastric arteries and perform Toupet fundoplication as previously described.
Robotic or Laparoscopic-Assisted Modified Heller Myotomy
Indication
Patients with achalasia diagnosed on manometry and esophagram can benefit from Heller myotomy. Techniques for the endoscopic management of achalasia (Botox injection, balloon dilation, and POEM) are outlined in Chap. 6.
Key Steps
1.
Mobilization of left anterior vagus nerve
2.
Esophageal myotomy
3.
Dor fundoplication (Alternative: Toupet fundoplication)
Position
Supine position with foot board.
Port Placement (see Fig. 7.1a)
1.
Use a 5-mm optical trocar (e.g., Ethicon XCEL® trocar or Covidien Versaport™ bladeless optical trocar) to place the first port under the left costal margin, lateral to the mid-clavicular line. Insufflate the abdomen.
2.
Place a 12-mm trocar in the midline approximately 15 cm from the xiphoid process (camera port for robot).
3.
Place three 8-mm robot metal trocars in the following locations:
Left mid quadrant trocar: 8 cm left of the 12-mm port on the left side
Left upper quadrant trocar: 8 cm lateral to the left mid quadrant port
Right mid quadrant port: 8 cm away from the 12-mm port, at approximately a 30-degree angle towards the right costal margin
4.
Place a 12-mm trocar in the right lower quadrant as the assistant port.
5.
Place a liver retractor through the 5-mm optical trocar and lift the left lobe of the liver.
6.
Place a grasper in the right mid quadrant port and a grasper in left upper quadrant port. Place an energy device in the left mid quadrant port.
Operation: Technique #1, Dor fundoplication
1.
Get Clinical Tree app for offline access

Mobilize the vagus nerve. Divide the gastrohepatic ligament and spare the hepatic branch of the vagus nerve. Divide the phrenoesophageal attachment, sparing the left vagus nerve. Dissect the esophagus away from the superior portion of the left and right crus only. Dissect the left vagus nerve away from the esophagus and place a vessel loop around it (Fig. 7.3a).
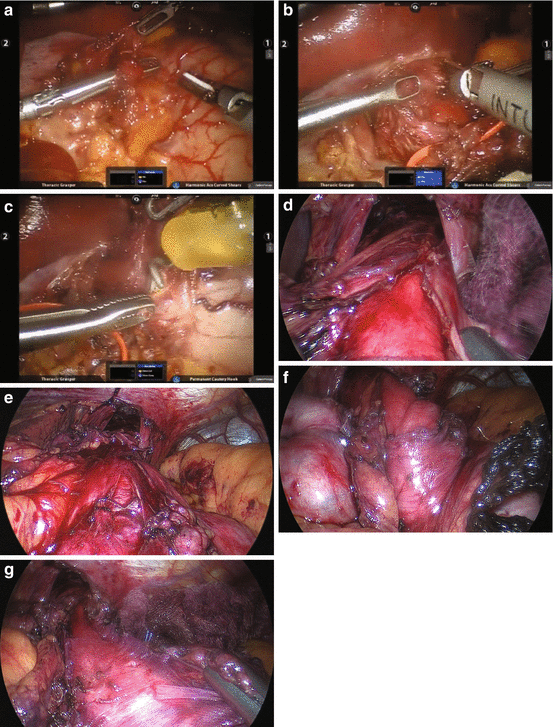
Fig. 7.3


(a) Mobilization of the left vagus nerve. The left vagus nerve is identified during the robotic dissection and can be seen here. It is subsequently slung to protect it during completion of the myotomy. (b) Performing a robotic myotomy. The esophageal muscle is divided using the harmonic scalpel, hot blade upwards for a robotic myotomy. We also use a hook without electrocautery as an alternative method for the myotomy. (c) The myotomy is extended down the stomach over a distance of 2–3 cm using hook dissection and electrocautery, used sparingly. (d) The complete myotomy can be seen here, with mucosa pouting out from the muscular layers of the esophagus. (e) The myotomy has begun and circular muscle is demonstrated proximally prior to division. (f) The myotomy continues; circular muscle is shown distally prior to division. (g) The “sling fibers” of the proximal stomach are shown prior to division
Related posts:


Stay updated, free articles. Join our Telegram channel
Full access? Get Clinical Tree