Fig. 17.1
Stoma in a patient with morbid obesity. Notice the large bulge around the stoma indicating the possible presence of a parastomal hernia
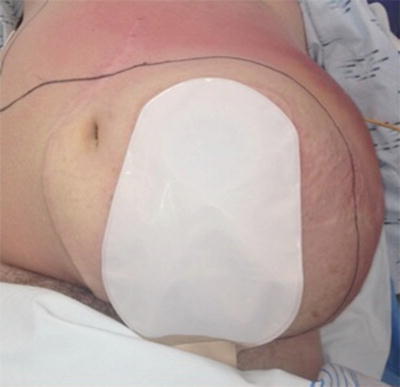
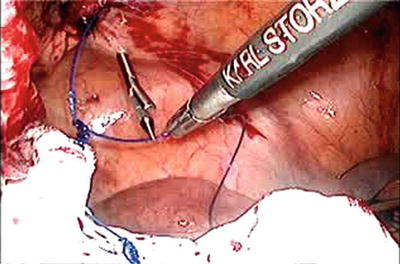
Fig. 17.2
Strangulated parastomal hernia with associated cellulitis
Preoperative Planning
As with most surgical procedures, patients offered PH repair should have an appropriate surgical indication and should be cleared as good operative candidates from a cardiopulmonary risk standpoint. Physical examination often reveals the presence of a hernia, and this may be better defined by asking the patient to Valsalva. It is important to note if the hernia is reducible. Cross-sectional imaging is often helpful in preoperative planning, especially in defining hernia anatomy, elucidating presence of hernia in patients whose exam is limited due to habitus, as well as accounting for the presence of other hernias in the vicinity of the PH that may impact the repair or size of mesh used (Fig. 17.3). In addition, patients should be up-to-date on their colonoscopic screening, as well as any cancer surveillance that might impact the operative plan. Controllable hernia risk factors should be emphasized when PH repair occurs in the elective setting to optimize success of the repair and decrease recurrence risk. These factors may include smoking cessation, weight loss, cessation of steroids (if possible), and control of medical factors that cause frequent Valsalva such as benign prostatic hyperplasia (BPH) and chronic cough or obstructive pulmonary disease. In preoperative holding, deep venous thrombosis chemoprophylaxis and broad-spectrum intravenous antibiotics to cover both skin and enteric flora within one hour of incision are given. A thorough discussion with the patient should occur regarding the operative plan and the risks of conversion to an open repair, need for relocation, or substitution of biologic for permanent mesh. A successful laparoscopic approach is dependent upon safe access to the peritoneal cavity, adhesiolysis, and reduction of the hernia contents. The presence of an associated incisional hernia also increases the risk of conversion or need for relocation.
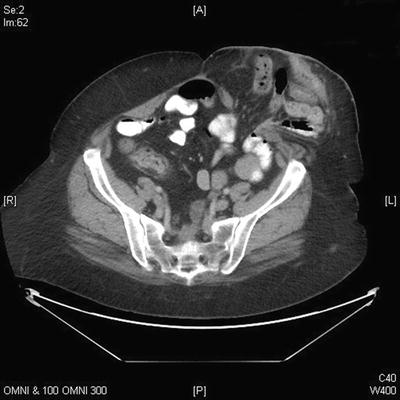
Fig. 17.3
CT demonstrating a large fascial defect with a moderate-sized parastomal hernia
Procedure
Setup
After induction and intubation, an orogastric tube and Foley catheter should be placed. The patient may be positioned at the discretion of the operating surgeon either in supine or in low lithotomy position. Generally, the arms should be tucked with pressure points padded, but this may not be necessary on all cases. The patient should be well secured to the operating room table to allow for intraoperative positioning changes such as Trendelenburg position that may be necessary during the procedure.
The operating surgeon stands on the contralateral side of the PH to allow maximal working room in the abdominal cavity. The assistant may stand either on the same or opposite side. Two monitors should be utilized—one directly across from the operating surgeon to allow for in-line tissue manipulation and visualization and a second for the assistant to view. The approach to PH repair is quite variable as stomas may be right or left sided and have associated incisional hernias. Principles described here are general guidelines, but the operating surgeon must be comfortable with some variation in monitor and port placement to allow for variation based on patient anatomy. All equipment for both a laparoscopic and open procedure should be in the room in the event that the procedure must be converted. The abdomen should be shaved and prepped and draped in the usual standard fashion. The stoma appliance should be removed and the stoma prepped into the field and then covered with gauze and an occlusive dressing to control effluent during the case (Fig. 17.4 a, b). This will help minimize the exposure of enteric contents and contamination to the mesh while it is being introduced into the abdomen.
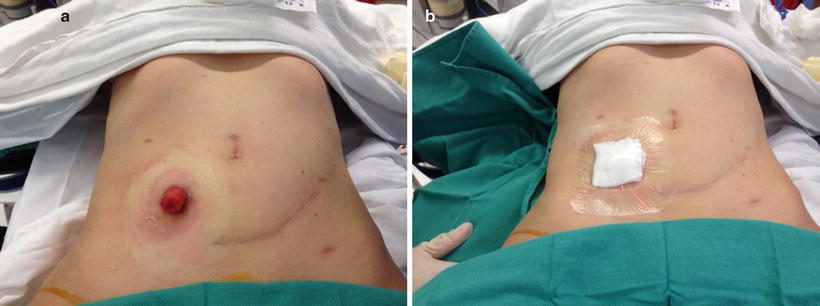
Fig. 17.4
Prepping and draping of the stoma. (a) The appliance is removed and the area around the stoma is cleaned. (b) The site is covered with a gauze and occlusive dressing. Courtesy of Joshua Bleier, MD, with permission
Procedure Steps
Insufflation and Port Placement
After the patient has been prepped and draped, and the laparoscopic equipment has been passed onto the field and situated, a time-out is completed, and intraperitoneal access is established. This is accomplished based on surgeon preference, typically with a 12 mm camera port placed first either with an open Hasson technique or after insufflation with a Veress needle usually placed in an abdominal quadrant deemed to have the fewest adhesions and is far enough away from the hernia to provide good visualization for dissection and mesh placement (Fig. 17.5). The abdomen should be insufflated to a pressure of 15 mmHg. The working ports are typically 5 mm in size, and generally 2–3 ports are required. Ports should be triangulated to the location of the hernia. A third port for the assistant is not always necessary, but can facilitate tissue retraction for the operating surgeon. This also helps if an extensive adhesiolysis is necessary prior to hernia reduction, and often some adhesions must be taken down to facilitate port placement. It must be kept in mind that the dissection of the hernia and its contents requires exposure of all 360° around the stoma and hernia.
Fig. 17.5
Port placement and patient positioning for laparoscopic parastomal hernia repair
Adhesiolysis and Hernia Reduction
Once adequate space has been cleared to facilitate port placement, attention is directed at completing an intra-abdominal survey for unexpected pathology, extent of adhesions, and the hernia and its contents. The hernia should be identified (Fig. 17.6) and reduced, taking care to protect the stoma. If adjacent small bowel or omentum is within the hernia, this can often be reduced with firm traction. However, first ensure that any adhesions to the stoma or the hernia sac are lysed, which may be accomplished sharply with laparoscopic scissors with or without monopolar cautery or an alternative energy device can be used. Care should be taken to identify the bowel proximal to the stoma as well as to avoid any enterotomies. Omentum and small bowel may often be adherent to the stoma limb and adhesions in this area may be dense, so sharp dissection without energy is preferred in this scenario. The hernia contents should be reduced completely, and the limb to the stoma should be mobilized as completely as possible. Once this is complete, all that should remain is the afferent limb to the stoma and the fascial defect (Fig. 17.7).
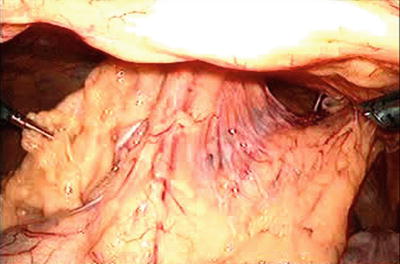
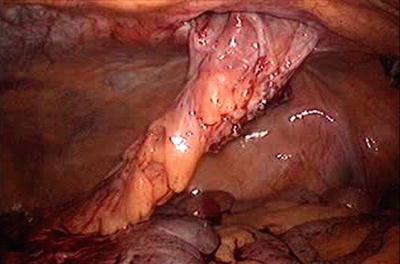
Fig. 17.6
Initial appearance of hernia following port placement
Fig. 17.7
Hernia appearance after reduction of hernia contents and adhesiolysis
Mesh Measurement and Preparation
At this point, the size of the hernia defect should be measured. This may be accomplished intracorporeally using a measuring device or with an open grasper as an estimate of size (an open grasper is typically 3–4 cm). Alternatively, a spinal needle can be passed transabdominally at the medial, lateral, cephalad, and caudad aspects of the defect and size measured in this fashion (Fig. 17.8). Once the defect has been measured, a piece of mesh should be selected to allow for 4–5 cm of overlap in all directions of the defect. If additional defects are present, the mesh must be enlarged to accommodate coverage of all defects. Any mesh shape may be used (round, oval, square, or rectangular), but it is crucial to ensure that the overlap is adequate. As long as no enterotomies have been made, synthetic mesh may be used. If synthetic mesh is used, it should have an anti-adhesion barrier on the dorsal side of the mesh that will be exposed to the abdominal contents. If an enterotomy is made, the risk of mesh infection is increased, and synthetic mesh should be avoided. In this case, a biologic mesh is an acceptable alternative.
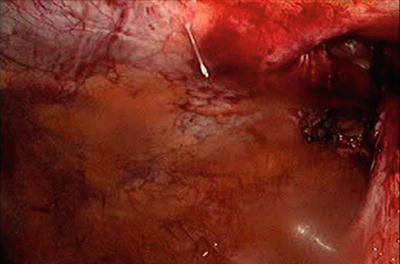
Fig. 17.8
Measurement of hernia defect with needle to determine mesh size
Once the mesh has been selected, it should be prepared according to the manufacturer’s package insert if it needs to be manipulated prior to use (i.e., saline hydration). Once ready for use, the mesh should be laid flat extracorporeally, and the transfascial sutures should be placed. For the Sugarbaker technique, transfascial sutures should be placed at the cephalad and caudad aspects of the lateral side of the mesh far enough apart to allow the stoma to exit the from the mesh, and then circumferentially from there approximately every 5 cm. Generally a nonabsorbable monofilament suture (1 Prolene) is used, and these should be tied in the mid-point of the suture to allow for long tails of equivalent length on each side. For a Sugarbaker repair typically six to eight transabdominal fixation sutures are used. On the lateral aspect of the mesh, the gap should be left large enough to allow the stoma limb to pass between the mesh and anterior abdominal wall without causing obstruction. Once all transfascial sutures have been placed, the sutures are laid in the middle of the mesh and the mesh is rolled like a cigar and inserted through the 12 mm camera port. It is often helpful to label the fixation sutures and mark the anterior surface of the mesh to help facilitate intraperitoneal orientation.
Mesh Securement
Sugarbaker Technique (Videos 17.1 and 17.2)
Once inserted, the mesh should be unrolled and oriented in its planned position. At this point, it is helpful to desufflate the abdomen to a pressure of around 10 mmHg to take tension off the abdominal wall and allow the mesh to lay as it will when the abdomen is completely desufflated. If the mesh is secured at full insufflation pressure, it will become undulated upon desufflation, often leading to mesh laxity and the appearance of a hernia recurrence over time. The lateral sutures are fixated first. Starting with the caudad-most suture to the stoma (Fig. 17.9), a suture-passing device (i.e., Carter-Thompson needle) is placed transabdominally through a small stab incision. One of the tails is passed intracorporeally into the suture device and it is extracted and secured with a clamp. This is repeated for the second tail of the suture, with care taken to pass the suture-passing device through the same skin stab wound but a separate fascial puncture site. This second tail is delivered and secured with a clamp but not tied. Attention should then be directed to the cephalad-most suture to the stoma on the lateral side of the mesh (Fig. 17.10), which should be secured next. By securing the cephalad and caudad sutures, this allows for proper mesh orientation, making the remainder of the sutures more easily positioned, and sets the gap where the stoma exits the mesh. It is of utmost importance that the transfascial sutures closest to the afferent limb of the stoma not be too close or tied so tight that it causes an obstruction of the stoma at the level of the mesh. If need be these sutures can be adjusted to give stoma adequate space between the mesh and abdominal wall (Fig. 17.11). This may be checked by ensuring a grasper can fit between the mesh and the stoma while maintaining tension on the transfascial sutures (Fig. 17.12). Once the cephalad and caudad sutures are placed, the remainder of sutures are secured starting farthest from the camera position and working circumferentially around the mesh leaving the sutures closest to the camera position for the end (Fig. 17.13). The mesh should be oriented so that the stoma deviates around the lateral side of the mesh and then back medially towards the stoma fascial defect in a Sugarbaker fashion. At any point if an undesirable suture position has been created, the sutures can be delivered back into the abdomen, and a separate position chosen by repeating the same procedure. It is important to note that none of the sutures are tied until all have been passed transabdominally. This allows for ensuring adequate coverage and tension on the mesh and avoidance of buckling or areas of poor coverage. Once all sutures are delivered, traction can be placed on each suture simultaneously to check for optimal mesh positioning as well as to ensure that neither the sutures nor mesh will cause a bowel obstruction. If the mesh is acceptably positioned, each suture can be tied at this point (Fig. 17.14). Once each suture has been tied, the remainder of the circumference of the mesh can be secured approximately every centimeter with a laparoscopic tacking device with care taken to avoid the afferent limb of the stoma. Either metal or absorbable tacks may be used based on surgeon preference. Some surgeons also prefer to tack in the middle portion of the mesh as long as care is taken to avoid both the stoma and the hernia defect.