Fig. 33.1
Longitudinal incision through the umbilicus after lifting its center with towel clips
Access remains controversial. Some surgeons place many trocars through different fascial incisions (while using a single skin incision). We believe the incident of umbilical hernia may be increased by making adjacent holes leaving thin strips of intact fascia in between (personal opinion without any supporting data). In addition, ergonomic challenge may increase with many trocars clashing in a small space (a problem that could be decreased by using low profile trocars). We prefer using a single multi-channel port through a single fascial opening. Many commercial products are available and discussed in different chapter; each has its advantages and disadvantages. We personally use the TriPort® (Olympus, Tokyo, Japan), which has three openings (one 12-mm, two 5-mm, and two small opening for insufflation and deflation of gas). Orientation of the port should be thought of carefully since improper orientation leads to instrument clashing and increased ergonomic difficulties.
Figure 33.2 shows the Triport® (Olympus) with the proper orientation with the camera placed through the inferior port. We keep the 12-mm port to the surgeon’s right hand and would use it to pass needles or larger suturing devices (if desired by the surgeon), while the other 5-mm is kept superiorly and to the patient right side and is used by the surgeon left hand for retraction and electrocautery (to clear the left crus and later make an opening over the right crus for tunneling).
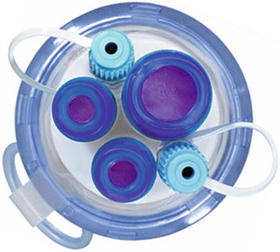
Fig. 33.2
TriPort (Olympus) in the proper orientation. Inferior 5-mm port is used for the flexible tip laparoscope, superior 12-mm port is used for grasper or passing a needle or 100 mm suturing device, the superior 5-mm port is for electrocautery or a grasper
33.3.3 Band Placement
It is important to remember to place the band prior to tunneling as the working port in the only access to the peritoneal cavity. We typically start the operation by lifting the liver and inspect the perigastric fat, we then decide size of the band. Two sizes are current available: AP standard and AP large; if in doubt, we place the larger size.
Once the band is chosen and prepared, we place it in the peritoneal cavity and try to leave it in the upper abdomen so it is easier to get later after placing the patient in reverse Trendelenburg.
33.3.4 Liver Retraction
This is probably the most controversial step. Some surgeons are able to perform this operation without a liver retractor. This helps decreasing the number of instruments passed through the umbilicus, or avoid making another incision (depending on type of retraction).
The majority of surgeons believe that proper retraction of the liver and excellent exposure of the hiatus is essential for proper placement of the band. We tend to follow this principle and feel strongly that this operation should not be done unless it is performed at the same standard as traditional laparoscopy.
The liver must be retracted well and the hiatus should be well exposed to rule out a hiatal hernia as missing one leads to adverse outcome.
Liver retraction could be achieved in three different ways:
Second epigastric incision and placement of a retractor (formal liver retractor or smaller instrument through a smaller incision). The advantage is avoiding an added instrument in the umbilical port (sparing the use of one channel and decreasing instrument jam). The disadvantage is leaving additional scar.
Retraction instrument placed through the umbilical port. This would avoid the added epigastric scar and make the operation truly “scarless”, but would occupy one of the channels and further limit the actual working space (increase ergonomic challenge).
Intra-corporeal methods. Using a virtual retractor to suspend the left lobe of the liver either by using hooks to the peritoneum or by placing sutures between the abdominal wall and the hiatus or crus to suspend the lateral left lobe. This method avoids the need for additional incision or additional instrument for retraction. However, placing these devices or sutures is often time consuming, has a significant learning curve, and often does not provide optimal exposure.
We went through many of these methods and always believed that the liver must be well retracted. Eventually, we decided to retract the liver using a small caliber trans-cutaneous instrument and we use the 2.3-mm wide MiniLap® Alligator (Stryker, Kalamazoo, MI, USA) with a sharp tip that can go through a stab without the need for a formal incision (Fig. 33.3). This provides a quick retraction and excellent hiatal exposure to see any subtle hiatal hernia (Fig. 33.4) without leaving a visible scar.
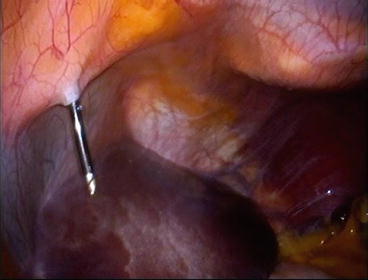
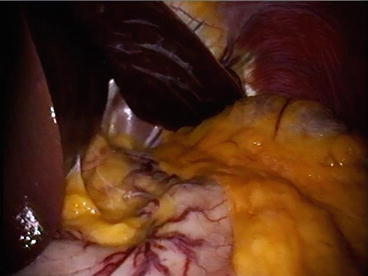
Fig. 33.3
2.3-mm rigid instrument to retract the liver. Shown is the sharp tip that allows passing it through a tiny stab at the skin to avoid visible scar
Fig. 33.4
Excellent exposure is paramount to detect small hiatal hernia and perform the operation well
33.3.5 Instruments
The rate-limiting step in evolution of single-site laparoscopic surgery (SSLS) remains the visualization and instrumentation. Adoption of RPLS has gone through two phases. The initial one was rapid adoption that came quick but also faded quick. The second phase was a slower, more careful adoption and this is where we are now. Surgeons initially jumped quickly on the idea of performing “scarless surgery” and many got into it without proper planning and without any modification in instruments or technique. These surgeons simply moved all their conventional “straight, rigid” instruments and scopes to have them all come through a small incision in the umbilicus. This led to the “Sword Fighting” phenomena, where parallel instruments clash in a very limited space that makes it impossible for them to manipulate or dissect tissues. These instruments also clashed against the laparoscope adding significant visual impairment. This caused surgeon frustration and jeopardized the safety of the operations causing most to abandon RPLS. The few who continued to have interest were those true innovators who felt the need for using different instruments while keeping the principles of traditional laparoscopy. Triangulation remains essential for exposure and good dissection and should be maintained. It just had to be moved from the abdominal wall to the peritoneal cavity. This necessitates the shift from using straight rigid instruments to reticulating, bent, or curved ones. For better visualization, a flexible tip laparoscope is highly preferred. This would allow instruments to come into the abdomen through a small opening (umbilicus), spread apart in the abdominal cavity, and then come back together towards the target to perform dissection.
Many available commercial products provide this concept. These are discussed elsewhere. Reticulating instruments are common, but often force surgeons to cross their hands adding additional ergonomic challenge.
We prefer to use curved instruments. These are rigid instruments with two curves: One extracorporial at the side of the handle (to separate surgeon’s hands and give them space to work), and the other intracorporial towards the tip (to allow space for the tips to be moved freely for tissues manipulation and dissection). The main advantage over reticulating instruments is preserving the orientation and avoiding the need for surgeons to cross their hands.
In the same logic of triangulation and preserving wide working space, we strongly feel the need for a flexible tip laparoscope. This allows the shaft of the scope to be directed away from the target (giving the surgeon space to work), while the flexible tip (the actual lens) is re-directed towards the target providing a steady and excellent focus on the area of interest without competing for working space (Figs. 33.5 and 33.6).
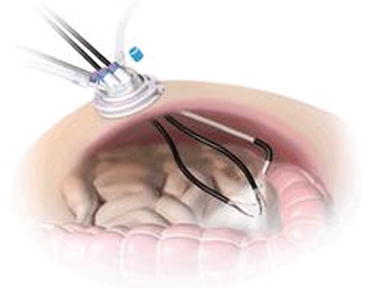
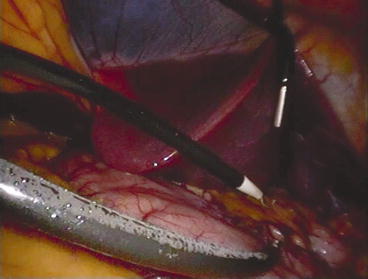
Fig. 33.5
Using a flexible tip laparoscope and curved instruments moves the triangulation to inside the abdomen and avoid instruments clash
Fig. 33.6
Moving the “triangulation” from the abdominal wall to the peritoneal cavity. Notice the scope shaft being away from the target, while its flexible tip is redirected to look down on the target. The curve of the instruments allows freedom of movement and avoids “Sword Fighting”
Figures 33.7 and 33.8 show the assistant holding the laparoscope against the right thigh leaving working space for surgeon’s hands. This allows the operating surgeon to move his hands comfortably and without ergonomic challenge.
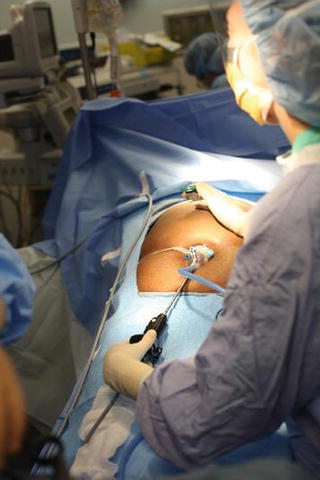
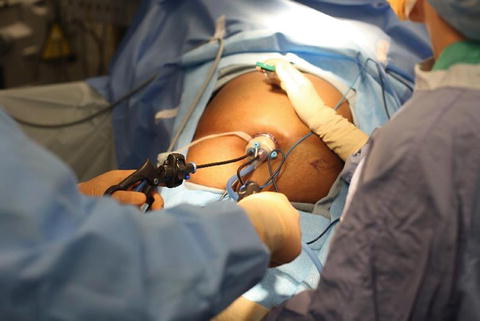
Fig. 33.7
Laparoscope is held against the right thigh by the assistant, who also holds the liver retractor
Fig. 33.8
Assistant’s hand and scope are away from surgeon’s hands. The curved handles separate the two operating hands giving freedom of movement and decreasing the ergonomic challenge
Figure 33.9 illustrates the ergonomics in a more complex sleeve gastrectomy case. It shows the surgeon standing on the right side while the assistant on the left side holding the camera (below and away from surgeon’s hands) and the small liver retractor. The laparoscope comes from below the instruments, and ends up (in the peritoneal cavity) above them with the tip articulated down to look at the operative field (as shown in the previous figure). Notice the surgeon’s hands are separated with comfortable distance from each other’s and from the laparoscope. Shown is a different port with four channels where a suction device can be added.
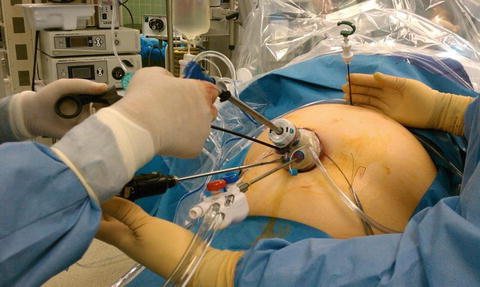
Fig. 33.9


Preserving working space while placing four instruments through a small incision (for sleeve gastrectomy in this case). The flexible tip of the camera and the curve of the instruments allow that separation
Related posts:


Stay updated, free articles. Join our Telegram channel
Full access? Get Clinical Tree
