Fig. 9.1
The ostomy triangle (With permission from Cataldo and MacKeigan [4]. Copyright © 2004 by Marcel Dekker Inc. All rights reserved)
Prevention of Parastomal Hernias
Key Concept: Although parastomal hernias are a relatively common complication, several technical maneuvers including mesh use, tunneling, and proper sizing of the trephine can help minimize this complication from developing.
In addition to stoma location, stomal trephine size is also important and, if done improperly, can lead to complications. Too small of an opening can cause stoma ischemia, while too large an opening can lead to parastomal hernia. The incidence of symptomatic parastomal hernia is as high as 39 % for colostomies and 6 % for loop ileostomies [5]. When identified by computed tomography, the incidence of parastomal hernia with a colostomy may be as high as 78 % [6]. Up to one-third of these patients eventually require surgical repair due to pain, incarceration, obstruction, and poor appliance fitting [6].
One technique for hernia prevention is to mature the stoma through the extraperitoneal route. This has been done during end sigmoid colostomy creation after laparoscopic abdominoperineal resection with promising results [7]. The stomas that were created through the transperitoneal route developed more parastomal hernias within a shorter period of time when compared to the extraperitoneal route. A large meta-analysis of 1,071 patients also showed that extraperitoneal colostomy is associated with a lower rate of postoperative parastomal hernia as compared to intraperitoneal colostomy [8]. Again, this is only applicable to patients undergoing permanent colostomy. For this technique, an incision is made in the parietal peritoneum immediately lateral to the transected end of the descending colon. A tunnel is then made that extends through the retroperitoneal tissues into the deep surface of the anterior abdominal wall. This tunnel is then connected to the stoma site on the anterior abdominal wall. Finally, the bowel is passed through the tunnel [9].
When hernias do occur, mesh is often required to close or repair the defect. In an attempt to reduce the rate of hernias, surgeons began placing mesh prophylactically. Several small studies have shown promising results with prophylactic mesh placement [6]. Two randomized trials using a lightweight polypropylene mesh found significantly more parastomal hernias in the no mesh group (53.7 %) when compared with the mesh group (14.8 %; P < 0.001) [6]. Additionally, the patients in the mesh group that did develop a hernia did not require surgical intervention as often. Mesh-related complications were rare. Most studies have looked at prosthetic mesh but biologic mesh has also been utilized prophylactically with similar results. However, the cost may be prohibitive [10]. The PREVENT trial, a multicenter randomized controlled study, is currently underway to determine if a retromuscular, preperitoneal monofilament polypropylene mesh at the stoma site can prevent parastomal hernias in patients receiving a permanent end colostomy without unacceptable complications [6].
The PREVENT trial uses a standardized technique for mesh placement [6]. First, the bowel intended for colostomy is stapled closed to minimize contamination. The trephine is created by excision of the skin oval at the preoperatively marked ostomy site without excising any subcutaneous tissue. After exposing the anterior rectus sheath, a cross-shaped incision is made in the fascia. The rectus abdominis muscle is split in the direction of the fibers. A retromuscular space is created and dissected to the lateral stomal border via the midline laparotomy. The posterior fascia/peritoneum is left undisturbed. Then a 10 × 10 cm piece of mesh, with a cross-shaped incision in the center to allow for passage of the colonic loop, is placed above the posterior rectus sheath. The lateral corners of the mesh are fixed with two absorbable monofilament sutures. The posterior fascia is opened over the trephine in the mesh, and the bowel gradually passed through. The running suture that closes the midline incision includes the medial border of the mesh and the peritoneum, thus preventing contact between the mesh and the viscera. Finally, the stoma is matured.
There are some opponents of prophylactic mesh placement, however, who say that it is too time-consuming and difficult to perform laparoscopically. One such group has proposed a stapled mesh stoma reinforcement technique, or SMART, to prevent parastomal hernias [11]. After excision of the skin and soft tissue cylinder, opening of the anterior rectus sheath, and splitting of the muscle, the posterior sheath/peritoneum is pierced with the tips of forceps used to grasp the anvil shaft of a circular stapling gun (28 mm) that was placed within the abdominal cavity. The anvil shaft is withdrawn through the posterior rectus sheath and exteriorized. The fully extended trocar of the gun, preloaded with a circular configured mesh 5 cm in diameter, is mated with the exteriorized anvil shaft. The gun is closed, fired, and removed, encompassing a disc of mesh, posterior rectus sheath, and peritoneum, leaving a precise reinforced stapled trephine. The outer mesh circumference is sutured to the anterior rectus sheath so it lines the trephine. The stoma is then fashioned in the usual way. If a prophylactic mesh is required, my preference is to use a square piece of mesh large enough to surround the stoma with a 2–3 cm ring of mesh in contact with the fascia. A cruciate incision is placed in the mesh. The mesh is placed deep to the anterior rectus sheath but superficial to the rectus muscle. The mesh is tacked to the anterior rectus fascia at the four corners. It is not sutured directly to the stoma. At this time there is conflicting evidence as to the benefit of prophylactic mesh in the prevention of parastomal hernias, and I do not use it universally.
End Ostomy Creation
Key Concept: Whether creating an end colostomy or ileostomy, the technique and principles are similar. The main difference will be how much the final stoma protrudes from the skin.
There are certain key aspects to creating an ideal end stoma. Among the principles:
1.
Create a circular skin incision approximately 2.5 cm in diameter at the previously marked site and excise the skin.
2.
Part the subcutaneous tissue with small retractors until the anterior rectus sheath is exposed. Do not excise this tissue.
3.
Make a vertical incision in the anterior rectus sheath approximately 3 cm in length. At the midpoint of the incision, make a perpendicular 1 cm incision laterally. This will keep the stoma opening away from the midline incision.
4.
Split the rectus abdominis muscle in the direction of its fibers.
5.
Create a vertical incision in the posterior rectus sheath.
6.
Deliver the previously divided bowel through the abdominal wall without twisting it. “Pushing” from within the abdominal cavity is preferred to “pulling” when exteriorizing the bowel.
7.
Again confirm that the bowel is viable and not twisted.
8.
For a colostomy, the colon should extend 2 cm above the skin surface. For an ileostomy, 5 cm of bowel should be pulled through. The matured colostomy should protrude 0.5–1 cm above the skin. The matured ileostomy should protrude 2–2.5 cm.
9.
Excise the staple line at end of the bowel cleanly with a #10 scalpel blade. Ileostomies must be everted. Eversion of a colostomy is optional and should ideally be dictated by the stomal therapist who will be working with the patient long term. The abdominal incision should be closed before this step. However, if there is concern that the stoma is under too much tension or has questionable viability, the abdomen can be closed after maturation of the stoma.
10.
Perform the enterocutaneous anastomosis with interrupted absorbable sutures that take full-thickness bites of the end of the colon and the subcuticular layer of the skin.
(a)
Colostomies may be matured flush or can be everted similar to ileostomies. For flush creation, full-thickness bites of the terminal end of the bowel are followed by corresponding dermal bites on the stoma trephine. Sutures through the skin may lead to “mucosal islands,” or small growths of mucosa, in the skin surrounding the stoma and therefore should be avoided.
(b)
Ileostomy eversion is created by placing “triplicate” sutures. First, the suture is placed through the dermis, followed by a seromuscular bite 4–5 cm from the proximal to the end of the ileum. The final bite is passed full thickness through the cut end of the bowel. Three everting sutures, away from the mesentery, will often even the stoma effectively. Gaps can be closed with standard sutures between the triplicate sutures.
Loop Ileostomy Creation
Key Concept: While loop ileostomies are ideal for a temporary diversion, some will become permanent; therefore, it is imperative that you construct as best of a stoma as possible.
When simple fecal diversion is required, a loop ileostomy will allow for easier reversal. However, it is important to remember that a significant number of diverting stomas become permanent. Therefore, creating a stoma that functions well and is easily reversible can be, and often is, the difference between reversal and life with a permanent ostomy. The purpose of a diverting stoma is to prevent fecal material from reaching a distal portion of the bowel, either because of fear of anastomotic leak or to treat a leak or injury. Diverting stomas do not decrease the incidence of anastomotic leak, per se, but instead decrease the related morbidity [12, 13]. When treating pelvic infection from a colonic source or when planning diversion of a low pelvic anastomosis, the two options are transverse loop colostomy and loop ileostomy. While it is important to be aware of both techniques, the loop ileostomy is clearly the superior procedure [14]:
1.
Identify an appropriate loop terminal ileum that will protrude easily at the stoma site. A segment at least 20 cm from the ileocecal junction will facilitate subsequent stoma reversal. Any closer to the cecum may make a stapled anastomosis at the time of reversal more difficult. It is also important to confirm and mark the distal bowel with a suture to ensure proper orientation.
2.
Make a circular skin incision that is slightly larger than that required for an end stoma at the previously marked site and excise the skin.
3.
Part the subcutaneous tissue with small retractors until the anterior rectus sheath is exposed. Do not excise this tissue.
4.
Make a vertical incision in the anterior rectus sheath approximately 2 cm in length. At the midpoint of the incision, make a perpendicular 1 cm incision laterally. This will keep the stoma opening away from the midline incision.
5.
Split the rectus abdominis muscle in the direction of its fibers.
6.
Make a vertical incision in the posterior rectus sheath.
7.
Deliver the bowel through the abdominal wall. This can be facilitated by placing a small Penrose drain through a defect created in the mesentery adjacent to the bowel wall. The Penrose can then be used as a handle to help deliver the bowel. If desired, the catheter can later be exchanged for the stoma bridge. Be careful in friable bowel, as a drain (or some prefer to use an umbilical tape) can inadvertently “saw” through the bowel with excessive tension.
8.
Again, the Alexis Wound Protector will facilitate passage of the bowel through the subcutaneous tissue, especially in obese individuals.
9.
Confirm that the bowel is viable and not twisted by using the previously placed suture in the distal segment (Fig. 9.2).
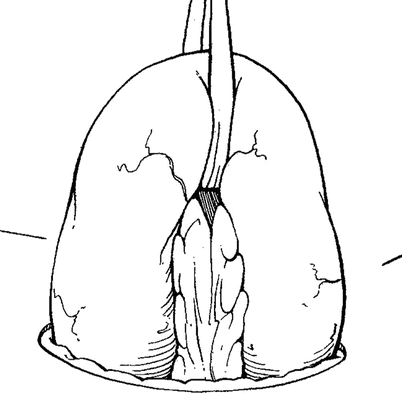
Fig. 9.2
Loop ileostomy creation. The ileum is elevated through stoma site with a Penrose drain. Care is taken to avoid twisting (With permission from Cataldo and MacKeigan [4]. Copyright © 2004 by Marcel Dekker Inc. All rights reserved)
10.
Transect 80 % of the circumference of the antimesenteric portion of the bowel wall just above where the distal end meets the skin between two Allis clamps (Fig. 9.3).
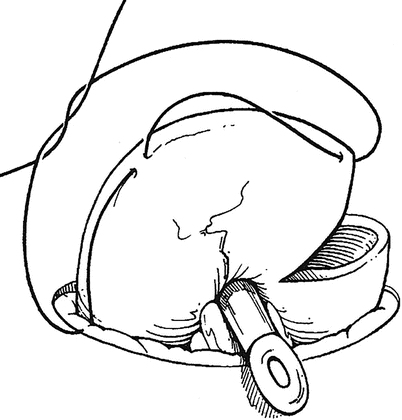
Fig. 9.3
Loop ileostomy creation. Eighty percent of the antimesenteric circumference is transected between Allis clamps (With permission from Cataldo and MacKeigan [4]. Copyright © 2004 by Marcel Dekker Inc. All rights reserved)
11.
Peel back the edges of the bowel to reveal the two openings. Exchange the catheter for the stoma bridge if desired. The proximal limb should still protrude approximately 2.5 cm, but the distal limb can site flush to the skin.
12.
Perform the anastomosis with interrupted absorbable sutures that take full-thickness bites of the end of the bowel and the subcuticular layer of the skin. Small bites are also taken of the seromuscular layer of the emerging colon at the level of the skin. It is best to mature the distal end without eversion using as little of the skin circumference as is practical. Evert the proximal end with standard three-part sutures on either side of the mesentery and the antimesenteric border (Fig. 9.4).
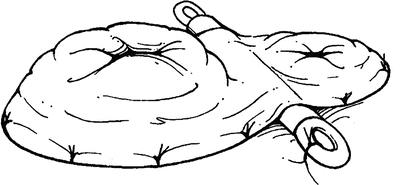
Fig. 9.4
Loop ileostomy creation. Proximal end of the ileum is everted with standard three-part sutures (With permission from Cataldo and MacKeigan [4]. Copyright © 2004 by Marcel Dekker Inc. All rights reserved)
13.
If using a bridge, remove it after 5 days. Of note, a bridge is rarely necessary.
End-Loop Stomas
Key Concept: By using an end-loop stoma that involves bringing the proximal and distal ends of the bowel out through the same trephine, you may be able to avoid a future laparotomy when restoring continuity at the appropriate time.
Related posts:


Stay updated, free articles. Join our Telegram channel

Full access? Get Clinical Tree


