eNOTES
Embryonic natural orifice transluminal endoscopic surgery
LESS
Laparoendoscopic single-site surgery
NOTUS
Natural orifice transumbilical surgery
OPUS
One-port umbilical surgery
SAS
Single-access site laparoscopic surgery
SILS
Single-incision laparoscopic surgery
SPA
Single-port access laparoscopic surgery
SPLS
Singe-port laparoscopic surgery
SSA
Single-site access laparoscopic surgery
SSL
Single-site laparoscopy
TUES
Transumbilical endoscopic surgery
TULA
Transumbilical laparoscopic assisted surgery
U-LESS
Transumbilical laparoendoscopic single-site surgery
11.2 Instrumentation
There are specialized articulating instruments available. This may be helpful in certain situations, although there is an additional learning curve to using those instruments. When learning a new technique, we suggest minimizing the number of learning curves as much as possible. Using the technique described below, the majority of cases can be performed using only conventional straight instrumentation available in all operating rooms.
11.3 Camera Options
Most experts agree that an articulating camera is preferred and can sometimes facilitate an efficient procedure (see Fig. 11.1b). However, bariatric length or longer 30° or 45° laparoscopes can also be successful using the techniques and principles described here. If a non-articulating laparoscope is used, we recommend that a 90° adaptor be used to minimize interference with the light cord (see Fig. 11.1a and inset).
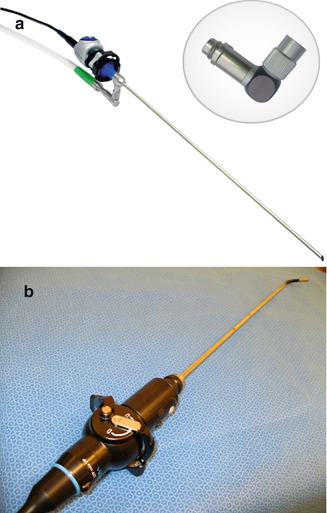
Fig. 11.1
Laparoscope options. (a) 30° or 45° laparoscopes work well for LESS. The longer and more angled the scope, the greater the minimization of external clashing. (a Inset), A 90° light cord adaptor will minimize interference with the light cord and other instruments. (b) An articulating scope provides excellent ability to position the camera away from other instruments (EndoEye [Olympus Surgical and Industrial America; Center Valley, PA, USA])
11.4 Technical Principles
1.
Plan the procedure and choose instrumentation and techniques that minimize the need for instrument exchanges.
2.
Always retract in such a way so that the handle of the instrument moves lateral, away from the camera and central area above the umbilicus. This prevents clashing of instruments externally.
3.
Use a good uterine manipulator with a colpotomizer or ring to delineate the vaginal fornix.
4.
If significant difficulty is encountered at any time during the procedure, an additional port can always be considered.
11.5 Ports and Gaining Access
Various access devices and techniques have been described for peritoneal access. The skin incision should be created to provide the most cosmetic result possible. The umbilicus itself is a scar, and each one has unique folds and shape. In some patients, a vertical skin incision may be preferred. In others, a circumferential or “omega” incision may produce a better cosmetic result [8]. General surgeons use this incision to provide additional space to manipulate multiple laparoscopic instruments while providing ample space for specimen removal and maintaining excellent cosmesis [9, 10]. Some have raised concerns regarding umbilical infections. A retrospective study of 120 patients did not find a difference in rate of infection when comparing vertical to circumferential umbilical incision for LESS [8]. As with all laparoscopy, we advocate thorough attention to the umbilicus during the surgical preparation prior to surgery. Overlimiting the size of the incision may place excess pressure on the incision edges that may result in pressure necrosis at the edges. Although this condition usually heals well, this should be considered when making the skin incision and choosing ports for each patient.
There are a number of commercially available ports designed to be placed through a single fascial incision (Fig. 11.2).
A.
The X-CONE (Storz Endoscopy, Tuttlingen, Germany) (three 5-mm valves).
B.
AnchorPort SIL Kit device (Surgiquest Inc., Orange, CT) (allows three or more 5-mm trocars through a 1-in. skin incision).
C.
SILS Port (Covidien, Norwalk, CT) (three 5-mm cannulas, one of which can be upsized to 15 mm).
D.
GelPoint (Applied Medical, Rancho Santa Margarita, CA) (includes four 5- to 12-mm universal cannulas. Additional instruments can be placed as needed).
E.
TriPort Plus (Advanced Surgical Concepts, Wicklow, Ireland) (three 5-mm and one 10-mm channel).
F.
TriPort 15 (Advanced Surgical Concepts, Wicklow, Ireland) (two 5-mm and one 15-mm channel).
The majority of commercially available ports have two attachments that can be used for insufflation, outflow, smoke evacuation, or an additional insufflation port as needed.
Ports that make use of a single open fascial incision maximize space for additional instruments. However, ports that have multiple channels or cannulas minimize instrument friction and unintended crossing at the level of the fascia at the expense of needing a slightly larger fascial incision.
When necessary, an additional port can be placed at an alternate location to facilitate the procedure. Conversion to two-port or multiport conventional laparoscopy should not be considered a complication.
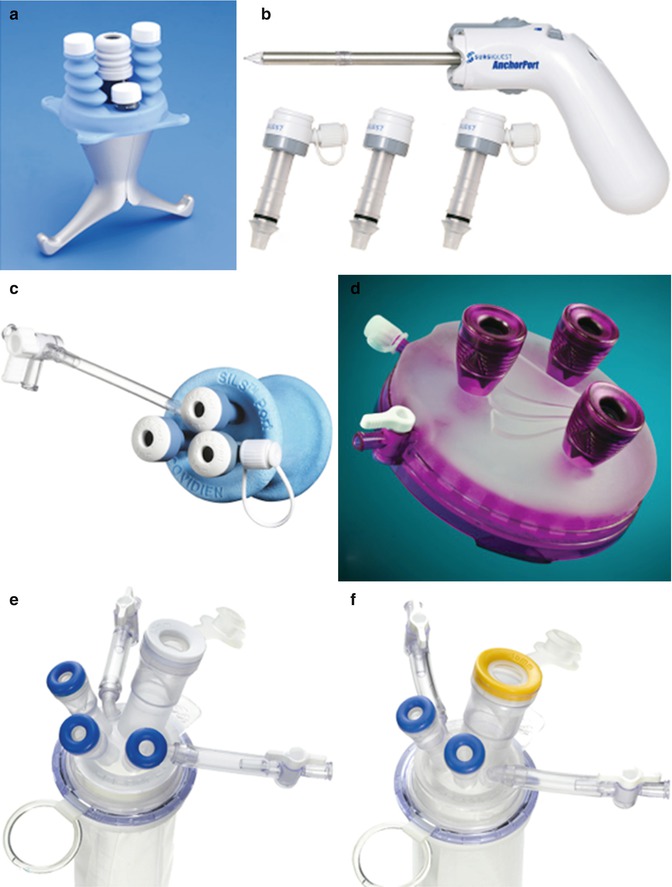
Fig. 11.2
(a) The X-CONE (Storz Endoscopy, Tuttlingen, Germany). (b) AnchorPort SIL Kit device (Surgiquest; Orange, CT, USA). (c) SILS Port (Covidien; Norwalk, CT, USA). (d) GelPoint (Applied Medical; Rancho Santa Margarita, CA, USA). (e) TriPort Plus (Advanced Surgical Concepts; Wicklow, Ireland). (f) TriPort 15 (Advanced Surgical Concepts; Wicklow, Ireland)
11.6 Technique
What follows is a step-by-step outline for an efficient procedure. The temptation is to skip steps or alter the order. We cannot stress enough the importance of completing the first step before moving on to the next. This will eliminate extraneous or duplicative movements. It also will ensure that instruments are positioned away from each other and avoid clashing, both internally and externally.
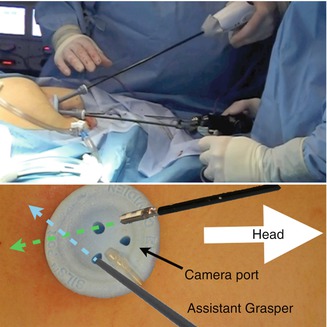
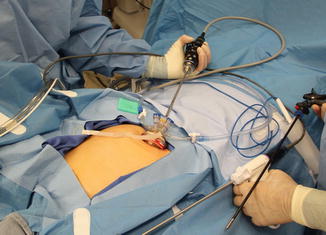
Fig. 11.3
Port orientation and camera placement. The port should be oriented so that the laparoscope may be placed through the most cephalad channel, valve, or cannula
Fig. 11.4
Camera placement. The camera should be placed first prior to any additional instruments. It should be positioned close to the chest and deviated laterally to maximize space for additional instruments
11.6.1 Step 1. Initial Port Placement and Orientation
The surgeon should choose the port based on the individual characteristics of the patient, the case, his or her preference and experience, and the advantages and disadvantages of the specific ports. The ports should be placed in accordance with the manufacturer’s instructions for use. Once securely placed in the peritoneal cavity, the port should be oriented as in Fig. 11.3. The channels or valves should be oriented so that the laparoscope can be placed through the most cephalad channel. The laparoscope should be positioned so that externally, the camera will be placed as close to the chest as possible. Then position the camera laterally as much as is practical (Fig. 11.4). This places the camera low and lateral, thereby maximizing space for other instruments and positioning the primary surgeon’s hands directly above the port. With the hands and camera close to the chest, the internal end of the laparoscope is elevated toward the anterior abdominal wall. With the hands and camera close to the chest, the internal end of the laparoscope is elevated toward the anterior abdominal wall out of the way of the additional instruments within the pelvis. The greater the angle of the scope (30-degree, 45-degree, or flexible), the easier it is to get the laparoscope and camera away from the operative field and avoid clashing.