6 Robot-Assisted Laparoscopic Colposacropexy and Cervicosacropexy
 Video Clips online
In recent years, there has been a growing recognition that adequate support of the vaginal apex is an essential component of a durable surgical repair for pelvic organ prolapse. (Summers et al, 2006; Maher et al, 2007) Sacrocolpopexy is considered the gold standard of surgical procedures for the repair of Level I pelvic support defects with excellent long-term results. (Sullivan, Longaker, Lee, 2001; Culligan et al, 2002) Vaginal reconstructive surgical options, such as uterosacral and sacrospinous ligament suspensions and vaginally placed mesh procedures, are alternative treatments but have different effectiveness levels and are associated with different complications. Although a small number of surgeons are able to accomplish sacrocolpopexies using standard laparoscopic techniques, the majority of these procedures are performed via laparotomy because of the challenges encountered with extensive suturing and knot tying. Small case series have demonstrated similar outcomes using a laparoscopic approach with the additional benefits of reduced pain, postoperative time for recovery, and length of hospital stay. (Nezhat, Nezhat, Nezhat, 1994; Ross, 1997; Cosson et al, 2002) With the introduction of the da Vinci robot, the feasibility of more surgeons performing this operation through minimally invasive techniques has greatly expanded. The steep learning curve that is inherent in mastering intracorporeal knot tying and suturing using standard laparoscopy is greatly diminished by the use of articulating instruments, making it an accessible option for all gynecologic surgeons treating women with pelvic organ prolapse. In this chapter, the steps involved in completing a robotic-assisted colposacropexy using a Y-shaped polypropylene mesh graft are described.
Surgical Technique
(Appropriate port placement and docking of the robot)
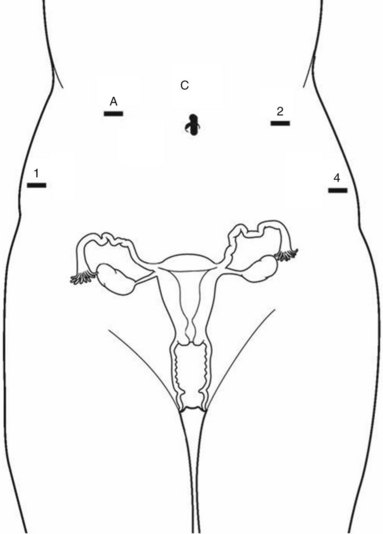
1. Pneumoperitoneum is obtained with a Veress needle technique, followed by the placement of five trocars (Figure 6-1). In a patient with prior abdominal surgery, we recommend entry in the left upper quadrant at Palmer’s point. Careful port placement is integral to the success of this procedure because of the following: (1) Inadequate distances between the robotic arms and the camera results in arm collisions and interference. (2) Easy visualization and access to the sacral promontory may be compromised if the camera is inserted too low on the anterior abdominal wall. (3) If the fourth arm is not at least 3 cm above the anterior superior iliac spine (ASIS), successful bowel retraction may be compromised. When evaluating the abdomen before trocar insertion, the authors of this text have determined that at least 15 cm is required between the pubic bone and the umbilicus to rely on this landmark for the 12-mm camera port. If this distance is shorter, as it is in many women who are obese, then insertion above the umbilicus is necessary. An accessory 12-mm port, which is used for the introduction of the sutures and the mesh graft, is placed approximately 10 cm lateral and 4 cm cephalad to the camera in the right upper quadrant. An 8-mm robotic port is placed in the right lower quadrant 10 cm lateral to the accessory port and approximately 3 cm above the ASIS. The third and fourth robotic arms are placed 10 cm apart in the left lower quadrant, with the fourth arm typically as far lateral as possible.
2. After placing the patient in a steep Trendelenburg position and locking the bed, the robot is docked from the patient’s left side at a 45-degree angle to the bed. Side-docking permits easy access to the vagina for the evaluation of graft tension and for the completion of the cystoscopy to ensure ureteral and bladder integrity. Care should be taken to ensure that the spine of the robot is positioned right next to the bed at the level of the patient’s hip; driving it up too high, relative to the abdomen, can compromise the mobility of the fourth arm. In addition, if the robot is not close enough to the bed, then the reach of the first (right) arm may be limited. Before starting the procedure, ensuring that the bowel is not obscuring the operative field is critical, and efforts to correct this position at the beginning of the procedure can minimize frustration.
3. Necessary instruments include monopolar scissors that are introduced through the right arm, a bipolar PK dissector through the left arm, and an atraumatic bowel grasper such as a Cadiere bowel retractor that is placed through the fourth arm. The bedside assistant stands on the right side of the patient with access to a long Maryland dissector and a suction and irrigation device.
Technique of the Sacrocolpopexy Procedure
1. With the use of a 0- or 30-degree down scope, the sigmoid colon is retracted laterally using the Cadiere forceps and the right ureter is identified. When first attempting this procedure, identifying the sacral promontory with the use of a standard laparoscopic instrument with haptic feedback may be helpful before docking the robot.
2. The peritoneum overlying the sacral promontory is elevated and opened using monopolar cautery. The fat pad overlying the anterior longitudinal ligament is exposed and gently dissected away (Figure 6-2). (See Video 6-1, “Dissection of the Sacral Promontory.”  ) The middle sacral artery is frequently visualized and can be coagulated using the PK dissector, if necessary.
3. A retroperitoneal tunnel is made from the sacral promontory to the level of the rectovaginal peritoneal reflection along the right paracolic gutter. (See Video 6-1, “Dissection of the Sacral Promontory.”  ) The creation of this tunnel allows the sacral arm of the mesh to lie flat and decreases the time at the end of the procedure to extraperitonealize the mesh. Care must be taken to keep this tunnel just beneath the peritoneum; bleeding can be encountered in the deeper fat plane.
4. With the vagina deviated anteriorly and the rectum posteriorly using the EEA sizers, the rectovaginal space is easily identified; and the peritoneal incision is extended transversely in a T shape to expose the posterior vaginal wall (Figure 6-3). (See Video 6-2, “Dissection of the Rectovaginal and Vesicovaginal Space.”  ) If indicated, the rectovaginal space can be dissected all the way down to the perineal body.
5. The vagina is then deviated posteriorly to facilitate the dissection of the bladder from the anterior vaginal wall using monopolar cautery. (See Video 6-2, “Dissection of the Rectovaginal and Vesicovaginal Space.”  ) If significant scarring is encountered between the bladder and vagina, then the bladder can be retrograde filled with 300 ml saline, mixed with methylene blue dye to help identify the surgical plane. Depending on the degree of anterior vaginal wall prolapse, approximately 6 to 8 cm of anterior vaginal wall is exposed. An attempt is made to leave the peritoneum intact at the apex of the vagina to reduce the chance of mesh erosion.
6. After measuring the respective lengths of the exposed anterior and posterior vaginal walls, a correctly sized Y-shaped polypropylene graft is created by suturing together two strips of Gynemesh that are approximately 3 cm in width. Significant variability in the relative dimensions of the anterior and posterior segments of mesh can exist, thus the recommendation to fashion the graft after completing the dissection. After assessing the differences in graft placement and manipulation by suturing the two arms together before or after intracorporeal placement, the opinion of the authors of this text is that the former method is far easier. IntePro (American Medical Systems, Minnetonka, Minnesota), Alyte (Bard Medical, Covington, Georgia), and Restorelle Y (Mpathy, Raynham, Massachusetts) are preformed type 1 polypropylene Y-mesh products that are available at a higher cost.
7. The mesh graft is introduced through the accessory port after exchanging the scissors and PK dissector for a suture cut and a large needle driver. The bladder is retracted using the fourth arm, and the anterior mesh arm is placed over the anterior vaginal wall and sutured in place using 2-0 Gore-Tex sutures on CT-2 needles that are each cut to 6 inches long. Anchoring the two distal corners first (Figure 6-4), (see Video 6-3, “Attachment of Anterior Mesh”  ) and then placing a series of interrupted stitches toward the vaginal apex is the most efficient sequence (Figure 6-5). Knots are tied using two surgeon’s knots, followed by two half hitches. An attempt is made to achieve healthy bites through the vaginal muscularis without perforating the epithelium.
8. After adequately securing the anterior mesh arm, the vagina is deviated anteriorly and the posterior mesh arm is draped over the posterior vaginal wall with the assistance of the fourth robotic arm, which can hold upward traction on the sacral end of the mesh graft. Starting at the vaginal apex, six to eight interrupted sutures are placed to secure the mesh to the posterior vaginal wall (Figure 6-6). (See Video 6-4, “Attachment of Posterior Mesh.”  ) If necessary, the 0-degree scope can be exchanged for a 30-degree up-scope to visualize fully the rectovaginal space.
9. The vaginal EEA sizer is retracted back to allow for the retrieval of the sacral arm of the mesh through the retroperitoneal tunnel. (See Video 6-5, “Attachment of Mesh to the Promontory.”  ) The vagina is then deviated toward the sacrum. To ensure that no excessive tension exists, the sacral portion of the mesh graft is sutured to the anterior longitudinal ligament at the promontory using two or three interrupted sutures (Figure 6-7). When placing the needle during this critical juncture, rotating through the ligament along the curvature of the needle is important, as opposed to driving the needle forward and potentially exiting further laterally than expected. Because of the slight traction that exists on the mesh, a slip-knot is preferred over a surgeon’s knot. Care is taken to visualize the middle sacral artery and either suture around it or cauterize it. If bleeding is encountered in this space, then a Ray-Tec sponge can be introduced through the accessory port for manual compression. If bleeding continues, then the use of Floseal is recommended for controlling hemostasis.
10. In an attempt to decrease the chance of postoperative bowel obstruction, the mesh is extraperitonealized using a 2-0 Vicryl suture cut to 8-10 inches. Accomplishing this task is easiest by starting at the vaginal apex with a suture similar to a purse-string stitch from the right anterior peritoneum to the right side of the cul-de-sac, coming over the mesh to pick up the left side of the incised peritoneum and then coming back through the left side of the bladder flap (Figure 6-8). After tying down the knot, the vaginal apex is covered. The smaller sacral peritoneal window is easily sutured over the mesh by continuing with a running stitch toward the sacral promontory. Suturing toward the camera and operative instruments, as opposed to away from them, is always easiest; this is especially true during this potentially challenging portion of the procedure.
Related posts:
 Preoperative Evaluation and Staging of Patients with Pelvic Organ Prolapse
 Surgical Management of Anterior Vaginal Wall Prolapse
 Surgical Correction of Posterior Pelvic Floor Defects
Stay updated, free articles. Join our Telegram channel

Full access? Get Clinical Tree


