■ Place the legs on Allen stirrup with the heels firmly planted on the stirrups to avoid pressure on the calves and the lateral peroneal nerves.
■ Keep the thighs parallel to the ground to avoid conflict between the thighs and the surgeon’s arms/instruments.
■ The coccyx should be readily palpable off the edge of the table. This will be critical for the perineal step of the operation.
■ The surgeon starts at the patient’s right lower side with the assistant to his or her left side.
■ Align the surgeon, the ports, the targets, and the monitors in straight lines. Place monitors in front of the surgeon and at eye level to prevent lower neck stress injuries.
■ Avoid unnecessary restrictions to potential team movement around the table. All energy device cables exit by the patient’s upper left side. All laparoscopic (gas, light cord, and camera) elements exit by the patient’s upper right side.
TECHNIQUES
PORT PLACEMENT AND OPERATIVE FIELD SETUP
■ Insert the GelPort through a 5- to 6-cm Pfannenstiel incision. This incision will be also used for specimen extraction. It provides a better cosmetic result and lowers the incidence of wound infections and hernias. It also allows for more working space between the hand and the instruments. (FIGS 1 and 2).

■ Ports: Insert a 5-mm working port in the right upper quadrant, a 12-mm working port in the right lower quadrant, and a 5-mm camera port above the umbilicus. These three ports are triangulated, with the camera port at the apex of the triangle. This setup avoids conflict between the instruments and the camera and prevents disorientation (avoids “working on a mirror”).
■ A 5-mm accessory working port may be inserted at the planned colostomy site in the left lower quadrant (LLQ). This port allows the surgeon to operate from the left side of the table (useful for the right-sided pelvic dissection, especially in males). It can also be valuable for the mobilization of the splenic flexure.
OPERATIVE STEPS
■ Our HALS APR operation is highly standardized and consists of eight steps:
■ Transection of the inferior mesenteric vein (IMV)
■ Transection of the inferior mesenteric artery (IMA)
■ Medial to lateral dissection of the descending mesocolon
■ Sigmoid colon mobilization off the pelvic inlet
■ Descending colon mobilization
■ Pelvic dissection
■ Transection of the levator ani muscles
■ Creation of colostomy and closure of abdominal wounds
Step 1. Transection of the Inferior Mesenteric Vein
■ This is the critical “point of entry” in this operation. We favor it over starting dissection at the IMA level due to the IMV’s constancy in location, the ease of its visualization by the ligament of Treitz, and the absence of structures that can be harmed around it (no iliac vessels or left ureter nearby). This will be the only time during the operation when a virgin tissue plane is entered. Every step will set up the following ones, opening the tissue planes sequentially.
■ The patient is placed on a steep Trendelenburg position with the left side up. Using the right hand, move the small bowel into the right upper quadrant and the transverse colon and omentum into the upper abdomen. If necessary, place a laparotomy pad to hold the bowel out of the field of view, especially in obese patients. This pad can also be used to dry up the field and to clean the scope tip intracorporeally. Make sure that the circulating nurse notes the laparotomy pad in the abdomen on the white board.
■ Identify the critical anatomy: IMV, ligament of Treitz, and left colic artery (FIG 3).
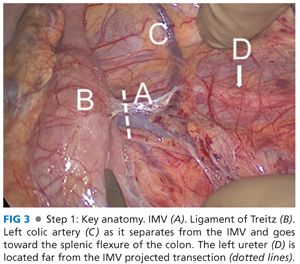
■ If there are attachments between the duodenum/root of mesentery and mesocolon, transect them with laparoscopic scissors. This will allow for adequate exposure of midline structures.
■ Pick up the IMV with the right hand. Dissect under the IMV and in front of Gerota’s fascia with endoscopic scissors, starting at the level of the ligament of Treitz and proceeding with the dissection caudally toward the IMA. The assistant provides upward countertraction with a grasper.
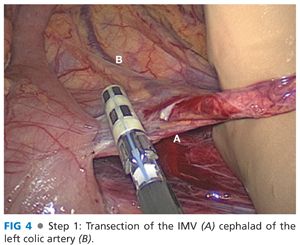
■ Transect the IMV cephalad of left colic artery (which moves away from the IMV and toward the splenic flexure of the colon) with the 5-mm energy device, thus preserving intact the left-sided marginal arterial arcade and maintaining the blood supply to the descending colon segment (FIG 4).
Step 2. Transection of the Inferior Mesenteric Artery
■ Identify the critical anatomy: the “letter T” formed between the IMA and its left colic and superior hemorrhoidal artery (SHA) terminal branches (FIG 5).
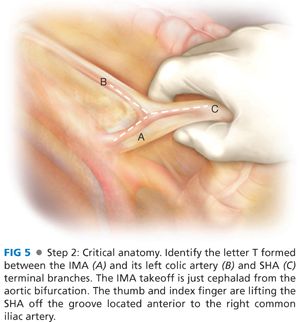
■ Holding the SHA up with the right hand, dissect the plane along the palpable groove between the SHA and the left iliac artery using laparoscopic scissors and a 5-mm energy device. Preserve the sympathetic nerve trunk intact in the retroperitoneum. Identify the left ureter in front of the left iliac artery and psoas muscle and medial to the gonadal vessels before transecting anything.
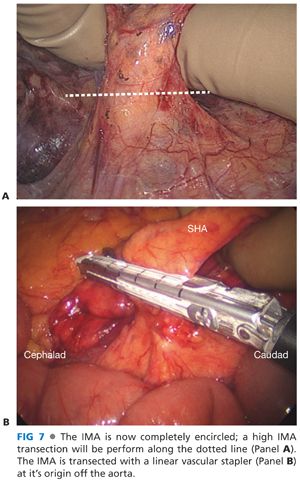
■ You can visualize the letter “T” formed between the IMA, the left colic artery, and the SHA (FIG 6). Dissect with your thumb and index finger around and behind the IMA and transect the IMA at its origin with a vascular load stapler or energy device (FIG 7A and B). This ensures excellent lymph node harvest and great exposure for step 3.

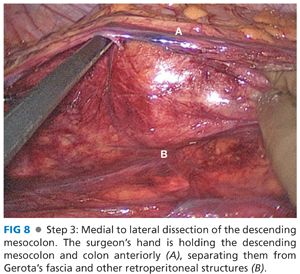
Step 3. Medial to Lateral Dissection of the Descending Mesocolon
■ The surgeon’s right hand and the assistant’s grasper hold the descending mesocolon up, creating a working space between the mesocolon and the retroperitoneum (FIG 8). The plane between the mesocolon and Gerota’s fascia, readily identified by the transition between the two fat planes, is dissected with the 5-mm energy device.
Related posts:
 End and Diverting Loop Ileostomies: Creation and Reversal
 Parastomal Hernia
 Surgical Management of Complicated Diverticulitis: Perforation and Colovesical Fistula
 Low Anterior Resection and Total Mesorectal Excision/Coloanal Anastomosis: Open Technique
 Low Anterior Resection: Hand-Assisted Laparoscopic Surgery Technique
 Total Abdominal Colectomy: Laparoscopic Technique
Stay updated, free articles. Join our Telegram channel

Full access? Get Clinical Tree


