Intraoperative Positioning
■ Supine or lithotomy position may be used based on the need for an adjunctive procedure for assessment of the colon, rectum, or perineum prior to ileostomy creation (e.g., colonoscopy).
Antibiotic Prophylaxis
■ Intravenous antibiotics must be given prior to the incision.
TECHNIQUES
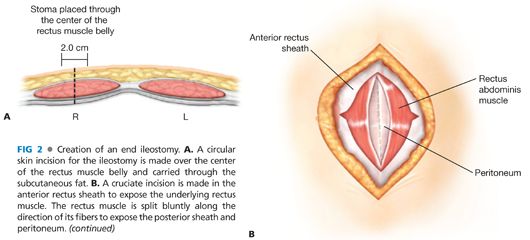
CREATION OF AN END ILEOSTOMY
■ Meticulous construction of an end ileostomy is paramount because the ileal contents are liquid, bilious, and voluminous. An everted, spout-shaped end ileostomy (Brooke ileostomy) is best suited to address these challenges.
Abdominal Wall Skin Incision for Exploratory Laparotomy and/or Bowel Resection
■ If an abdominal incision for bowel resection is necessary, a left paramedian skin incision can be made and angled toward the midline. The abdomen can then be entered through the linea alba. This approach maximizes the distance and amount of skin between the ileostomy and the skin incision.
Ileal Mobilization
■ The ileum is prepared by releasing the lateral attachments along the pelvic brim and by fully mobilizing the embryonic root of the terminal ileal mesentery to the level of the duodenum.
Stoma Site Skin Incision
■ Following the intestinal resection, the skin opening is created in the right lower quadrant at the premarked site. The skin is grasped with a Kocher clamp and a circular skin incision of 2 cm in diameter (FIG 2A) is made tangentially beneath the Kocher clamp with a no. 10 blade. The excised skin disc is removed.

Abdominal Wall Aperture Creation for the Stoma
■ Bovie electrocautery is used to perpendicularly divide the subcutaneous fat in the right paramedian plane at the ileostomy site. Handheld retractors can be gently used. The subcutaneous fat should be preserved as much as possible.
■ The anterior rectus sheath is identified and incised in a cruciate fashion for approximately 1 cm in both directions. (The horizontal limb should not be placed too close to the midline.)
■ Mayo clamps are used to split the rectus muscle bluntly in order to expose the posterior rectus sheath and peritoneum. The rectus muscle fibers are not divided (FIG 2B).
■ The surgeon places one hand into the abdominal cavity behind the marked stoma site to protect the abdominal contents.
■ The abdominal cavity is entered through the stoma incision with a thin-point clamp (e.g., Schnidt or tonsil clamp).
■ The defect in the posterior rectus sheath and peritoneum is widened to allow for passage of the ileum without compromising its mesenteric blood supply. The appropriate defect size is obtained by digitally dilating the stoma site with the tips of two digits to create an approximately 2-cm aperture (FIG 2C).
Ileal Limb Preparation and Placement
■ At least 6 cm of viable distal or terminal ileum with the adjacent marginal artery should be preserved to maintain an optimal blood supply. The mesentery should not be stripped (FIG 2D). The ileal limb preparation should be performed as early as possible during the course of the operation to allow for sufficient time to observe and assess the ileum’s vascularity. The mesentery must be handled gently to avoid hematomas and mesenteric vascular injury.
■ The ileum is gently advanced (pushed rather than pulled) through the split muscle and the abdominal wall to about 4 cm beyond the skin level (using a Babcock clamp to grasp the ileum only if necessary). If the ileum and adjacent tissues are too bulky to pass easily through the aperture, the epiploic fat can be excised.
■ To facilitate a future ileostomy reversal procedure, an adhesion barrier (e.g., Seprafilm®) can be used at the time of ileostomy creation. The adhesion barrier is wrapped around the ileal limb used for the ileostomy, extending along the intraabdominal ileal segment for approximately 5 cm.
■ The ileal mesentery may be secured to the peritoneum over a length of 3 to 4 cm if a permanent stoma is planned. (This step may prevent torsion, retraction, and prolapse of the ileum.)
■ Both edges of the rectal stump (or other potentially remaining distal bowel segment) are tagged with polypropylene suture to facilitate identification of the distal intestinal segment for potential ileostomy reversal.
■ To prevent wound contamination, the surgical abdominal incision is closed next and then covered with a protective wound dressing prior to maturing the stoma.
Stoma Maturation
■ The staple line is removed from the ileum.
■ 3-0 absorbable (e.g., Vicryl®) interrupted stitches are placed (but not immediately tied), with the stitches running through the following three points (FIG 2E):
■ end of the ileum (full-thickness)
■ skin-level base of the stoma (4 cm from the end of the ileum) (seromuscular layer)
■ Dermis (large bites of the subcuticular layer should be avoided to prevent “buttonholing” and mucosal islands).
■ One stitch is placed in each quadrant followed by one stitch between each quadrant stitch for a total of seven to eight stitches. Ensure that one stitch is on each side of, and adjacent to, the mesentery (but not through the mesentery).
■ To allow for more precise placement, each stitch should be individually tagged and tied only when all stitches have been placed. The subcutaneous and mesenteric fat can be tucked in as each suture is tied. The goal is to create a stoma with a spout that protrudes about 2 cm beyond the skin level when completed (FIG 2F).
■ The ileostomy appliance is placed over the stoma. Waterproof, nonallergenic tape can be used to further secure the edge of the appliance to the skin.
CREATION OF A LOOP ILEOSTOMY
Stoma Site Skin Incision and Abdominal Wall Aperture Creation
■ The skin incision for a loop ileostomy is similar to the incision for an end ileostomy, except that it can be made slightly longer and slightly oblong. In obese patients, some of the subcutaneous tissues may have to be excised down to the fascia in the shape of a cone (apex at skin level) so as to not constrict the afferent and efferent limbs of the loop ileostomy.
Ileal Limb Preparation and Placement
■ An ileal segment 20 to 30 cm proximal to the ileocecal valve is identified. The segment is selected so as to maximize mesenteric pedicle length and to avoid compromising the ileocecal valve. The segment’s mesentery and vasculature are preserved (FIG 3A).
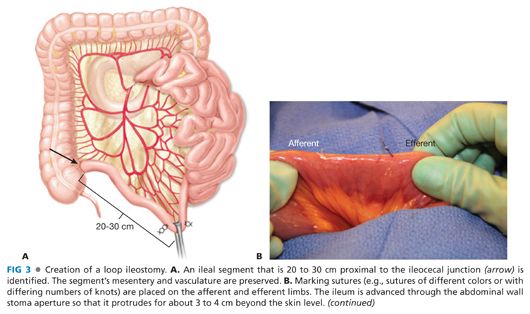
■ Two different orienting sutures are placed on the anti-mesenteric side of the ileum to mark the afferent and efferent side of the ileal segment (e.g., by using sutures of different colors, or sutures with one knot for the afferent segment and two knots for the efferent segment) (FIG 3B).
■ An umbilical tape is passed behind the ileum at the ileal-mesenteric interface. The ileal loop is advanced through the abdominal wall using the umbilical tape as a guide, taking care to maintain proper orientation and to avoid torsion.
■ The afferent (productive) limb of the loop ileostomy is placed inferiorly so that its spout will be located on the caudal aspect of the stoma. This requires a partial (about 90 degrees) twist for correct orientation. Alternatively, the afferent limb can be placed on the medial or superior side of the stoma site, depending on surgeon preference and amount of tension on the ileostomy.
■ Optionally, sutures may be placed between the ileal mesentery and peritoneum to maintain the appropriate rotation specially in obese patients.
■ The umbilical tape is removed and may optionally be replaced with a supporting rod or a 6-cm segment of red rubber catheter (which may be looped and sutured to itself above the loop ileostomy or secured to the skin).
■ To prevent contamination of the laparotomy incision, the surgical abdominal incision (midline or left paramedian) is closed next and a protective wound dressing is placed prior to stoma maturation.
Stoma Maturation
■ It is important to create an adequate spout on the afferent bowel limb.
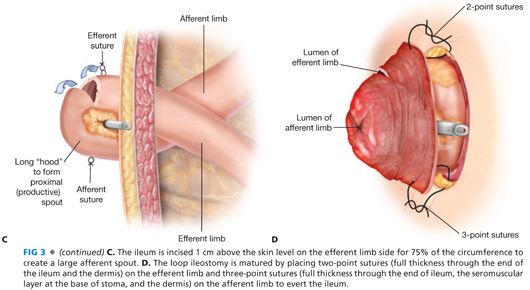
■ First, the efferent (distal) limb of the ileum is transversely incised 1 cm above the skin surface for approximately 75% of the circumference of the ileum to allow for appropriate stoma eversion (FIG 3C). This allows for a large “hood” and for the os on the afferent productive limb to be larger (encompassing 80% to 90% of the ileostomy) than the os of the efferent limb.
■ The stoma is created and matured with 3-0 absorbable suture (e.g., Vicryl®). First, the efferent stoma is sewn flush with the dermis by using a two-point suturing technique, with each stitch taking a full-thickness bite through the cut edge of ileum and then through the dermis. Next, the afferent stoma is matured with a three-point suturing technique as already described in principle for the end ileostomy (FIG 3D). The main difference with an end ileostomy is that for a loop ileostomy, the seromuscular stitches at the base of the afferent stoma are closer to the stoma’s os (about 3 to 4 cm) and the stoma spout may thus not protrude quite as much as with an end ileostomy. Also, sutures cannot be placed on the posterior bridge of ileum that joins the afferent and efferent limbs.
■ Optionally, as the sutures are tied, the spout can be formed over a supporting rod (or catheter), which is left in place for 3 to 5 days postoperatively.
■ The edge of the aperture in the ileostomy faceplate is placed beneath the rod or catheter.
CREATION OF A DIVIDED LOOP ILEOSTOMY
■ A divided (or separated) loop ileostomy is an alternative technique for creating a protecting loop ileostomy; it may result in a more complete fecal diversion.
Stoma Site Skin Incision and Abdominal Wall Aperture Creation
■ The skin incision and abdominal wall aperture are created as for a loop ileostomy.
Ileal Limb Preparation and Placement
■ The ileum is divided with a linear cutting stapler 20 to 30 cm proximal to the ileocecal valve. The mesentery and vasculature are only minimally divided (FIG 4A).
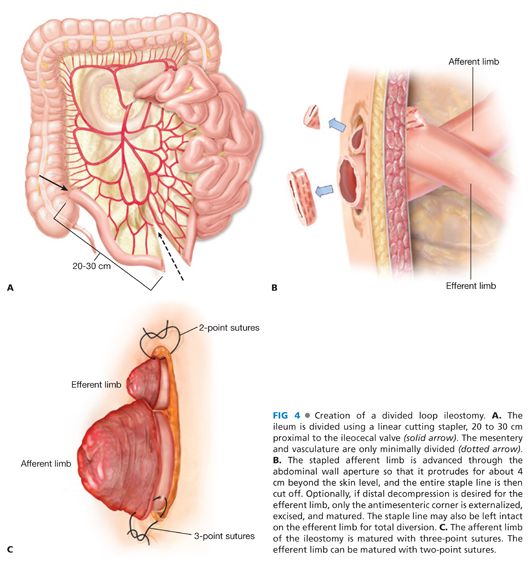
■ The stapled afferent limb is advanced through the abdominal wall aperture so that it protrudes 4 cm beyond the skin and the staple line is removed. Only the antimesenteric corner of the efferent limb is externalized, thus minimizing the need for division of the mesentery (FIG 4B).
Stoma Maturation
■ Afferent limb—The stoma is constructed in the same manner as described for an end ileostomy, using a three-stitch technique (FIG 4C).
■ Efferent limb—The antimesenteric corner is excised to decompress the distal bowel if desired. A two-stitch technique is then used, placing sutures that encompass the full-thickness edge of the ileum and the dermis. Alternatively, the efferent limb can remain stapled closed if complete fecal diversion is desired.
CREATION OF AN END-LOOP ILEOSTOMY
■ An end-loop (or loop-end) ileostomy is functionally not different from an end ileostomy, but the stoma maturation is akin to the technique for a loop ileostomy. An end-loop ileostomy allows for preservation of an adequate mesenteric blood supply when the mesentery would otherwise be too short for adequate advancement through the abdominal wall (e.g., in case of a shortened mesentery or a thickened abdominal wall). This technique is often used in obese patients and those with prior operations.
Stoma Site Skin Incision and Abdominal Wall Aperture Creation
■ The skin and stoma site are prepared as described for a loop ileostomy.
Ileal Limb Preparation and Placement
■ The mesentery and vasculature are divided to obtain as much length as possible (FIG 5A).
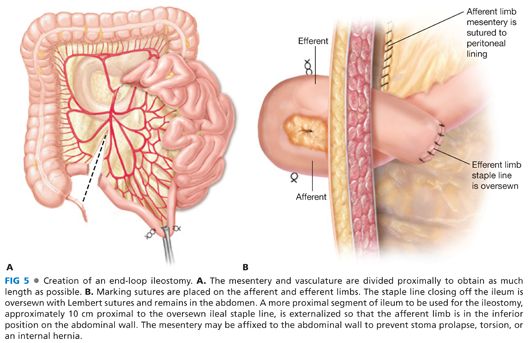
■
Related posts:


Stay updated, free articles. Join our Telegram channel

Full access? Get Clinical Tree


