Chapter 23 Techniques in Enteral Access
![]() Video related to this chapter’s topics: Jejunal Feeding Tube Placement Through an Existing Gastrostomy
Video related to this chapter’s topics: Jejunal Feeding Tube Placement Through an Existing Gastrostomy
Introduction
Using the gut and providing nutritional therapy by the enteral route play a pivotal role in patient outcome in the critical care setting. When there is failure to obtain enteral access and gut disuse ensues, the gut becomes a proinflammatory organ, increasing oxidative stress and the risk of complications.1 Early enteral access and use of the gut promote or support the mass of gut-associated lymphoid tissue and mucosal-associated lymphoid tissue at distant sites such as the liver, lungs, and kidney.2 This process contributes to an appropriate immune response, downregulation of inflammation, and a reduction in the rate of long-term complications. The sicker the patient, the greater the need to maintain gut integrity, and enteral nutrition support becomes a therapeutic tool or pharmacologic agent capable of changing outcome by reducing nosocomial infection, multiple organ failure, and hospital length of stay.3,4
The literature confirms that aggressive enteral tube feeding decreases the rate of complications compared with “standard therapy” (patients advance to oral diet on their own as tolerated) or total parenteral nutrition.5,6 However, obtaining enteral access early in the course of a critically ill patient may be difficult. Patients in this setting are at the height of the hypermetabolic response, often requiring high doses of narcotic analgesia and sedation; they are prone to ileus, gastroparesis, and high gastric residual volumes. Transporting these patients to the radiology suite for placement of feeding tubes is difficult because they are unstable. Transport leads to delays in getting tubes placed and has been shown to increase the risk of complications (e.g., aspiration, hemodynamic instability, and new cardiac dysrhythmias).7,8 Bedside techniques to place feeding tubes are essentially blinded, which carries some additive risk. Although bedside techniques may be sufficient in many patients in the critical care setting, the success rate for bedside placement decreases as disease severity increases, and there is greater need to place the tube lower in the gastrointestinal (GI) tract.
In long-term acute care and in the long-term management of patients recovering from stroke and neurologic injury, percutaneous endoscopic techniques provide a more reliable semipermanent enteral access, affording numerous options in a variety of patients. Getting a tube down below the stomach into the small bowel has been shown to reduce the incidence of regurgitation and aspiration.9,10 In a meta-analysis, small bowel feeding was shown to reduce significantly the incidence of aspiration pneumonia compared with gastric feeding.11 In patients with severe gastroparesis, percutaneous endoscopic techniques may provide a gastrostomy tube for decompression and a direct jejunostomy tube for continued enteral feeding. In patients with recurrent flares of chronic pancreatitis, placement of an endoscopic jejunostomy tube may provide therapeutic options that preserve nutritional status, decrease dependence on narcotic analgesia, and reduce the number of hospitalizations per year. In patients with dysphagia resulting from neurologic injury, percutaneous endoscopic feeding tubes are easily removable should the patient recover function and resume adequate volitional oral intake.
Endoscopic Nasoenteric Tubes
Over-the-Guidewire Technique
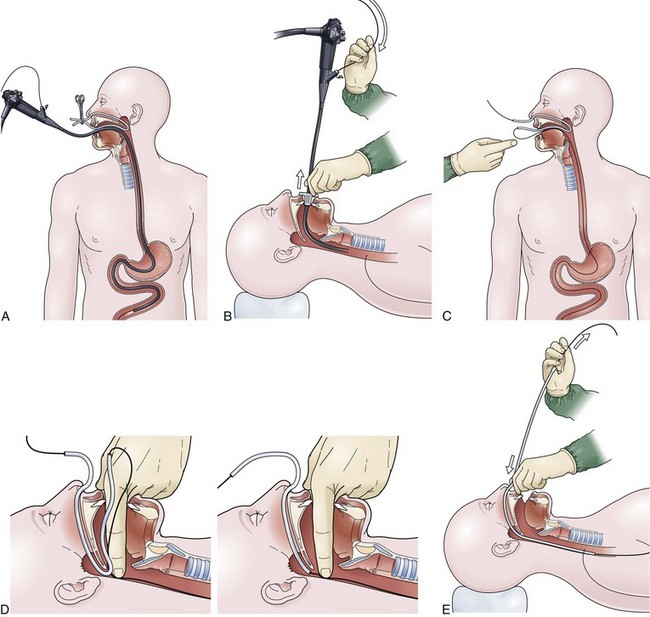
The over-the-guidewire technique may be more difficult technically than other ENET procedures because of the oronasal transfer and wire exchanges (removing the endoscope from the wire and placing the feeding tube over the wire). However, this technique is the one ENET procedure that most reliably places the feeding tube at or below the ligament of Treitz. Before performing endoscopy, the oronasal transfer tube is placed through one nostril, brought out the mouth, and clamped to the side using a hemostat. The pediatric colonoscope is passed through the mouth down the esophagus and stomach into the small bowel. As the endoscopist traverses the duodenum, it is important to pay attention to landmarks of the duodenal bulb and the C-loop. The long straight segment immediately after the duodenal C-loop is the distal duodenum leading up to the ligament of Treitz. The ligament of Treitz is the first turn after this long segment. Paying attention to these landmarks helps assure the endoscopist of the location of the tip of the endoscope within the GI tract. Passing the endoscope one to two loops below the ligament of Treitz helps to anchor the tip of the wire ultimately during subsequent wire exchanges (Fig. 23.1A). Once the endoscope has been passed as deep as possible, the wire is extended out from the end of the endoscope until it meets gentle resistance.
The first wire exchange involves removing the endoscope off of the wire without displacing the tip. The key point to this aspect of the procedure is that the endoscopist places one hand on the endoscope as he or she removes it from the mouth and the other hand on the wire as it is passing into the operating channel of the endoscope at the other end (Fig. 23.1B). An assistant may support the weight of the scope, keeping it from bowing in the middle during the wire exchange. The point at which the colonoscope has been withdrawn off the wire, the tip of the wire is protruding from the patient’s mouth. If done incorrectly, the oronasal transfer of the wire causes a loop to form in the mouth or displacement of the tip of the wire from the small bowel back into the stomach or both. The tip of the wire is placed through the oronasal transfer tube, passing the excess wire out of the end of the transfer tube protruding from the nose (Fig. 23.1C).
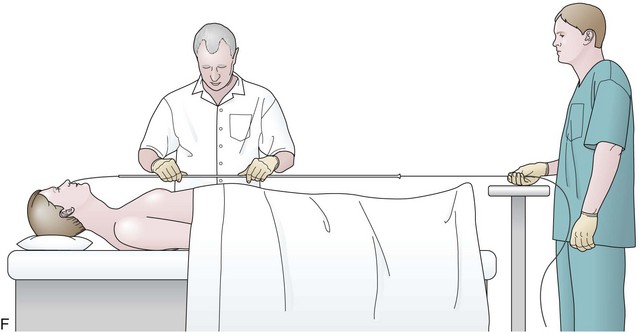
Before the final loop protruding from the mouth is withdrawn or eliminated, the index finger is passed through the mouth, pinning the wire against the posterior wall of the oropharynx (Fig. 23.1D). While firmly holding the wire against the posterior pharyngeal wall, traction is placed on the end of the wire protruding from the nose, completely eliminating the loop protruding through the mouth (see Fig. 23.1D). With the wire now protruding from the nose, the second and final wire exchange is made. This latter wire exchange may be accomplished using one of two different techniques. One technique involves carefully passing the feeding tube over the wire in a manner similar to the first wire exchange (Fig. 23.1E). The endoscopist is careful to place one hand at the nose as he or she inserts the tube, with the other hand at the opposite end of the feeding tube where the wire is being withdrawn. The rate of the tube passing down into the nose should match exactly centimeter for centimeter the rate of the wire being withdrawn at the other end, to avoid deflecting the tip of the wire (see Fig. 23.1E). An alternative technique for this second wire exchange involves pinning the end of the wire to a bed rail or bedside table to establish a “point in space” (Fig. 23.1F). Assistants help keep the wire straight and level while the endoscopist slides the feeding tube over the fixed wire into final position.
Drag and Pull Technique
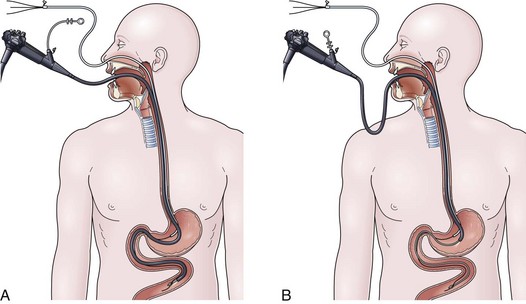
The drag and pull technique is facilitated by placing one or two extra guidewires (for a total of two or three) through the nasoenteric tube before placement. Two to 3 cm of the soft tip of one wire should protrude out through the distal end of the tube. This assembly is passed down through the nose into the stomach, followed by passage of the endoscope alongside the tube down through the mouth into the stomach. Once in the stomach, a long biopsy forceps is used to grab the soft tip of the wire protruding from the feeding tube. The endoscope holding the wire is passed into the small bowel, it is hoped down to or beyond the ligament of Treitz (Fig. 23.2A). From the point of deepest insertion, the endoscope is slowly withdrawn back toward the stomach as the biopsy forceps holding the wire is advanced holding the tip of the wire in place in the small bowel. Once the endoscope is positioned back into the stomach, the feeding tube is advanced over the wire down to its tip, which is still being held by the biopsy forceps (Fig. 23.2B). Only at this point are the biopsy forceps opened, and the wire is released. The biopsy forceps are withdrawn back into the endoscope, and the endoscope is slowly withdrawn back out through the esophagus and mouth. The keys to success for this procedure are a pair of biopsy forceps that are long enough (≥240 cm) and the stiffening of the feeding tube with extra guidewires (which facilitates removal of the endoscope without displacing the tube back into the stomach) (see Fig. 23.2B).
Transnasal Technique
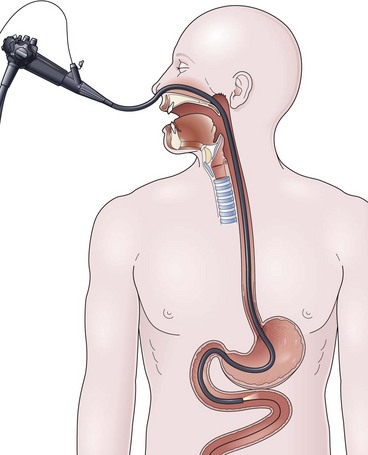
Availability of a small-caliber gastroscope affords the endoscopist the opportunity for a simple technique for ENET placement. The key to success with this technique is the placement of a biopsy forceps or a Savory guidewire down through the operating channel, which serves to stiffen the instrument and increase the ease with which it may be passed through the bowel. Transnasal passage of the endoscope is tolerated well by the patient, and sedation is not usually required. After intubating the esophagus and stomach, the endoscope is passed as far as possible, usually to the third or fourth portion of the duodenum. At this point, the stiffening device is withdrawn, and a guidewire is placed down through the operating channel out as far as possible until meeting gentle resistance (Fig. 23.3). Using the wire exchange system described in the section on the over-the-guidewire technique, the small-caliber gastroscope is withdrawn off the wire. No oropharyngeal transfer of the wire is required, and the feeding tube may be passed immediately directly over the wire. Wire exchanges are more tenuous and difficult with this procedure because the wire is usually not passed as deep into the small bowel as in the over-the-guidewire technique, and the tip may be displaced more easily back into the stomach.
Alternative Options
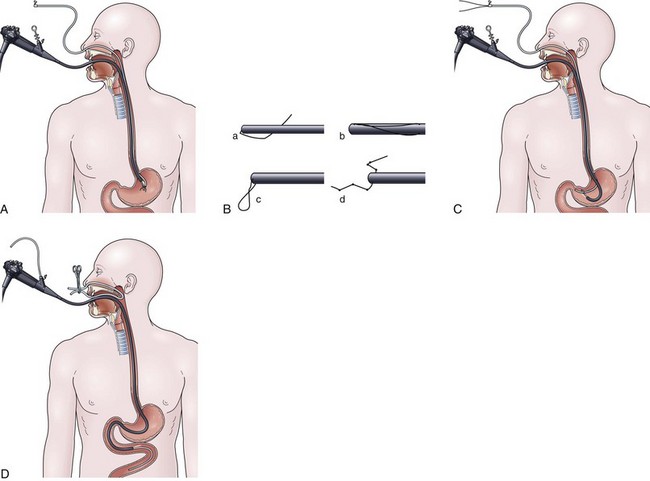
In a simpler version of the previously mentioned drag and pull technique, knotted suture line is attached to the distal end of the feeding tube, and the tube is passed through the nares down into the stomach. The endoscopist passes the endoscope alongside the tube through the mouth down into the stomach, grabbing the knotted suture with biopsy forceps (Fig. 23.4A). It can be difficult and frustrating to drag the tip of the feeding tube through the pylorus and down into the duodenum. The success of this sometimes awkward procedure is improved by using knotted suture line instead of a loop or single strand on the tip of the tube (Fig. 23.4B), by adding a second guidewire to stiffen the tube to prevent displacement on withdrawal of the endoscope, and by keeping the biopsy forceps 1 to 2 cm out away from the tip of the endoscope to enhance visualization (see Fig. 23.4A).
In another alternative technique, one or two extra guidewires (for a total of two or three) are added to the feeding tube to increase stiffness, and the tube is passed through the nares down into the esophagus and stomach. The endoscope is passed through the mouth alongside the tube down into the stomach, and the tip of the stiffened tube is simply pushed or nudged using open biopsy forceps through the pylorus into the duodenal bulb (Fig. 23.4C). Continuing to watch endoscopically from the stomach, the endoscopist pushes the stiffened feeding tube from the outside proximal end in an effort to pass the distal tip around the C-loop and into the third and fourth portion of the duodenum (see Fig. 23.4C). The most reliable of the three alternative methods uses an 8-Fr nasoenteric tube, which is passed through the operating channel of the endoscope after it has been passed through the esophagus and stomach into the small bowel. The success of this procedure is enhanced by using a large-channel therapeutic endoscope and a small-bore (8-Fr) nasoenteric tube whose proximal feeding cap can be removed. Because the endoscope is passed through the mouth, it requires placement of an oronasal transfer tube and the subsequent transfer of the tube from the mouth out through the nose (Fig. 23.4D) using the method described in the over-the-guidewire technique.
Securing Tube with Nasal Bridle
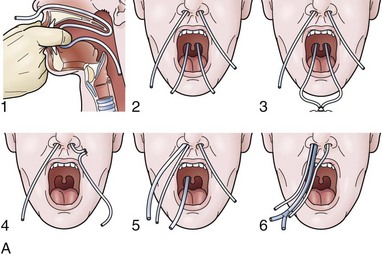
For any case in which the time and expense of endoscopic placement of a nasoenteric tube is required, consideration should be given to securing the tube with a nasal bridle. Although this technique may seem barbaric and overly punitive to the patient, selection of the proper tube for the nasal bridle results in a degree of discomfort that is no different than the presence of the nasoenteric tube alone. The timing of the nasal bridle placement is important; placement should be done initially before endoscopy is performed (before the patient is agitated from the passage of the endoscope). Two separate but similar techniques may be used to establish a nasal bridle. In one technique, two 5-Fr neonatal feeding tubes are used. The first tube is passed through one nares and brought out the mouth, and the second is passed through the other nares and likewise brought out the mouth. The two ends protruding from the mouth are secured together by a single suture (Fig. 23.5A) or are tied together by hand using a square knot. Traction is placed on one end protruding from the nares, pulling the nasal bridle into place (pulling the knotted juncture out through the nares such that one of the tubes passes into the nares around the nasal septum and out the other nares) (see Fig. 23.5A).
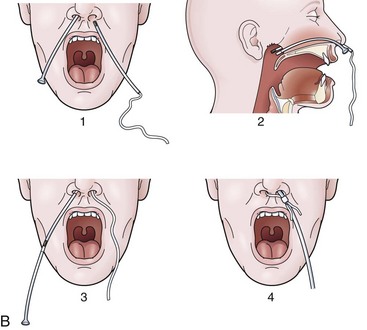
An alternative technique uses a commercial device with two flexible rubber sticks, each with a magnet at one end. A cloth ribbon is attached to the opposite end of one of the sticks. Each stick is passed through a separate nares, allowing the magnetic tips to click together in the posterior hypopharynx. Traction is applied to one of the sticks to pull the cloth ribbon into final position in one nares, around the nasal septum, and then out the other nares (Fig. 23.5B). The oronasal transfer tube is placed, and the rest of the ENET procedure commences thereafter. At the completion of the ENET placement, the feeding tube is taped to the 5-Fr nasal bridle tube (beginning 1 cm below the nose and wrapping the tape downward over the feeding tube and bridle until the bridle is completely covered; see Fig. 23.5A) or clipped to the cloth ribbon (see Fig. 23.5B).
Percutaneous Endoscopic Gastrostomy
In the past, the traditional location for PEG placement was in the left upper quadrant in the vortex formed by the midline and left costal margin (Fig. 23.6A). Relocating the site of routine PEG placement down lower close to the umbilicus and to the right of the midline should be considered for two good reasons. First, as shown on computed tomography (CT) scan (Fig. 23.6B), the area of greatest interface between the stomach and anterior wall that provides the shortest, most direct passage into the stomach is located at this site. The traditional site in the left upper quadrant creates a tract that is longer and more tangential as it enters the stomach. Even more importantly, this lower position on the abdomen places the PEG in the antrum, which facilitates conversion of the PEG to a PEGJ should the patient develop intolerance to gastric feeding later on.
Stay updated, free articles. Join our Telegram channel

Full access? Get Clinical Tree


