Figure 5.1
The robotic cart protected with a sterile drape
5.2 Skin Disinfection
The patient’s skin is disinfected with a betadine® solution from the Xyphoid level to the thighs, and up to posterior axillary lines on both sides. This is done twice; first by the circulating nurse, then by the instrumentist or the assistant-surgeon (Fig. 5.2). A four-piece sterile drape is used to circumscribe a large rectangular abdominal space limited by the mid-axillary line bilaterally, superiorly and inferiorly by the xyphoid and the pubis respectively (Fig. 5.3).

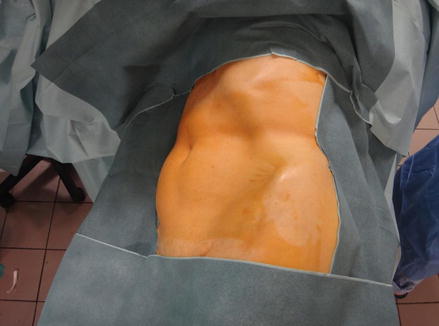
Figure 5.2
Skin disinfection with betadine solution
Figure 5.3
Patient covered with sterile drapes leaving a large abdominal access which includes the Pfannenstiel area
5.3 Pneumoperitoneum Creation, Laparoscopic Ports Placement, and Robotic Arms Docking
As for all laparoscopic procedures, the equipment check is capital before the operation starts. Apart from ensuring all robotic instruments are functioning and the camera is well calibrated, attention is paid to the carbon dioxide tanks. A second spare must be available in the OT room.
The first surgical steps are the same as for all laparoscopic renal surgeries. The summary presented below is given as a general guidance and must be adapted according to the patient’s body habitus since this can affect the placement of the ports: the initial ports may need to be adjusted when the patient has a history of past abdominal surgery in order to address the problem of expected adhesions; all the ports are better moved laterally in obese and superiorly in very tall patients to facilitate lateral and superior perinephric dissection [1].
We recommend the open Hasson technique because of its safety.
For the left side nephrectomy, the first 12 mm-port is created at the intersection between the left pararectal line and an oblique line between the umbilicus and the lowest level of the ribcage. Once the peritoneum cavity access is confirmed, the pneumoperitoneum is created and pressure parameters monitored (Fig. 5.4). The camera is introduced to visualize cannulas introduced from the next ports. These are created in the following order (Fig. 5.5):
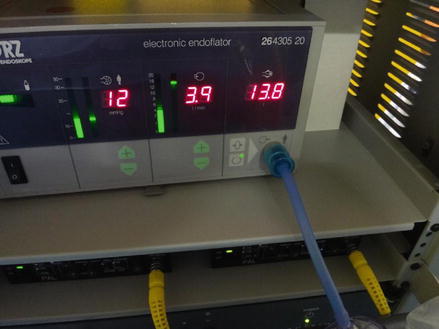
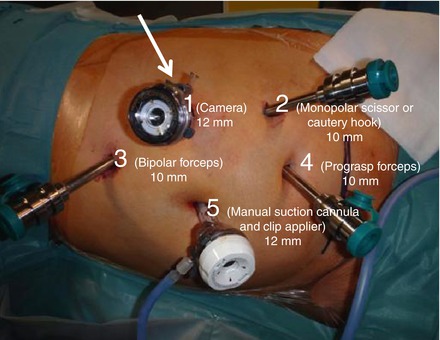
Figure 5.4
Peritoneal pressure monitor
Figure 5.5
Laparoscopic ports sites and robotic cannulas in position: the numbers indicate the chronology of ports creation as well as the corresponding robotic arm to be docked (up to number 4). The instruments to be used through each port are mentioned between brackets and the port sizes are given below. The arrow indicates the oblique axis of the robotic cart in the direction of the camera port and perpendicular to the line between ports 2 and 3
a 10-mm port four finger-breadths in an oblique line from the first port to the iliac crest, for the monopolar scissor or the permanent cautery hook (this can be inverted with the next port for left-handed surgeons),
a 10-mm port four finger-breadths in sub-costal position at a vertical line from the first port to the rib cage, for the bipolar forceps,
a 10-mm port four finger-breadths from the second port in the pararectal line at the level of the anterior superior iliac spine, for the prograsp forceps,
a 12-mm port at the umbilicus for the manual suction device and the clip-applier to be controlled by the assistant. It helps also for the introduction of compresses, sutures, manual scissors, etc.…
Once all five ports are created, the patient’s side robotic cart is obliquely advanced to the patient aiming the camera port in an axis perpendicular to the line between the second and the third ports through which the two most deployed instruments will be used (Figs. 5.5 and 5.6a, b).
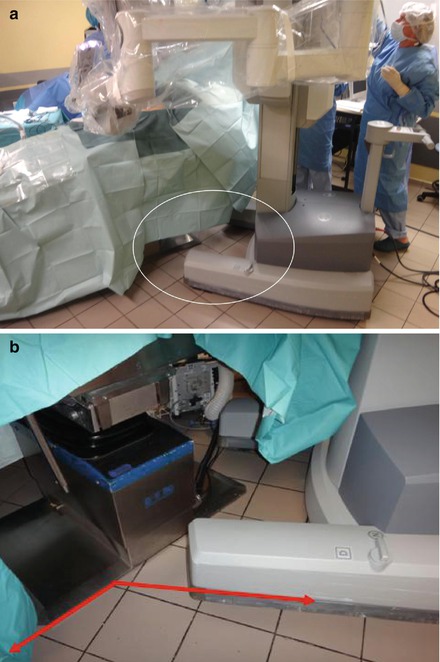
Figure 5.6
(a) Oblique approach of the robotic cart at the patient’s left shoulder for a left nephrectomy (see the circle and the Fig. 5.6b). (b) Angle formed by the robot cart foot and the operating table
The four robotic arms are docked to the cannulas (Fig. 5.7), the instruments are mounted on the robotic arms, the cautery tools are connected to the electro-surgical unit, and the cutting and coagulation values are adjusted according to the Surgeon’s preference (Fig. 5.8).
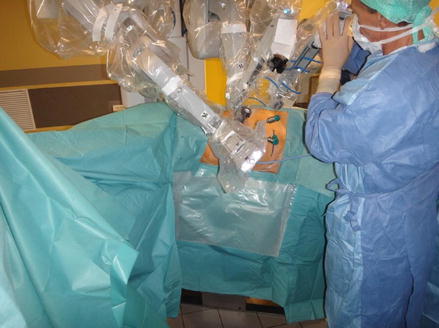
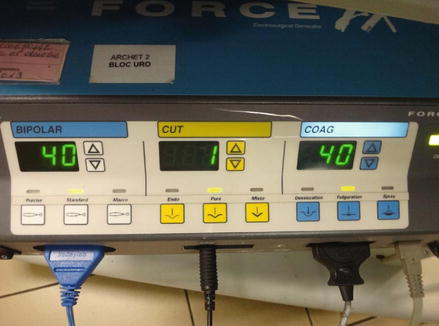
Figure 5.7
Docking of the robotic instruments
Figure 5.8
Electrosurgical unit
However it is important to note that experienced Surgeons tend to use only three arms: one for the camera and two for the operating tools (the monopolar scissor or the permanent cautery hook being controlled by the dominant hand, and bipolar forceps by the other hand). This strategy is guided by financial reasons and is particularly feasible in non-obese patients.
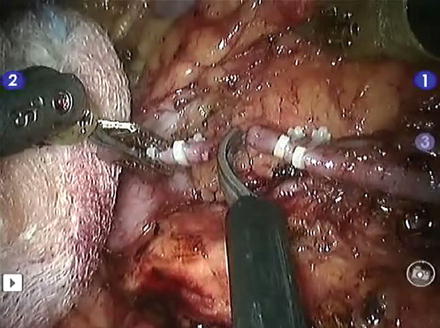
Figures 5.9 and 5.10 show the operation site after instruments docking and a whole view of the operating theater when the complete set-up is ready.
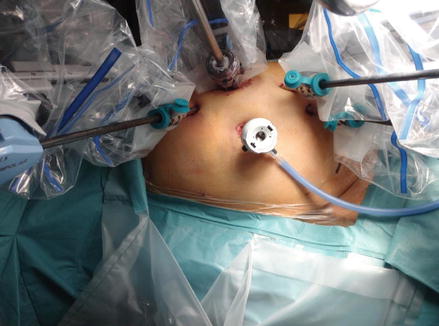
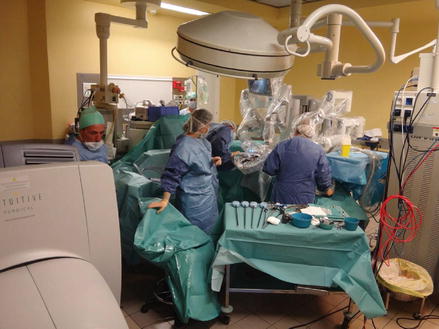
Figure 5.9
View of the ports and instruments after docking
Figure 5.10
The set-up is completed. Now the Surgeon will seat in front of the console and start the telemanipulation of the robotic cart
For the right nephrectomy, patient’s positioning is mutatis mutandis the same as abovementioned: the patient lies now in a left semi-lateral position with the back turned to the robot cart. The laparoscopic ports’ topography is:
a 12-mm port in the right pararectal line at the horizontal level of the umbilicus for the camera (1st robotic arm),
a 10-mm port in the right pararectal line 1–2 cm below the ribcage for the monopolar scissor or the cautery hook (second robotic arm),
a 10-mm port 1–2 cm above and medial to the right antero-superior iliac spine for the Bipolar Precise® Grasper (third robotic arm),
a 12-mm port at the umbilicus for the assistant suction device and clip-appliers,
a 5-mm is inserted in the midline at the level of the second port for the liver retractor,
if required, a 10-mm port is created in the right pararectal line just above the iliac crest for the fourth robotic arm.
For the sake of clarity, we will initially describe the technical aspects of the left donor nephrectomy, then we will address the particular points of the right side donor nephrectomy, and at the end we will comment on the final common steps.
5.4 Left Donor Nephrectomy
Generally the procedure starts with the dissection of the splenic flexure of the colon along the avascular Toldt’s white line. However if intra-peritoneal adhesions are present, these will be dealt with first (Fig. 5.11).
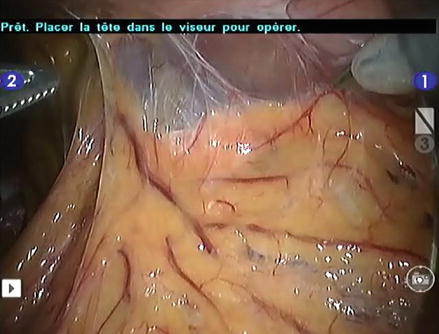
Figure 5.11
Intra-peritoneal adhesions being released
The fascia of Toldt is incised to free the left colic angle from the abdominal wall in order to access the retroperitoneal space (Fig. 5.12a, b). Then the phreno-colic, spleno-colic and spleno-renal ligaments are divided (Fig. 5.13). This allows the upper pole of the kidney with its covering Gerota’s fascia to be seen. Dissection is followed downwards along the white line of Toldt through a plane between the Zuckerkandl fascia posteriorly and the mesocolon anteriorly until the left colon falls medially with its attached peritoneum. At this time the kidney with its covering fascia is left attached to the posterior abdominal wall (Fig. 5.14). The dissection of the fascia of Toldt is continued caudally (Fig. 5.15). The retroperitoneal space is entered and fatty tissues are incised using the bipolar forceps and the monopolar scissor (or the cautery hook) until the left gonadal vein is reached. This is then freed from its posterior attachments and the psoas muscle is displayed (Fig. 5.16a, b). At this level, the ureter is seen medial to the gonadal vein. It is delicately held by its surrounding fascia and its loose posterior attachments are released up to the psoas muscle (Fig. 5.17a, b). Now the gonadal vein is followed cranially where it crosses the ureter and lies medial to it. Dissection is continued until the left renal vein is reached and its anterior aspect dissected. The characteristic venous violet cross appears; it is formed by the confluences of the adrenal and gonadal veins into the left renal vein (Fig. 5.18). At this step, the assistant retracts the medial lip of the opened Gerota’s fatty fascia with the aid of a compress held by the suction cannula (Fig. 5.19). This maneuver allows a better exposure and dissection of the adrenal vein which is clipped with two Hem-o-loks distally and one proximally, and sectioned by the robotic scissor (Fig. 5.20a, b). The Prograsp forceps docked to the robot’s fourth arm holds the lateral lip of the Gerota’s fascia and lifts the kidney up. This allows a good exposure of the gonadal vein which is clipped and sectioned to allow dissection of the posterior aspect of the left renal vein (Fig. 5.21). If the monopolar scissor was used so far, it is better replaced now by the cautery hook and further dissection is carried out around the renal vein. This is done with a maximum of patience, millimeter by millimeter, until the reno-azygo-lumbar vein is visualized on the posterior aspect of the renal vein (Fig. 5.22). It is dissected and sectioned between two Hem-o-lok® clips (Fig. 5.23). Now the renal vein is free all around. Again the cautery hook replaces the monopolar scissor and hilar dissection is performed further posteriorly (Fig. 5.24). The renal artery is soon seen after some fatty tissues have been cleared. When two arteries are present as shown in our selected case, the first artery is seen and dissected all around, then the second (Fig. 5.25a, b). The forthcoming steps are similar to the right side donor nephrectomy and are dealt with in paragraph 6.
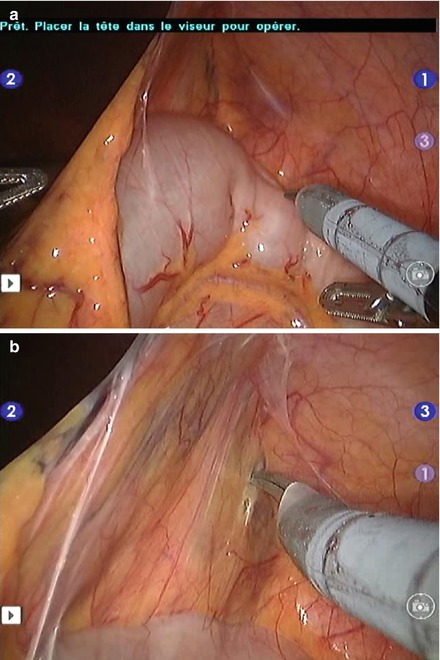
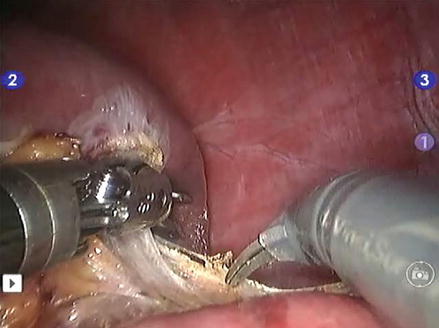
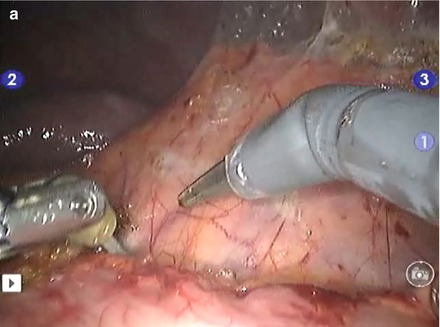
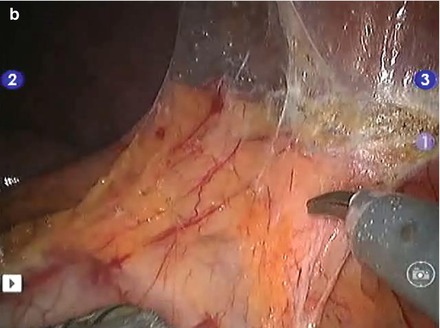
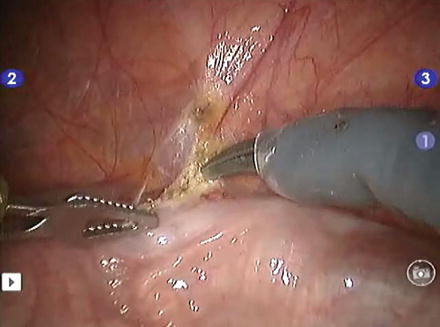
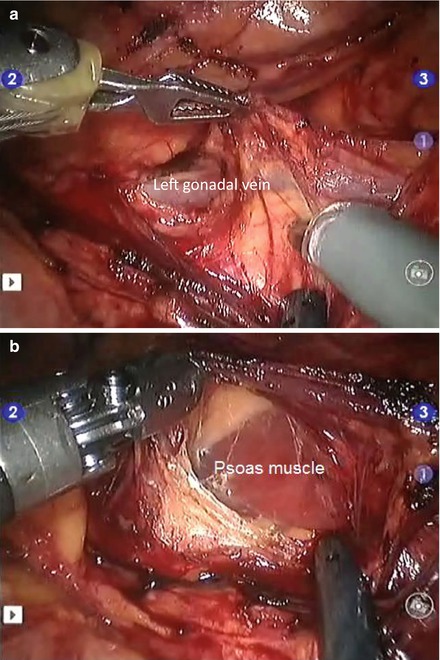
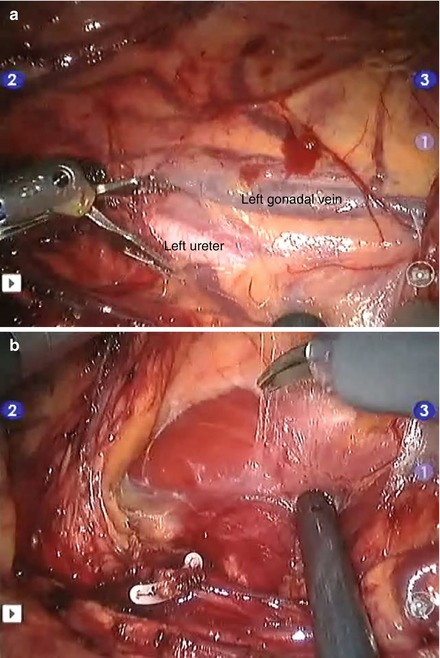
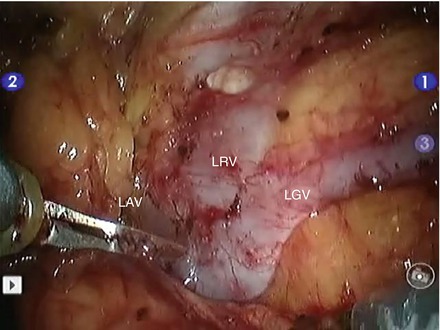

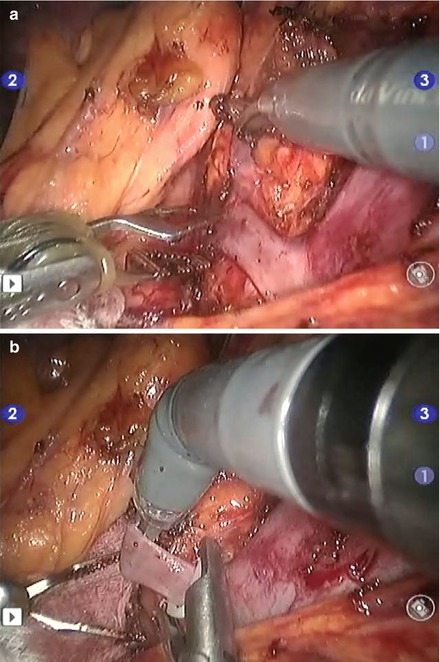
Figure 5.12
(a) View of the left colic angle and the fascia of Toldt. (b) The fascia of Toldt is dissected using a cautery scissor, to free the left colic angle from the abdominal wall
Figure 5.13
Division of the spleno-renal ligament
Figure 5.14
(a) Dissection along the white line of Toldt. (b) The left colic angle has fallen medially revealing the fatty fascia covering the kidney with its covering fatty fascia
Figure 5.15
Dissection of the white line of Toldt is continued more caudally
Figure 5.16
(a) View of the left gonadal vein freed of fatty tissue (note the action of the PreCise™ Bipolar Forceps lifting the vein by catching on its covering fatty fascia, with the monopolar scissor cutting its posterior attachments while the sucking cannula aspirates smoke and retracts the colon). (b) The gonadal vein is lifted by the bipolar forceps and the psoas muscle is displayed
Figure 5.17
(a) View of the left ureter and gonadal vein. At this level the ureter is seen medial to the gonadal vein. Few centimeters above, the vein will cross in front of the ureter to lie medially. (b) Both the ureter and the gonadal vein are lifted and their loose posterior attachments to the psoas muscle are released with the monopolar scissor
Figure 5.18
View of the “violet cross of the left nephrectomy”. LRV left renal vein, LAV left adrenal vein, LGV left gonadal vein
Figure 5.19
The assistant retracts the medial lip of the opened Gerota’s fascia with the aid of a compress held by the sucking cannula
Figure 5.20
(a) Exposure of the left adrenal vein. (b) Clipping of the left adrenal vein. Note the action of the monopolar scissor lifting the vein to allow its optimal clipping without catching the posterior fatty tissue