Fig. 14.1
Standard placement supine. Courtesy of Jane Carmel, MSN, RN, CWOCN
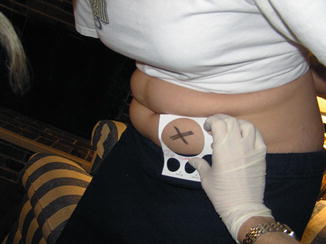
Fig. 14.2
Placement bending over. Courtesy of Jane Carmel, MSN, RN, CWOCN
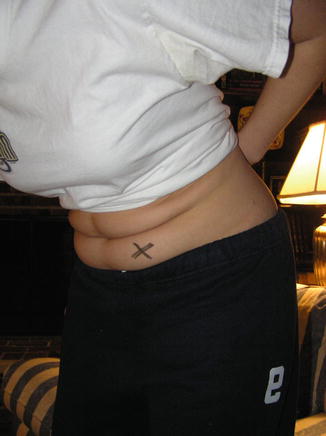
Fig. 14.3
Placement on standing position. Courtesy of Jane Carmel, MSN, RN, CWOCN
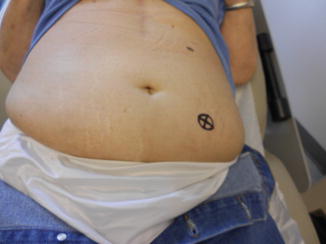
Fig. 14.4
Obese abdomen placement supine
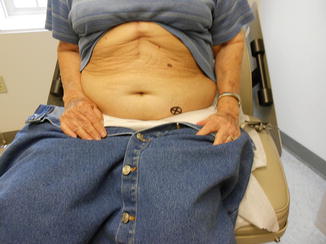
Fig. 14.5
Obese abdomen placement on sitting position
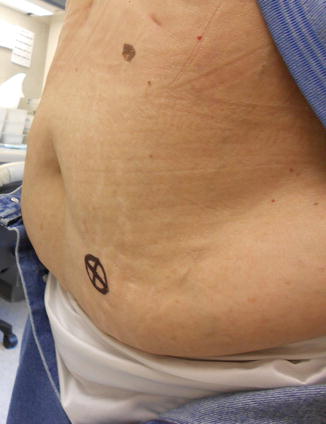
Fig. 14.6
Obese abdomen on standing position
These maneuvers help reduce postoperative complications such as pouch leakage, peristomal skin irritation, pain, odor, and patient/family frustration and they are currently supported with current literature. It can enhance patient independence and return to optimal functioning [3–7].
It is important in the marking process to place the stoma within the rectus muscle and in the patient’s visual field, outside of any creases, scars, wrinkles, and bony prominences and considering [8]. The guide developed by ASCRS and WOCN is noted in Table 14.1.
Table 14.1
Stoma marking key points
Key points to consider |
• Positioning issues: contractures, posture, mobility, e.g., wheelchair confinement, use of walker, etc. |
• Physical considerations: large/protruding/pendulous abdomen, abdominal folds, wrinkles, scars/suture lines, other stomas, rectus muscle, waistline, iliac crest, braces, pendulous breasts, vision, dexterity, presence of hernia |
• Patient considerations: diagnosis, history of radiation, age, occupation |
• Other: surgeon preferences, patient preferences, type of ostomy or diversion, anticipated stool consistency |
• Multiple stoma sites: mark fecal and urinary stomas on different horizontal planes/lines |
The usual site for an APR would be the left lower quadrant, but there are specific patient considerations (i.e., in wheelchair-bound or obese patients the optimal stoma site should be in the left upper quadrant; in patients whose profession requires them to wear specific tool belt or harness, they should bring that belt with them to be marked).
Indelible marking is the recommended method and most common since it does not leave permanent marking (tattooing) or break skin barrier (scratching) [8]. When marking for an anticipated robotic APR, since there is no midline incision, one of the trocar sites may serve as a potential stoma site; therefore, it is imperative that the surgeon and the WOC nurse have a direct communication. It is recommended to “bud” all stomas. This allows the effluent to readily flow into the pouching system increasing the wearing time even in situations with diarrhea stool secondary to radiation enteritis, medication side effects, clostridium difficile colitis, or other pathology.
14.4 Procedure for Robotic APR
14.4.1 Room Setup
Appropriate preplanning and arrangements in the room will facilitate the flow of the operation, operating room space, and resource usage (Table 14.2).
Table 14.2
Procedure of stoma marking
Gather items needed for the procedure:
1. Marking pen, surgical marker, transparent film dressing, flat skin barrier (according to surgeon’s preference and facility policy)
2. Explain stoma marking procedure to patient, and encourage patient participation and input
3. Carefully examine patient’s abdominal surface. Begin with patient fully clothed in sitting position with feet on the floor. Observe the presence of belts, braces, and any other ostomy appliances
4. Examine patient’s exposed abdomen in various positions (standing, lying, sitting, and bending forward) to observe for creases, valleys, scars, folds, skin turgor and contour
5. Draw an imaginary line where the surgical incision is going to be. Choose a point approximately 2 in. from the surgical incision where 2–3 in. of flat adhesive barrier can be placed
6. With the patient lying on back, identify the rectus muscle. This can be done by having the patient do a modified sit-up (raise the head up off the bed). Placement within the rectus muscle can help to prevent peristomal hernia formation and/or prolapse
7. Choose an area that is visible to the patient and if possible below the belt line to conceal the pouch
8. If the abdomen is large, choose the apex of the mound or if the patient is extremely obese, place in the upper abdominal quadrants
9. It may be desirable to mark sites on the right and left sides of the abdomen to prepare for a change in the surgical outcome (you may want to number your first choice as 1)
10. Clean the desired site with alcohol and allow to dry. Then proceed with marking the selected site with a surgical marker/pen. You may cover with transparent film dressing if desired to preserve the mark
11. Once marked, have the patient assume sitting, bending, and lying position to assess and confirm the best choice. It is important to have the patient confirm they can see the site
Routine placement of the patient-side cart on the patient’s left side will decrease the docking time considering side docking in the left hip (Fig. 14.7).
Fig. 14.7
Robotic left-hip docking
The patient bed may be angled toward the right side about 10–15°.
The bedside assistant is on the patient’s right side as the port is usually located over the right upper quadrant of the abdomen. Routinely, the instruments are passed from the surgical technician or placed in the pocket of the surgical draping.
14.4.2 Patient Positioning
Routine combined approach is performed in these cases where the main operating surgeon will perform the abdominal part and a second surgeon will proceed through the perineal portion of the procedure when the intra-abdominal dissection has been completed. For that reason, all our patients will be placed in a modified lithotomy position. The patient is secured to the table using the Allen® Hug-U-Vac® steep trend positioner (Allen Medical Systems, Inc. Acton, MA). The advantages with this system include a patient weight capacity up to 500 lb (227 kg), enabling secure positioning in robotic surgery, the design allows easy access to the forearm and the IV lines, and the bag system securely straps to the table with no sliding noted in over 300 robotic colorectal surgeries performed at our institution; however, there are incidents reported in the literature that the patient has fully slid off the operating table [9].
In morbidly obese patients we place elastic tape wrapped around the chest and across the shoulders.
The anesthesia team routinely performs a “tilt” test prior to the draping of the patient to ensure proper ventilation and evaluate cardiovascular effects of the Trendelenburg positioning.
14.5 Port Placement
As part of our standardization protocol for the robotic team, the port placement is the same in every deep pelvic operation, rarely adding any ports, most of the time for additional laparoscopic lysis of adhesions in patients with prior major abdominal surgeries. In virgin abdomens, a supraumbilical port is placed using the standard 12 mm port under direct vision through the port using the 8 mm straight robotic camera. Once appropriate pneumoperitoneum is established, it is easier to place the remaining ports. Alternatively, a right or left upper quadrant port may be placed prior to the midline to evaluate for possible adhesions (Fig. 14.8).
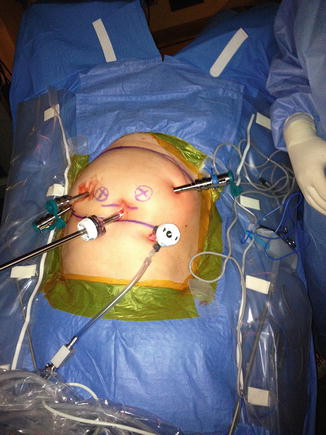
Fig. 14.8
Port placement and positioning
Evaluation of the abdominal cavity for possible metastatic disease is performed prior to the port placement.
The port #1 could be 8 mm or the 13 mm robotic stapler port. It is placed at least 10 cm lateral to the umbilical port to avoid collisions, the most common place is in the right lower quadrant at the intersection of the right midclavicular line (MCL) and a line between the superior iliac crest (SIC) and the umbilicus. Port #2 (8 mm robotic port) is placed over the mirror image in the left MCL. However, for the most part, we use the outside outline of the stoma site marking by our enterostomal therapist, which will be used at the end of the operation to perform the permanent colostomy. Port #3 is also an 8 mm port and will be placed over an area at or lateral to the left anterior axillary line and a horizontal line from the umbilicus.
An assistant port is routinely placed in the right upper quadrant, normally a 12 mm. The clinical reasoning is twofold: if robotic stapling is not available to use one of the current market endoscopic staplers to transect the proximal specimen or in case of robotic instrument failure, we have for emergent situations a 10 mm diathermy sealing device for control of the vessels. If a robotic stapler port is placed in port #1, then a 5 mm port is used for the first assistant.
Routine use of 10 mm camera 0° angle is done for all pelvic cases.
Instruments used:
Port #1: cautery hook or scissors
Port #2: Cadiere grasper or fenestrated bipolar grasper
Port #3: intestinal graptor
14.5.1 Docking the Patient-Side Cart
The robot is docked though an imaginary line from the left SIC to the right shoulder after the patient has been placed in surgery-ready position and tilted. We routinely place the patient on 20–30° of Trendelenburg and 15° to the right. It is important to lower the table to the minimum height to facilitate the robotic arm docking. In efficient robotic teams, this maneuver can be accomplished in less than 2 min.
14.5.1.1 Exposure of the Pedicle and Pelvic Inlet (Video 14.1)
The graptor retractor is used to cranially tent the rectosigmoid junction, and the assistant may use a laparoscopic bowel grasper to expose the groove underneath the vessels for further triangulation (Fig. 14.9). This maneuver when well performed will facilitate the entire pelvic and structure identification.
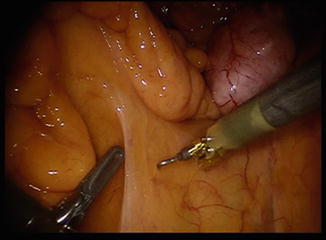
Fig. 14.9
Exposure IMA with triangulation
Get Clinical Tree app for offline access
Use the Cadiere grasper to triangulate the tissues underneath the pedicle for blunt and sharp dissection. Using the hook with or without cautery blunt and sharp dissection is performed.
Identification of the hypogastric nerves and separation from the IMA pedicle.
Continuation of the medial to lateral approach with identification of the ureter at the junction with the left iliac. A common mistake is to try to find it deeper in the left retroperitoneal area caudal to the internal and external iliac bifurcation. A second window sometimes is performed lateral to the pedicle, this window many times will expose the ureter right underneath it (Figs. 14.10 and 14.11).
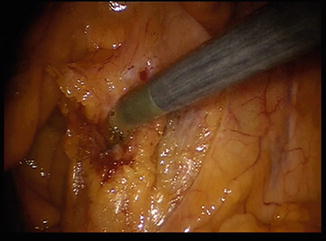
Fig. 14.10
Second window for ureter exposure lateral to IMA
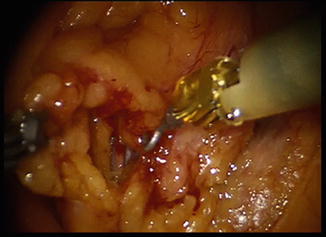
Fig. 14.11
Second window for ureter exposure lateral to IMA fully exposed
Once the ureter has been identified, proximal dissection of the retroperitoneal space is done with care to avoid injury to the ureter and gonadal pedicle. For the most part this part is truly areolar (Fig. 14.12) and blunt dissection may be performed in many cases to nearly reach the splenic flexure without the need of rotating the robotic system.
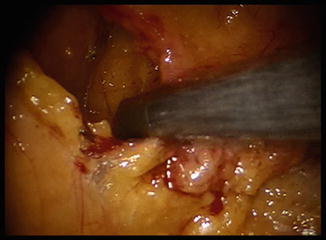
Fig. 14.12
Paracolic mobilization medial to lateral
Takedown of the pedicle (Fig. 14.13) with diathermy device can be done using:
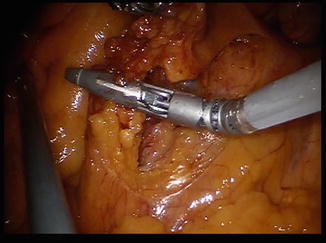
Fig. 14.13
Takedown of inferior mesenteric artery
Arm #1 with the sealing device.
Assistant Port using laparoscopic diathermy device from the right upper quadrant.
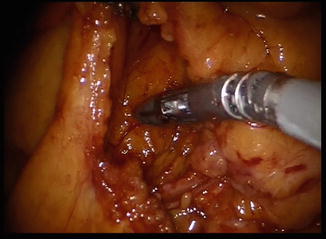
After this maneuver, the paracolic gutter is further mobilized above the Gerota’s fascia (Fig. 14.14).