Fig. 11.1
Diagram of possible operating room layout and positioning of equipment and personnel
The bedside assistant is on the patient’s right side, next to the scrub table.
11.3.2 Patient Positioning
Modified lithotomy position is ideal. Due to concerns of prolonged operative time and the risk of venous thromboembolic disease and extremity complications, a split-leg table might also be used.
Secure the patient to the table, as incidents of sliding off the operating table during steep Trendelenburg have been reported [9].
Our preferred technique is to use curved pink pads on each shoulder with elastic tape wrapped circumferentially around the upper torso and across the shoulders securing the patient to the bed (see Fig. 11.2).
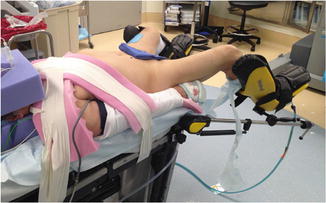
Fig. 11.2
Photograph of patient undergoing robotic sigmoid colectomy demonstrating our technique for securing the patient to the bed using foam pads and circumferential tape across the shoulders and upper torso
Perform a “tilt test” prior to prepping and draping the patient with maximal Trendelenburg and right side down tilt to ensure minimal movement on the table.
11.3.3 Port Placement
Begin by inserting a 12 mm balloon port in the supraumbilical position via an open technique for use as the camera port. A balloon port is ideal as it is long enough for the camera to fit through and allows for the least amount of “extra” trocar to be in the abdomen.
The robotic camera is held by the assistant and inserted into the abdomen.
For lesions in the distal descending and sigmoid colon that require splenic flexure mobilization, use a set-up similar to that of a low anterior resection with the ports arrayed around a vector pointing at the target lesion in the left lower quadrant (LLQ) (see Fig. 11.3a).
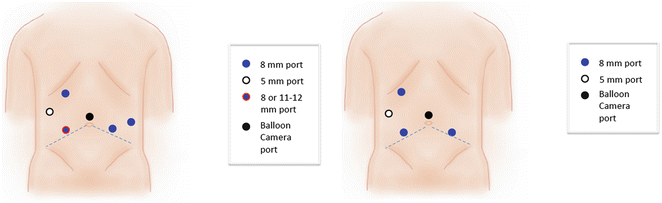
Fig. 11.3
Port placement for (a) distal descending and sigmoid colon lesions and (b) distal transverse and proximal descending colon target lesions
Draw a line on the skin from the ASIS to the camera port—placing ports below this line can cause crowding during any pelvic dissection and can limit the reach to the splenic flexure.
An 8 mm robotic port is placed in the right upper quadrant (RUQ) on the mid-clavicular line.
An 8 mm robotic port is also placed in the right lower quadrant (RLQ) port 8 cm from the camera port and usually 1–2 cm above the marked line. Alternatively, a 10–12 mm laparoscopic port with an 8 mm robotic port placed through it can be placed here to allow for intracorporeal stapling.
Another 8 mm robotic port in the LLQ is placed on the opposite side.
For procedures where retraction in the pelvis is important, we will also place a fourth 8 mm robotic port laterally in the left flank, 8 cm lateral to the LLQ port and 1–2 cm superior to allow for third-arm retraction during pelvic dissection.
A 5 mm laparoscopic port is placed in the right mid-abdomen between the RUQ and RLQ ports for use by the bedside assistant.
For target lesions proximal to the mid-descending colon, use an amphitheater approach to port placement surrounding a vector directed at the target lesion in the left upper quadrant (LUQ) (see Fig. 11.3b).
An 8 mm robotic port in the right upper quadrant (RUQ) and another in the right lower quadrant (RLQ) are placed along the midclavicular line.
A third 8 mm robotic port is placed in the left lower quadrant (LLQ) for the third arm, but may not be necessary for a left colectomy and can interfere with other working arms causing collisions. This can be minimized if the RLQ and LLQ ports are not in the same sagittal plane.
Each port should be at least 8 cm away to avoid arm collisions. In addition, ports should not be placed directly in front or behind the camera port, as visualization will be limited.
A 5 mm laparoscopic port placed in the right mid-abdomen is very useful and allows your bedside assistant to help with retraction and suction as needed.
11.3.4 Docking the Patient-Side Cart
11.3.4.1 Exposing the Left Colon
Use laparoscopic graspers in the RUQ and RLQ ports and the robotic camera held by the assistant.
Tilt the patient to approximately 30° Trendelenburg and 15° left side-up.
Reflect the transverse colon & omentum superiorly above the liver and arrange the small bowel into the right side of the abdomen, exposing the Ligament of Treitz, Inferior Mesenteric Vein (IMV) and the vascular pedicle of the sigmoid.
Take note of the specific location of the target lesion and any anatomical variances, such as redundancy.
11.3.4.2 Angled Docking
This configuration is ideal for most distal left colectomies and sigmoid resections as it gives reach to the splenic flexure, yet allows for pelvic dissection without re-docking.
Position the patient-side cart at a 45° angle to the pedestal of the operating bed on the lower left side, resulting in the patient-side cart approaching over the left hip (see Fig. 11.4).
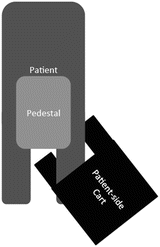
Fig. 11.4
Diagram of angle docking used for left hemicolectomy and sigmoidectomy. The patient-side cart straddles the pedestal of the operating table at approximately a 45° angle
The third arm of the patient-side cart may change ports during the procedure.
During pedicle dissection, ligation and splenic flexure mobilization, Arm 3 is over the patients’ LUQ and inserted into the RUQ port. Arm 1 is placed in the RLQ port (see Fig. 11.5a). Arm 2 is usually not used, but can be placed in the LLQ port for some limited retraction if needed. The hinge of Arm 3 closest to the patient-side cart should be locked during this part of the operation to maximize the reach.
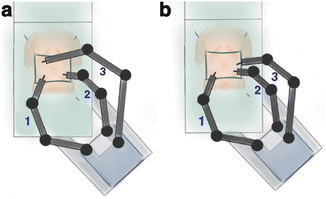
Fig. 11.5
Diagram of the arm arrangement for angle docking. (a) This arrangement is best suited for the splenic flexure portion. Arm 3 must be locked at the base of the patient-side cart to maximize its reach. (b) For the sigmoid or pelvic portions, move Arm 3 to the lateral left port and unlock it from its base
For pelvic dissection, Arm 3 is unlocked and moved to the left lateral port. Arm 2 is placed in the LLQ port while Arm 1 remains in the RLQ port (see Fig. 11.5b).
11.3.4.3 Side Docking
This position is ideal for target lesions in the proximal descending, splenic flexure or distal transverse.
The patient-side cart is positioned perpendicular to the pedestal of the operating bed over the patient’s left flank (see Fig. 11.6).
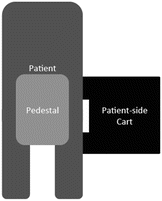
Fig. 11.6
Diagram of side docking for proximal left colon lesions. The patient-side cart approaches the left side of the patient and table perpendicularly
Arm 2 is placed in the RUQ port and Arm 1 in the RLQ port.
Arm 3 is left unlocked and placed extending over the patient’s left hip into the LLQ port with a grasping instrument.
11.3.4.4 Instrument Selection
The monopolar scissors or the vessel sealer should be used in the surgeon’s right hand, Arm 1.
The surgeon’s left hand (Arm 2 or 3) should have a bipolar grasper, either the Chaudière or the Prograsp.
The retracting arm not in active use by the surgeon should have another grasper, such as the double fenestrated grasper.
11.3.5 Vascular Dissection
Using the retracting third arm or the bedside assistant, the sigmoid mesentery is placed on slight tension to identify the vascular pedicle of the Inferior Mesenteric Artery (IMA).
Divide the peritoneum just to the right of the base of the pedicle at the level of the sacral promontory; using soft sweeping motions expose the IMA and dissect posterior to the vessel (see Fig. 11.7).
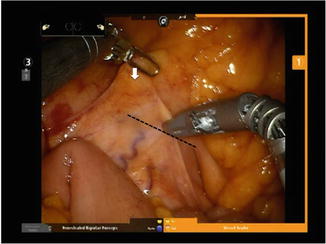
Fig. 11.7
Intraoperative photograph of the appearance of the vascular pedicle when placed on tension during robotic dissection. During this exposure, the surgeon’s left hand lifts up on the sigmoid mesentery (white arrow) exposing the Inferior Mesenteric Artery (IMA) pedicle. The assistant can help by retracting the sigmoid colon to the left pelvis. The vessel sealer or monopolar scissors are used to incise the peritoneum and begin the dissection along the dashed line indicated
The correct plane is avascular and generally bloodless.
Protect the hypogastric nerves in this area as dissection proceeds toward the origin of the IMA.
Continue the dissection superiorly around the base of the IMA and identify the bifurcation of the Left Colic Artery (see Fig. 11.8).
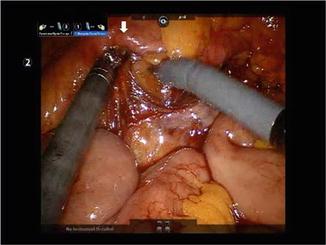
Fig. 11.8
Dissect posterior to the Inferior Mesenteric Artery by lifting up on the artery (white arrow) with the surgeon’s left hand to visualize the tension and define the correct plane for dissection laterally. Blunt dissection of the avascular plane laterally can be performed with the right hand
Creating a wide window behind the IMA facilitates identification of the retroperitoneal strictures.
Division of the vascular pedicle can be performed at this time if the left ureter can be identified and protected.
For maximal splenic flexure mobilization, extend the peritoneal incision superiorly to the IMV, dividing any adhesions to the Ligament of Trietz (see Fig. 11.9a).
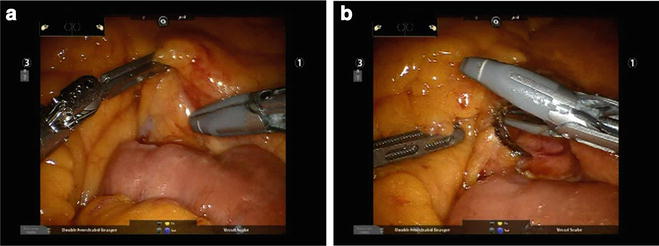
Fig. 11.9
Taking the Inferior Mesentery Vein (IMV) proximally allows for greater mobilization of the left colon. In addition, it is easy to identify as can be seen here. (a) The left hand lifts up on the mesentery just lateral to the IMV, which can be seen clearly in the retroperitoneum. (b) After incising the peritoneum and dissecting posterior to the IMV, the vessel can be divided using the vessel sealer
The mesentery of the left colon is gently lifted up near the IMV and the peritoneum is incised. The IMV is dissected from surrounding structures, including the retroperitoneum and can be divided at this time to prevent avulsion (see Fig. 11.9b).
11.3.6 Medial-to-Lateral Mesocolic Dissection and Mobilization
The plane developed when dissecting posterior to the IMV or the superior hemorrhoidal artery is extended laterally and will guide you into the proper plane for dissecting the mesocolon from the retroperitoneum.
Gently place one operating arm under the mesocolon and lift up, opening the plane and showing the tension. Gentle blunt dissection will separate the mesocolon from the retroperitoneum (see Fig. 11.10a).

Fig. 11.10
The proper plane for medial-to-lateral dissection can be entered in several locations, including posterior to the IMA and the IMV. (a) Demonstrates the dissection posterior to the IMV. (b) As the dissection is carried laterally, a white line is identified that is the retroperitoneal fascia, which should be preserved
Using a blunt bipolar grasper in the left hand and another blunt instrument, such as the vessel sealer, in the right hand is preferred. Pointed instruments such as Maryland graspers or scissors can make this dissection difficult and more traumatic.
Again, the correct plane is avascular and nearly bloodless.
Often you will notice a “white line” of thin filmy fascia—this is the retroperitoneal fascia and should be dissected down to stay on the retroperitoneum (see Fig. 11.10b).
Continue laterally and inferiorly to develop the dissection extending from the transverse colon to the sigmoid.
Once the plane lateral to the IMA pedicle is dissected and the Left Colic Artery is located, it is time to identify the left ureter, which is usually located in the retroperitoneum just to the left of the IMA pedicle (Fig. 11.11).
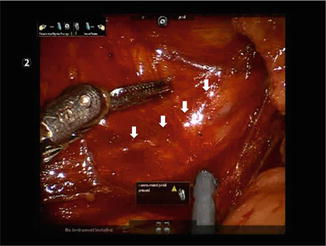
Fig. 11.11
Identification of the left ureter (white arrows) is a key step in the procedure, performed before vascular pedicle ligation. Is this photograph, the surgeon is retracting the IMA superiorly out of view using the right hand. The assistant is helping to clear the view using suction to expose the ureter
Using the left grasper or the assistant, come under the IMA, tenting this up and exposing the view to the retroperitoneum.
Using the right hand and possibly the third arm, gently dissect the retroperitoneum to expose the left ureter, looking for the characteristic vascular pattern and vermiculation to identify the structure.
Ureteral stents are of little help in these cases as there is no tactile feedback to help locate the ureter. Because of the improved visualization of the robotic camera, we have seldom had difficulty in identifying the ureter.
If the mesocolic dissection is too deep or the ureter is not found quickly, look for the structure on the posterior surface of the mesocolon, which is now tented up.
After identification of the left ureter, it is safe to divide the vascular pedicle (see Fig. 11.12a).
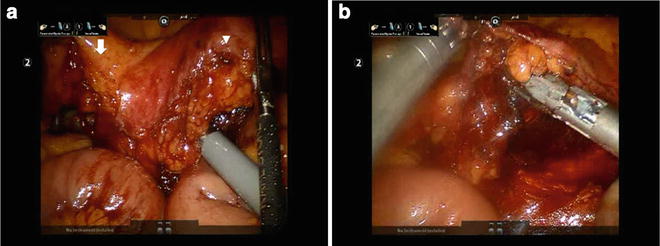
Fig. 11.12
Vascular pedicle division. (a) Extending the dissection lateral and superior to the IMA allows the surgeon to connect the superior plane (from IMV dissection) to the pedicle dissection, as seen here. Note the vessel sealer, which is wrapped around the IMA and the tip can be seen superior in the left of the screen. The Left Colic Artery is identified by the white arrow and the IMA by the white arrowhead. (b) The IMA (as seen here) or the Left Colic Artery can be divided using the EndoWrist® One™ Vessel Sealer (Intuitive Surgical Inc., Sunnyvale, CA)
The robotic vessel sealer can be used for pedicle ligation. If it is not yet available in your area, the RLQ robotic arm can be removed and another bipolar sealing and cutting device can be inserted through the same port and operated by the assistant (see Fig. 11.12b).
In cases of severe atherosclerosis, changing the RLQ port to an 11–12 mm port and using a laparoscopic stapling device to divide the pedicle is recommended. Alternatively, an ENDOLOOP™ (Ethicon, Cincinnati, OH) may be used after division of the pedicle with an energy device. Following this, the 8 mm robotic port can be placed through the larger laparoscopic port (a “port-in-port” technique) to return to using the robotic arm.
The avascular plane between the mesocolon and the retroperitoneal fascia can now be dissected further in the lateral, superior and inferior directions (see Fig. 11.13).
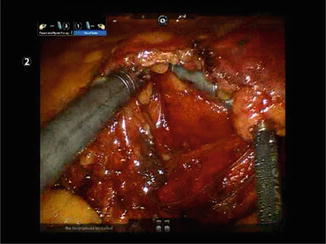
Fig. 11.13
After pedicle ligation, the mesocolic dissection is extended laterally and superiorly in a similar fashion, by lifting with the left hand and gently, bluntly dissecting with the right handRelated posts:

Stay updated, free articles. Join our Telegram channel

Full access? Get Clinical Tree


