Robotic
Cadière forceps
Small grasping retractor
Additional
Pre-cut suture (15–20 cm)
Endovascular stapler with vascular and small bowel loads—60 mm
Laparoscopic babcock
4-0 absorbable monofilament suture
4-0 equivalent barbed suture (optional)
Urinary diversion stents (Single J) or eight French feeding tubes
Surgical Technique: Step-by-Step
Preparation of the Left Ureter
The left ureter is tunneled under the sigmoid mesentery to the right side (Fig. 11.1). It is important to create a sufficient opening in the mesentery to avoid kinking of the ureter. The left and right ureter are then held together with an extra large Hem-o-Loc® clip (Weck Surgical Instruments, Teleflex Medical, Research Triangle Park, NC). This step makes it easier to find the ureters after the bowel work.
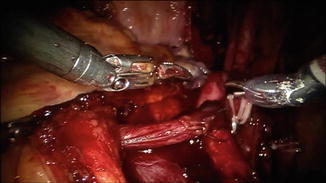
Fig. 11.1
Passing the left ureter through the window in the mesentery
Bowel Identification and Anastomosis
Fifteen to twenty centimeters of the distal ileum are isolated, leaving at least 15 cm to the ileocecal valve. The bowel is divided using a 60-mm laparoscopic stapler with a cartridge for small bowel/vasculature (Fig. 11.2). By using a vascular load (red color) the small vessels of the mesentery are easily controlled along with division of the bowel segment. The assisting surgeon is performing the stapling through the 15-mm port from the left side of the patient. Care is taken to fire the stapler perpendicular to the bowel into the mesentery. In some cases, having tags on the bowel for retraction by the third robotic arm is helpful. It is important to achieve sufficient length at the distal incision in order not to have the bowel anastomosis too close to the stoma. The bowel continuity is restored using the same stapler with a small bowel load (blue color). The stapler is passed through the cut corners on the antimesenteric side of the staple lines of the distal and proximal ends of the ileum (Fig. 11.3). The anastomosis is performed in a “side-to-side” fashion with the antimesenteric part facing each other (Fig. 11.4). An additional transverse firing of the stapler is used to close the open ends of the ileal limbs—similar to what is done in open cases with an open gastrointestinal stapler. It is important to be gentle on the bowel serosa with all of the robotic instruments as inadvertent serosal tears can be encountered with tools such as the robotic needle drivers and robotic graspers.
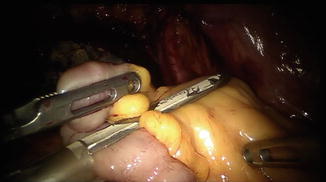
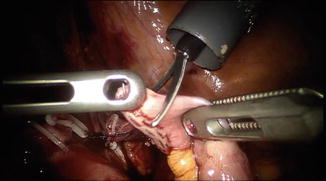
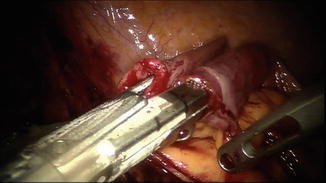
Fig. 11.2
Isolating the bowel segment
Fig. 11.3
Excising the antimesenteric corners of the staple line in preparation of passing the stapler
Fig. 11.4
Performing the side-to-side bowel anastomosis
Ureteroileal Anastomosis
The distal staple line of the conduit is cut away and two separate openings in the proximal part, for the ureteral implantation, are created (Fig. 11.5). At our institution we prefer the separate Nesbit (Bricker) implantation but using the Wallace plate is also an option. The ureters are secured with the third arm and a ProGrasp™ and spatulated approximately 2 cm. The anastomosis between the ureters and the proximal part (butt end for Wallace) of the conduit is carried out using two 4-0 monofilament running sutures, one at each side of the ureter (Fig. 11.6). A slipknot is preferably used when first approximating the ureter and bowel. More recently, barbed sutures have become available. Some surgeons are using the 4-0 equivalents for the ureteroileal anastomoses. Ensuring a watertight anastomosis visually is important since it is difficult to “test” the anastomosis robotically as one would do open.
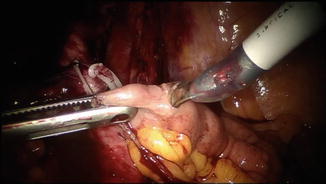
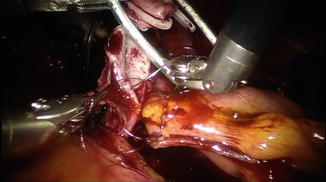
Fig. 11.5
Creating the enterotomy for the anticipated ureteroileal anastomosis
Fig. 11.6
Creating the ureteroenteric anastomosis
Before completing the ureteroenteric anastomosis, the baby-feeding tubes (or single J urinary diversion stents) are pushed up to the kidney pelvis and secured at the bowel mucosa with absorbable suture. Two baby-feeding catheters each 55 cm are inserted through the right assistant port and pulled through the ileal segment. The passage of the stents can be challenging and coordination between the assistant and the surgeon is key (Fig. 11.7a, b). The surgeon must be careful to estimate the distance to advance the stents as haptic feedback is not available to know once the kidney is reached. In most cases, passing 20 cm (approximately four lines on marked stents) is sufficient.
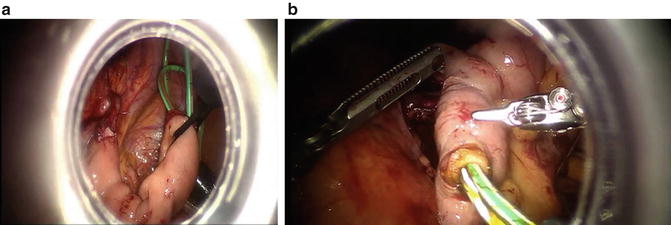
Fig. 11.7
(a) Passing the stents; (b) pulling through the stents
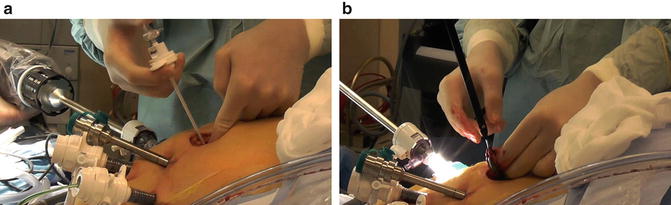
Creation of the Stoma
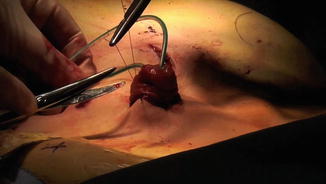
The robot is then undocked with the ports still be in place. A drain is inserted through the second robotic port on the left side. The stoma is then constructed at its appropriately marked location. The skin and underlying fat are removed and the fascia is incised like a cross (cruciate incision). The muscle is separated and a 12-mm laparoscopic port is pushed through peritoneum still having pneumoperitoneum (Fig. 11.8a). A laparoscopic Babcock is used through the laparoscopic port to grab the distal part of the conduit and pull it through the abdominal wall (Fig. 11.8b). The stoma is then everted and sutured to the skin (Fig. 11.9). Alternatively, the bowel can be passed to the stoma site through the infraumbilical extraction incision once the bladder is removed.
 History of Minimally Invasive Techniques for Radical Cystectomy with Urinary Diversion
Robot-Assisted Radical Cystectomy: Male
Perioperative Care: The Radical Cystectomy Pathway
Perioperative Outcomes and Complications of Robot-Assisted Cystectomy
History of Minimally Invasive Techniques for Radical Cystectomy with Urinary Diversion
Robot-Assisted Radical Cystectomy: Male
Perioperative Care: The Radical Cystectomy Pathway
Perioperative Outcomes and Complications of Robot-Assisted Cystectomy
 Cost of Robot-Assisted Radical Cystectomy
 Intracorporeal Ileal Neobladder


Fig. 11.8
(a) Creating the stoma site; (b) pulling the conduit through the stoma site with a laparoscopic babcock
Related posts:
History of Minimally Invasive Techniques for Radical Cystectomy with Urinary Diversion
Robot-Assisted Radical Cystectomy: Male
Perioperative Care: The Radical Cystectomy Pathway
Perioperative Outcomes and Complications of Robot-Assisted Cystectomy
Cost of Robot-Assisted Radical Cystectomy
Intracorporeal Ileal Neobladder
Stay updated, free articles. Join our Telegram channel
Full access? Get Clinical Tree
