Fig. 5.1
Robotic Room
The surgeon will command and organize the whole group; however, each person on the team should feel that they are an integral part and that their participation leads directly to improve patient outcomes. The surgeon should not only be in full command of the robot procedure but also have knowledge and experience for the setup, basic services, and troubleshooting the system errors and be prepared for any emergency situations. The team members, nurses, and surgical technician have critical roles for robotic operations in regard to starting up the robot, draping, docking instruments, troubleshooting, and exchanging the instruments. We emphasize a “total team approach.” The surgical assistant should have experience with trocar insertion, clipping, suction, and irrigation cutting and feel comfortable with vessel-sealing instruments [5, 9].
The operating room should be designed for robotic surgery to accommodate all of the robotic components. The robotic system needs more space than the standard laparoscopic system. The connections can be done easily, and each person can see each other and communicate in an easy way [5, 12, 13]. The room should be big enough to facilitate the docking of the robot for different types of surgery [2, 13, 14].
If the operation room is not dedicated to robotic surgery, there may be a need to have additional laparoscopic towers to accommodate the other instruments. Ideally the operating room will accommodate a room for laparoscopic surgery and robotic surgery only [6, 15, 16].
5.3 Patient Positioning
For most surgical approaches, patients are placed directly onto a gel pad on the operating room table. The gel pad increases friction and prevents patients from sliding during the procedure. The patient is placed in a modified lithotomy position using yellow fin stirrups with thromboembolic stockings and intermittent pressure devices. The angle of the stirrups should allow the robotic arms to move without collision. We have found that flexion of less than 10° at the hip area is ideal. Both arms are padded and placed along the side of the patient’s body. A block of foam is placed over the face as a protector. A safety strap or tape can be used to secure the patient to the table. We do not use any shoulder braces as these have been associated with brachial plexus injuries (Fig. 5.2).
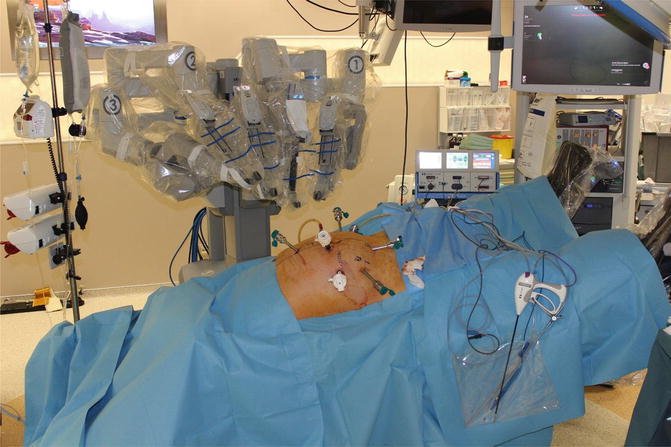
Fig. 5.2
Patient positioning
5.4 Robotic System
The da Vinci Surgical System consists of three main parts: console, cart with the four arms, and video and insufflation systems [2, 17]. The surgeon performs the operation from the console with command of the four robotic arms. We often have to educate patients that the “da Vinci®” is a slave robotic system that does not have artificial intelligence and cannot perform the operation by itself. The standard system was released in 1999 and was originally with one camera and two instrument arms. A few years later, the S series was launched into the market. This system had some improved developments in terms of a motorized patient cart, color-coded fiber optic connections, more straightforward device connection, and quick click trocar attachments [3, 18, 19]. In 2007, the S system upgraded to a high-definition video system and named Si HD. Recently another surgeon console is adapted the Si system. The dual console connects two surgeon consoles to the same patient cart and is ideal for teaching purposes. It helps to coordinate surgery real time and also permits collaboration of different specialties at the same time during the operation. The “da Vinci” XI has been launched to the market in mid-2014. The XI system has many differences on the patient-side cart such as laser targeting system and long, thin, and more flexible arms. This new chart is more suitable for general surgery procedures such as complex procedures. This new technology allows for easier and faster docking and for multiple-quadrant approaches [20–24] (Figs. 5.3 and 5.4).
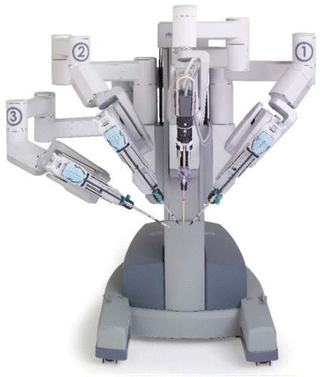
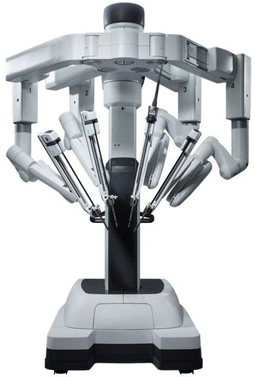
Fig. 5.3
Da Vinci Si patient cart
Fig. 5.4
Da Vinci Xi patient cart
5.4.1 Surgeon Console
The surgeon console is the driver seat for controlling the robot. From here the surgeon obtains three-dimensional images of the surgical field through the stereo viewer, adjusts the system with the pod controls, and controls the instrument arms [9]. The stereo viewer displays the real-time high-resolution three-dimensional images of the surgical field, system status icons, and messages. The three-dimensional image is created by capturing two independent views from two 5 mm endoscopes fitted into the stereo endoscope and displaying them into right and left optical channels [5, 10, 11, 25]. The system status icons and messages are displayed in specific locations within the stereo viewer and alert the surgeon to any changes or errors within the system. Directly adjacent to the stereo viewer are infrared sensors. These are activated at the surgeon console when the surgeon’s head is placed between them. This prevents unwanted movement of robotic instruments inside of the patient’s body as the robotic instruments are immediately deactivated when the doctor looks away from the stereo viewer and removes their head from between the infrared sensors. This feature is an exquisite security tool in robotic surgery [5, 11, 26].
The da Vinci standard and S models have right- and left-sided pod controls that can communicate significant system errors and turn on and off the system. The Si-HD model combines the right and left pod controls into a central touchpad on the armrest. In addition, the console can be adjusted in four different directions to facilitate better ergonomics and particular settings can be stored for each surgeon [5, 25, 27].
For all of the da Vinci models, the master controllers are the manual manipulators that the surgeon uses to control the instruments, arms, and endoscope. The controllers are grasped with the index finger and thumb. Movements are translated by a computer that scales, filters, and relays them to the instruments [5, 7, 28].
For activation of the instrument arms during the surgery, the surgeon must “match grips” by grasping the masters to match the position and grip of the EndoWrist instrument tips as seen within the body. This feature prevents accidental activation of the instrument arms and inadvertent tissue damage. When toggling between two instruments and taking control of an instrument that is retracting the tissue, the master is closed to prevent dropping the tissue. The foot switch panel allows the surgeon to control the camera for zoom-in or zoom-out positions and to activate energy sources if desired for each device in each arm. The clutch pedal allows the surgeon to change to the third arm or adjust the working distance between the master controllers. Quickly tapping of the clutch pedal once allows the designated master controller toggles between the powers of the current arm to the third robotic arm. Tapping the clutch pedal once again reverses the action. This feature allows the surgeon to toggle control of two different robotic arms using the same master controller. Depressing the clutch pedal disengages the master controls from the instrument arms, and the surgeon can readjust their arms to more comfortable position in the working space. Utterly depressing the camera pedal disengages the master controls from the instrument arms and instead engages the endoscope. The endoscope may then be moved or rotated to the appropriate area of interest within the body. The scope comes in 0 and 30°. There is a focus control lever on the standard and S systems for endoscope labeled “+/−” in the center of the foot switch panel. The coagulation pedal is connected to a compatible electrosurgical unit. With the dual power capabilities, one machine arm can be connected to bipolar energy while the other one is connected to monopolar energy. The Si model has a completely remodeled footboard with two tiers of pedals and levers on the side of the board. There are still clutch and camera pedals on the left side of the board. The brakes on the side of the panel are used to shift power between the two surgeons in dual-console mode. In addition, the foot switch panel on the right can be used to change the coagulation pedal to bipolar mode. This property prevents accidental electrosurgical activation of the wrong tool arm [5, 12, 22, 28].
5.5 Patient Cart
The patient cart for the standard and S system houses the camera and instrument arms. Each arm has several clutch buttons that assist with the gross movements of the arm and to enter or remove devices [2–4]. To activate the clutch, the buttons are depressed and the arm is moved. Otherwise, there will be resistance encountered, and the arm will return to the original position. Each arm has two port clutch buttons used for gross movements of the instrument arm. There is also a particular camera or instrument clutch button located at the top of each arm to adjust the final trajectory of the arm during docking and inserting or withdrawing endoscope/instruments. Each division requires several sterile accessories that are placed during the draping procedure [4].
The standard system was initially offered with a camera arm and two instrument arms. Later an optional third instrument arm became available for new standard systems. The third instrument arm is mounted on the same axis as the camera arm. Because of this reason, the team should be more careful and aware that the third arm can have collusion with the other arms or operating table. Each arm on the standard system is color coded, the camera arm is blue, and instrument arms are yellow, green, and red. With the standard system, the surgeon can only use one clutch at a time to move the tool arm. With S and Si systems, surgeon can use the port clutch and camera/instrument clutch simultaneously to maneuver the arm into position [2, 18, 29].
Similar to the standard system, S and Si systems have a camera arm and two instrument arms and are available with an optional third instrument arm. Each tool arm is numbered. These models also added LED light below the camera/instrument clutch and a touch-screen monitor. The LED light communicates the status of the arm to the surgical team using preset color scheme. The Xi system does not have specific camera arm. Each arm will act as a camera arm. The Xi system has laser-targeting mode. The laser-targeting specialty makes docking easier than the previous models [5, 11].
The touch-screen monitor is synchronized with the surgeon’s view and displays all of the system status icons and messages. It can be used for endoscope alignment and telestration or to toggle between video inputs. The patient-side cart of the S and Si systems also features a motor drive, which assists in docking the patient cart to the operating table and trocars [5, 30].
5.6 Instruments
The actual robotic system has four arms for the surgical interventions. One arm is designed for the endoscope, and the other are for the surgical procedure. The endoscopic arm holds the endoscope and provides a stable image. In conventional laparoscopic surgery, the view is obtained by an assistant. This may cause unnecessary movements and low-quality vision also. In the robotic surgery, the surgeon commands the camera often eliminating the visual confusion caused by laparoscopy.
The robotic system does not contain an inherent smoke evacuator. Smoke occurs after every single cauterization. One of the trocars may be reserved for smoke evacuation. However, it is a time-consuming procedure and also one of the disadvantages of robotic surgery [31–33]. A suction/irrigator does exist; however, it will take up the use of one of the working arms. We usually use an assistant laparoscopic 5 mm port for this purpose.
With any surgery, hemostasis is paramount. The bleeding from a major vessel can directly contaminate the endoscope, and it causes of loss of vision. In this situation, the assistant should clean the lenses of the endoscope. The assistant should separate the endoscope from the robotic system, clean, and reinsert it immediately and rapidly. Sometimes this takes time and needs to convert to open surgery. In this case, the weight of the endoscope may cause a delay. Thus, a more secure dissection is required in robotic surgery [3, 14, 34]. More time is needed to control bleeding than the laparoscopic surgery or convert into an open surgery.
The tips of the instruments are designed to act like the dexterity of the human and wrist. This is a new technology and specific to the robotic surgery, and it is named EndoWrist function. The robotic instruments carry out precise motions, which are coming from the surgeon console [2, 14, 35, 36]. The instruments have 7 degrees of freedom with 180° of articulating and 540° of rotation simulating a surgeon’s hand and wrist movements. The EndoWrist function allows the surgeon to perform secure intracorporeal anastomosis after bowel resections. This is one of the major advantages of robotic surgery. Laparoscopic intracorporeal anastomosis has often been a major hurdle for surgeons performing colorectal procedures and has led to the vast majority of anastomoses being performed by extracorporeal means. In addition, the EndoWrist function is also very useful for the pelvic dissection and around blood vessels. One can perform very delicate and precise dissection in very narrow confines of the deep pelvis [2, 3, 37, 38].
One of the major issues with pelvic surgery is dissection and transection of mesorectum, particularly in a narrow pelvis. This can often be a complicated and difficult procedure even in the open surgery. In laparoscopic surgery, the axis of the rectum and the axis of the instrument are often at oblique or tangential angles. The surgeon would prefer an acute- or right-angle approach to this dissection, but often it is not possible given the limitations of current widely applicable laparoscopic instruments. The robotic instrumentation, with its increased ability to rotate and provide acute angulation, allows for a right-angle approach during the transection of the mesorectum. The angulated instruments of the robotic system can act as a retractor also. The robotic instruments can create a bigger space than the classic laparoscopic instruments even in deeper pelvis [38–40]. However, the robotic instruments do have a usage limit. The robotic surgery system tracks the number of uses and data of usage will be tracked on the master console. An instrument arm will not function if an overused device is inserted [19, 20, 41].
Related posts:


Stay updated, free articles. Join our Telegram channel

Full access? Get Clinical Tree


