Fig. 1
Schematic diagram of the fully implantable telemetry system for measurement of kidney tissue PO2. After implantation surgery each rat is placed on a SmartPad that enables transcutaneous recharging and continuous recording with a data acquisition system. Control of the telemeter settings is facilitated wirelessly by the Configurator
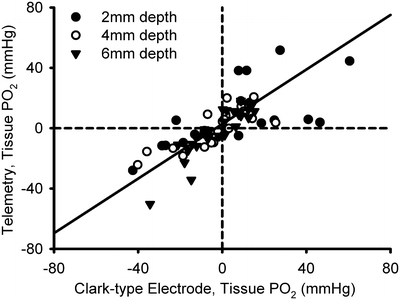
Fig. 2
Validation of the telemetry system. Changes in kidney PO2 in anesthetized rats, measured by Clark electrode and the carbon paste oxygen electrode-telemetry system. Kidney PO2 was changed by altering inspired oxygen. Measurements were made sequentially at different depths below the cortical surface. Symbols represent individual data points. The solid line represents the line of best fit, calculated by ordinary least products regression analysis (r = 0.74, P < 0.001). Reproduced from ref. 14 with permission from the American Physiological Society
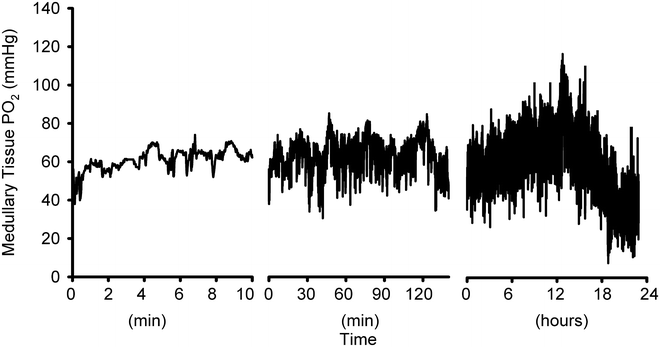
Fig. 3
A typical recording of renal medullary tissue PO2 measured over minutes, hours, and one day using a telemeter that had been implanted for a week. Values are derived using the post-implantation calibration relationship and subtraction of zero offset values
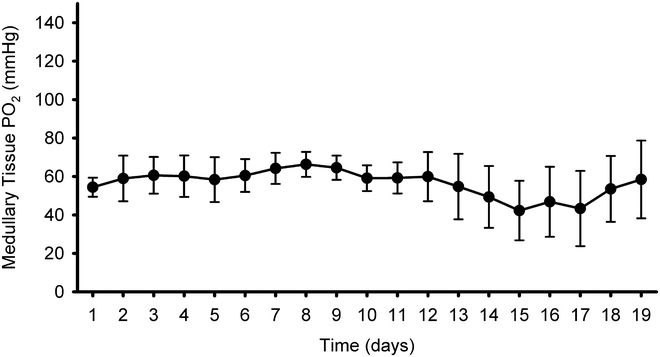
Fig. 4
Mean daily medullary tissue PO2 across a 19-day period. Values are derived using the post-implantation calibration relationship and subtraction of zero offset values and are shown as mean ± SEM of six rats (see Note 11 ). Reproduced from ref. 14 with permission from the American Physiological Society
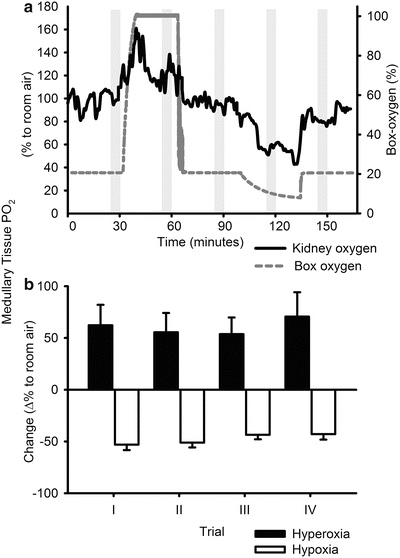
Fig. 5
Responses of medullary tissue PO2 to altered inspired oxygen content. (a) Typical response in one rat (solid line, 0.01 Hz low-pass filtered). The dashed line indicates the oxygen levels measured in the chamber. The shaded area shows the 5-min periods over which average data were obtained during the four trials over the 3-week period of telemeter implantation. (b) Mean changes in medullary tissue oxygen in response to hyperoxia (closed bars) and hypoxia (open bars) of 14 rats. I–IV represent the successive trials performed at 3–4 day intervals. Reproduced from ref. 14 with permission from the American Physiological Society
2 Materials
2.1 Oxygen Telemetry System
1.
Telemeter (TR57Y, Millar Inc., Houston, TX, USA).
2.
Configurator and ConfigSoft™ software (TR190, Millar Inc.).
3.
SmartPad™ (TR181, Millar Inc.).
4.
Acquisition hardware and software (e.g., ADInstruments PowerLab and Lab Chart Data).
2.2 Connection of the Electrodes
1.
Oxygen electrode: carbon paste electrode (Millar Inc.).
2.
Teflon (Polytetrafluoroethylene, PTFE) coated silver wire (AG549511, Advent Research Materials, Suffolk, UK) or reference and auxiliary electrodes (Millar Inc.).
3.
FluoroEtch™ (Acton Technologies, Pittston, PA, USA).
4.
Acetic acid.
5.
70 % ethanol.
6.
Scalpel.
7.
Fine (long) nose pliers.
8.
Needles for applying epoxy adhesives.
9.
Silver conductive epoxy adhesive (8331-14G, MG-Chemicals, Ontario, Canada).
10.
Clear nail varnish.
11.
Polyurethane tubing (internal diameter of 1.5 mm).
12.
Generic (slow setting) 2-part epoxy adhesive, Selleys Super Strength Araldite™ (Selleys Australia & New Zealand, Padstow, NSW, Australia).
2.3 Implantation of the Telemeter
1.
Isoflurane.
2.
Scalpel.
3.
Fine forceps.
4.
Cotton buds.
5.
Sterile saline.
6.
Gauzes.
7.
Scissors.
8.
Retractor for laparotomy.
9.
Hemostats.
10.
Suture to suture the leads to the adventitia of the aorta (non-absorbable, 6-0).
11.
Needle to pre-puncture the kidney (30G).
12.
n-Butyl-2 cyanoacrylate tissue adhesive (TissueSeal, Ann Arbor, Michigan, USA).
13.
SurgicalMesh™ (Textile Development Associates Inc, Brookfield, Connecticut, USA).
14.
Sutures and staples (or sutures) to close abdominal muscle and skin.
15.
Buprenorphine.
16.
Sodium pentobarbitone (or alternative method of euthanasia).
17.
Terg-a-zyme enzyme detergent (Sigma-Aldrich, St. Louis, MO, USA).
3 Methods
3.1 System Overview
The Millar Tissue Oxygen Telemeter (TR57Y) is an implantable telemeter for measurement of tissue PO2 in small animals (>200 g) such as the rat. The telemeter incorporates a potentiostat and is encased in silicone (Fig. 1). The unit has three stainless steel coiled lead wires that must be attached, by the user, to the three electrodes required for measurement of tissue PO2 (working, reference, and auxiliary). The oxygen electrode (working) is a carbon paste electrode [15–19], while the reference and auxiliary electrodes are silver electrodes. The telemeter units come in a fully implantable form, i.e., fitted with all three electrodes. Although the electrodes used for measurement of PO2 are not suitable for reuse (stabilization of the oxygen electrode in vivo requires deposition of proteins at the tip of the electrode), the great advantage of the system is that the user can attach new electrodes before the next experiment.
3.2 Connection of the Carbon Paste Oxygen Electrode to a Telemeter
These are the recommended procedures for attaching new electrodes to the leads of the telemeter (Fig. 6). The process of attachment of the electrodes to the telemeter leads requires at least 3 days. An additional 2 days is required for the connection to be completely cured, prior to calibration and implantation (see Note 1 ).
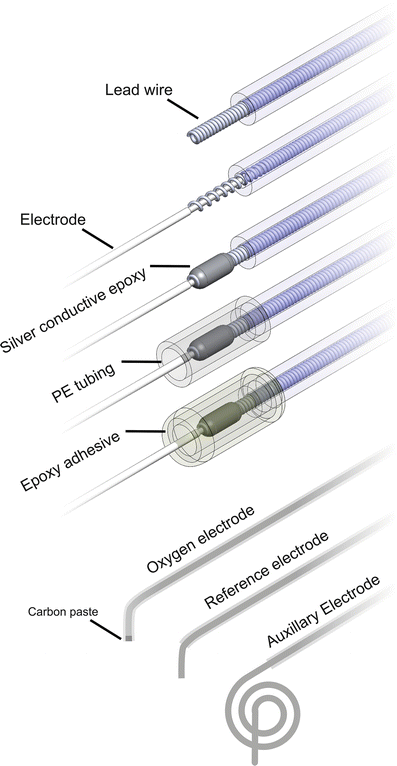
Fig. 6
Electrode lead preparation. In order to reuse the telemeter, new electrodes are attached to the telemeter leads. Silver conductive epoxy will facilitate conduction between electrodes and lead wire. Polyethylene (PE) tubing in combination with epoxy adhesive will provide a waterproof seal. Before use ~5 mm and 8 cm of the Teflon coat is removed from the reference and auxiliary electrode, respectively. Both the carbon paste oxygen and reference electrode are bent at a 90° angle ~5 mm from the electrode tip while the auxiliary electrode is coiled
3.3 Electrode Lead Preparation
The oxygen electrode supplied by Millar Inc. is pre-etched by the supplier. The etching process enhances adhesion of the polyurethane tubing (used to cover the connection) to the electrodes. Approximately 5 mm of the Teflon-coating of the electrodes should be removed at one end of the electrode to facilitate insertion of the electrodes into the stretched stainless steel coils of the telemeter leads. A properly etched electrode will have a light brown color on the Teflon coating. For best results we strongly recommend purchasing the electrodes from Millar Inc. for use with the TR57Y telemeters. Although Millar Inc. can supply the reference and auxiliary electrodes, these can be easily made and etched by the researcher from Teflon-coated silver wire.
3.3.1 Etching of the Reference and Auxiliary Electrodes
1.
Cut ~5 cm and ~8 cm of the Teflon-coated silver wire for the reference and auxiliary electrode, respectively.
2.
Heat FluoroEtch, acetic acid, and distilled water in a water bath at 80 °C. FluoroEtch deactivates rapidly once exposed to air. Therefore the sealed bottle should be placed inside the water bath.
3.
Immerse ~3 cm of the end of the electrodes to be etched into the etchant for 1 min before immersing them into 70 % ethanol and distilled water for 30 s each in succession.
4.
Finally, immerse the electrodes into acetic acid for 1 min.
5.
The etched end of the electrode will appear brown in color once it is successfully etched.
3.3.2 Preparation of the Telemeter for Reattachment of Electrodes
The telemeters can be reused after they are explanted. Using a scalpel carefully remove the used electrodes from the explanted telemeter, as close to the original joint as possible to preserve as much telemeter lead length as possible.
3.3.3 Lead Wire Preparation
1.
Place the telemeter leads on a flat surface so that the tubing is not stretched. Cut off any used and exposed stainless steel coiled wire.
2.
Cut the leads so that all three of the telemeter leads are of the same length.
3.
For each lead, hold the polyurethane tubing upright. Using a pair of long nose pliers, extend and stretch the unexposed stainless steel coiled wire ~1 cm past the end of the polyurethane tube.
4.
Carefully remove any colored silicone (blue, black, or red coverings around the coiled wires) from within the center of the extended coiled wire using forceps or by rolling the silicone coverings on the lead between two fingers.
5.
Cut the stretched lead wire so that approximately 3 mm is extending out of the end of the tubing for each lead.
6.
The leads are color coded as follows:
(a)
Blue lead = carbon paste electrode (oxygen electrode)
(b)
Black lead = reference electrode
(c)
Red lead = auxiliary electrode
3.3.4 Electrode Attachment (Fig. 6)
1.
Insert the exposed wire of the electrode into the coiled telemeter lead wire (at least 2 mm).
2.
Mix a small amount of the two component silver conductive epoxy (1:1 ratio). The working time of this product is about 10 min. After that time it becomes too thick to apply. Using a needle apply the silver epoxy between and around the areas where the electrode comes into contact with the telemeter leads. Ensure that the silicone tubing of the electrode is free of silver epoxy.
3.
Using a fresh (or cleaned) needle, remove excess epoxy. The joint should be able to fit inside the polyurethane tubing, so the connection should be no wider than the coiled wire itself.
4.
Leave the silver epoxy to dry overnight.
3.3.5 Sealing the Connection (Fig. 6)
1.
Coat the silver conductive epoxy with two layers (30 min in between each) of clear lacquer (nail varnish).
2.
After the second coating is dry (>30 min), mix a small amount of the two component adhesive epoxy in a 1:1 ratio.
3.
Apply a layer of adhesive epoxy over the silver epoxy layer. Cut a piece of polyurethane tubing (1.5 mm inner diameter) and carefully slide it along the electrode, ensuring that the tubing covers the connection and fits around the telemeter lead. Take care not to damage the tip of the carbon paste electrode.
4.
Leave this to dry overnight. Keep the leads and electrodes vertical to prevent uneven setting of the glue.
5.
Mix a small amount of the two component adhesive epoxy in a 1:1 ratio. Allow it to cure for 15 min before applying to the connection.
6.
 Propagation and Culture of Human Renal Fibroblasts
 Isolation and Primary Culture of Murine Podocytes with Proven Origin
 Isolation and Propagation of Rat Peritoneal Mesothelial Cells
 An In Vitro Murine Model of Vascular Smooth Muscle Cell Mineralization
 Qualitative and Quantitative Analysis of Histone Deacetylases in Kidney Tissue Sections
 The Isolation and Quantitation of Fetuin-A-Containing Calciprotein Particles from Biological Fluids


Apply the epoxy adhesive to each of the connections so that all sides are covered and that some of the etched (brown) part of the electrode coating is covered. Do not apply excess epoxy or it will run down the electrode. Ensure that both ends of the polyurethane tubing covering the silver conductive epoxy layer are completely sealed.
Related posts:
Propagation and Culture of Human Renal Fibroblasts
Isolation and Primary Culture of Murine Podocytes with Proven Origin
Isolation and Propagation of Rat Peritoneal Mesothelial Cells
An In Vitro Murine Model of Vascular Smooth Muscle Cell Mineralization
Qualitative and Quantitative Analysis of Histone Deacetylases in Kidney Tissue Sections
Stay updated, free articles. Join our Telegram channel
Full access? Get Clinical Tree
