Fig. 19.1
Patient placement and Trendelenburg testing
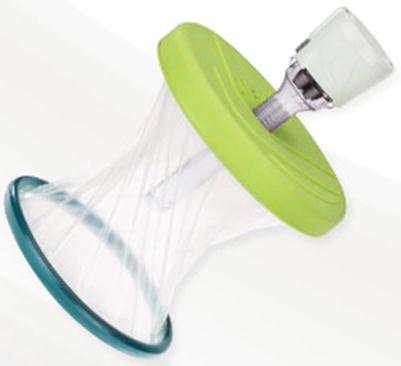
Fig. 19.2
Alexis laparoscopic system
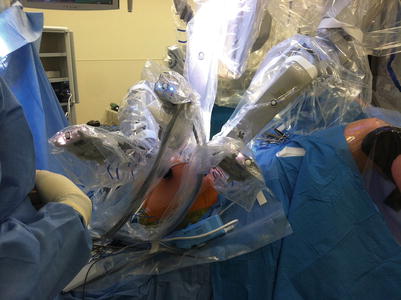
The assistant uses atraumatic laparoscopic bowel graspers through the laparoscopic port. A zero-degree camera is used for the entire procedure unless there is difficulty during the splenic flexure mobilization. At that time, the 30-degree camera with the angle down may be of help. The robotic cart is docked over the left hip, aligning the camera port with the left hip and the contralateral right shoulder (see Figs. 19.3 and 19.4). Adequate room should be left in the space between the legs to properly perform transanal surgery especially for an intersphincteric proctectomy, the TATA approach, or an abdominoperineal resection. The abdomen and the perineum are prepped separately.

Fig. 19.3
Left hip robotic placement, docking assistant side view
Fig. 19.4
Left hip robotic placement, side view
Port Setups and Extraction Sites
Port placement is dictated by the location of the pathology. For all pelvic pathology, the 12 mm camera port is routinely placed in the periumbilical area with the optiview technique. Veress needle or Hasson technique are optional. The placement of the camera port varies depending on the body habitus of the patient though. Taller patients will require the port placement at or below the umbilicus; shorter patients will have it placed somewhere between the xiphoid and the umbilicus. Smaller patients will also require the ports placed more widespread to avoid collisions. Routinely about 10–15 cm of distance between the ports is required.
Three robotic ports (R) are then inserted under direct visualization (see port configuration in previous chapter):
R1 is a robotic stapler trocar inserted approximately midway between the anterior superior iliac spine and the umbilicus in the right lower quadrant (RLQ). If an ileostomy is expected, all attempts should be made to place the port through the lateral aspect of the marked area to avoid any further incisions.
R2 is an 8 mm trocar located about 2–3 cm below the level of camera port in the left midclavicular line over the left lower quadrant (LLQ).
R3 is an 8 mm trocar located about 5 cm above the umbilical camera port in the anterior axillary line over the left flank. Proper placement of this port is crucial in order to perform cranial retraction and exposure during the deep portion of the pelvis.
One 8 mm laparoscopic port is placed (L) in the right midclavicular line above the level of camera port in the right upper quadrant (RUQ) (see Fig. 19.5). Care should be taken that this port is not placed too far towards the lower quadrant or “in-line” with the camera towards the splenic flexure, so it is possible to perform the splenic flexure mobilization avoiding the collisions internally or externally. A 12 mm port is utilized here if a laparoscopic stapler is needed for the colonic transection.
Fig. 19.5
Robotic LAR port placement
The preferred extraction site is the planned ileostomy site. Despite adequate mobilization of the proximal colon, it might not reach the right side of the abdomen sometimes. The benefit of a total robotic approach is that it allows the proximal transection and placement of a purse string intracorporeally. Alternatively, the specimen can be pulled through the anus for a coloanal hand-sewn anastomosis or utilizing a robotic distal purse string as described below.
Operative Steps (Table 19.1)
Table 19.1
Operative steps
Operative steps | Degree of technical difficulty (scale 1–10) |
|---|---|
1. Exploratory laparoscopy | 1 |
2. Identification of the ureter and ligation of the inferior mesenteric artery | 5 |
3. Mobilization of the sigmoid colon | 3 |
4. Mobilization of the descending colon and splenic flexure with identification and ligation of the inferior mesenteric vein | 6 |
5. Rectal mobilization | 5 |
6. Transection of the rectum | 3 |
7. Anastomosis with leak test | 2 |
Exploratory Laparoscopy
Appropriate pneumoperitoneum is established, and evaluation of the abdominal cavity and solid viscera is done for metastatic disease. After initial laparoscopic exploration, ports are placed and the patient positioned as described above.
Identification of the Ureter and Ligation of the Inferior Mesenteric Artery
All robotic ports and the assistant port are used during this operation. Medial to lateral identification of the pedicle is performed with the monopolar hook through R1 and a fenestrated grasper through R3 (see Fig. 19.6 and Video 19.1). R2 and the assistant port are used to tent up the sigmoid colon. Identification of the ureter is done medially below the pedicle (see Fig. 19.7). In some cases a second window can be opened above the pedicle to identify the ureter as well. Care is taken to identify hypogastric plexus, which is made possible with the three-dimensional visualization. The nerve plexuses are preserved prior to the transection of the vessels. The inferior mesenteric artery pedicle is taken with the robotic bipolar energy device (see Fig. 19.8).
Fig. 19.6
Medial to lateral entry
Fig. 19.7
Medial to lateral ureteral exposure
Fig. 19.8
IMA division
Mobilization of the Sigmoid Colon
After the medial to lateral mobilization of the sigmoid colon and division of the IMA, the lateral attachments can be easily taken again using a monopolar hook through R1. The graspers through R2 and R3 retract the sigmoid colon then medially. Although the medial to lateral approach is routinely employed, the surgeon must be well versed in the lateral to medial approach as in obese patients it may be very helpful to identify the ureter.
Mobilization of the Descending Colon and Splenic Flexure with Identification and Ligation of the Inferior Mesenteric Vein
The robotic vessel sealer is used again to complete a retroperitoneal dissection bluntly above the Gerota’s fascia cranially until the splenic flexure is reached, avoiding the tail of the pancreas. The inferior mesenteric vein (IMV) is taken also with the robotic vessel sealer device.
There are two recommended techniques to perform the splenic flexure take down robot assisted. Surgeon’s preference dictates whether this is performed in the beginning or at the end of the procedure.
The first technique involves the continuation of the medial dissection after ligation of the IMA and medial to lateral mobilization of the sigmoid colon. R1 is used for the right-handed instrument; typically the robotic sealer and R3 will be used for the left-handed instrument, typically a fenestrated grasper. For this, R3 needs to be repositioned described as the “flip technique” (see Fig. 19.9). R3 is undocked from the left flank port and docked through the 12 mm laparoscopic port in the RUQ. That port may be changed to a robotic port or a robotic port may be telescoped through the 12 mm port. If the commercially approved dual robotic 8/12 mm trocar kit is not available, care must be taken when performing this maneuver, as the manufacturer does not recommend it. The assistant can use R2 after the robotic arm has been undocked.
 Right Hemicolectomy and Ileocecectomy: Robotic Intracorporeal Anastomosis
 Right Hemicolectomy and Ileocecectomy: Single-Port Laparoscopic Approach
 Right Hemicolectomy and Ileocecectomy: Robotic Approach
 Transanal Endoscopic Surgery (TES)
 Proctectomy and Rectopexy: Laparoscopic Approach
 Sigmoid Colectomy and Left Hemicolectomy: Single-Port Laparoscopic Approach


Related posts:
Right Hemicolectomy and Ileocecectomy: Robotic Intracorporeal Anastomosis
Right Hemicolectomy and Ileocecectomy: Single-Port Laparoscopic Approach
Right Hemicolectomy and Ileocecectomy: Robotic Approach
Transanal Endoscopic Surgery (TES)
Proctectomy and Rectopexy: Laparoscopic Approach
Sigmoid Colectomy and Left Hemicolectomy: Single-Port Laparoscopic Approach
Stay updated, free articles. Join our Telegram channel
Full access? Get Clinical Tree
