Fig. 17.1
Port configuration. C 5 or 12 mm camera port, L1 5 mm working port, 12 mm for endoscopic stapler, L2 5 mm working port, L3 and L4 5 mm assistant ports, L5 optional 12 mm port for endoscopic stapler
Various extraction sites can be utilized. A small Pfannenstiel incision has the distinct additional advantage for a low anterior resection to allow placement of an open (TA) stapler for distal transection. A right lower or left lower quadrant muscle-splitting incision can be also utilized offering decreased incisional hernia rates compared to a midline incision.
Operative Steps (Table 17.1)
Table 17.1
Operative steps
Operative steps | Degree of technical difficulty (scale 1–10) |
|---|---|
1. Exploratory laparoscopy | 1 |
2. Identification of the ureter and ligation of the inferior mesenteric artery | 5 |
3. Mobilization of the sigmoid colon | 3 |
4. Mobilization of the descending colon and splenic flexure with ligation of the inferior mesenteric vein | 5 |
5. Rectal mobilization | 8 |
6. Transection of the rectum | 6 |
7. Anastomosis with leak test | 2 |
The initial part of the surgery including vascular pedicle ligation and splenic flexure mobilization is performed similar to a laparoscopic sigmoid resection as described in a previous chapter (Steps 1–4).
Exploratory Laparoscopy
The method for initial access used depends mostly on surgeon preference. A Hasson or Veress needle technique is acceptable. Usually the camera port is placed first at or near the level of the umbilicus, based on the plan for future ports, presence of previous scars, and body habitus. A thorough examination of the abdominal cavity is performed to rule out metastatic disease.
Identification of the Ureter and Ligation of the Inferior Mesenteric Artery
The first step in radical resection for rectal cancer is identification and division of the inferior mesenteric artery or superior hemorrhoidal artery. Preservation of the IMA trunk allows collateral blood flow through the left colic artery and does not result in a decrease in oncologic outcome [9]. It may, however, limit the mobility of the descending colon provided with a high ligation technique (Box 17.3). Placing the sigmoid colon on stretch and incising the peritoneum medially along the right iliac artery from the base of the pedicle toward the pelvis and the peritoneal reflection identifies the IMA pedicle. There is often a subtle change in the color of the fat from yellow mesentery to a dull opaque overlying the area that should be incised (see Fig. 17.2). Careful blunt sweeps directly underneath the superior hemorrhoidal artery allow the retroperitoneal tissues to be swept posteriorly, especially the sympathetic nerves which lie directly below this pedicle. If in the correct avascular plane, these structures can be separated to allow identification of the ureter, which should be done before vascular division. Significant bleeding during this step implies one is too high in the mesentery or too low in the retroperitoneum. From medial to lateral, the structures running in the retroperitoneum include the hypogastric nerve trunks, the iliac artery, the ureter, the gonadal vessels, and the psoas tendon (see Fig. 17.3). Identification of the ureter is paramount before proceeding to the next step. The ureter can easily be swept up with the vascular pedicle and divided unless a deliberate effort is made to identify and preserve it along its course. It should be swept out of harm’s way for a distance above and below the level of the vascular pedicle. Failure to identify this structure requires conversion to a lateral to medial or open approach.

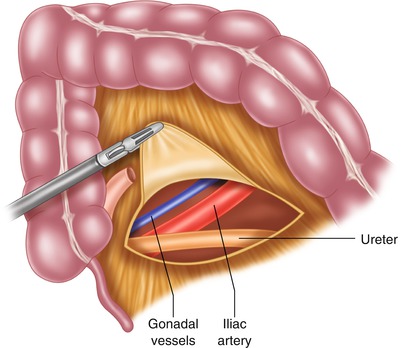
Fig. 17.2
Correct location to begin dissection of retroperitoneum. There is a slight color change from yellow to more gray at the junction of the mesentery with the retroperitoneum. Often, globular yellow fat can be seen in the mesentery. The retroperitoneal fat does not have this quality
Fig. 17.3
Retroperitoneal structures. At the level of the inferior mesenteric pedicle, the structures identified from lateral to medial are psoas muscle (not shown), gonadal vessels, ureter, and iliac vessels. As one proceeds more inferiorly, the ureter crosses the iliacs and will be seen medial to these structures
Box 17.3 Tip
Entering the upper presacral plane first and tracing it cephalad allows to easily identify the plane between sigmoid colon mesentery and retroperitoneum. The IMA elevates progressively to a perpendicular angle to the aorta.
There is a bare area on the proximal side of the IMA pedicle and between that structure and the inferior mesenteric vein that can be used to create a window to isolate the vessel. Any number of methods can be used for vascular division: surgical stapling, energy device, or suture ligature. The vessel may be stripped of some overlying fat prior to ligation to minimize the risk of device failure [10, 11]. When transecting the vascular pedicle with an instrument in the surgeon’s right hand, the left-handed instrument should be used to control stump bleeding should this occur. This allows the surgeon to have complete control of bleeding while additional methods are used to control the pedicle including: clip placement, suture ligature, or endoloop placement.
Mobilization of the Sigmoid Colon
Once the arterial branch is divided, a scissoring motion and blunt sweeps can again be used to lift the sigmoid mesentery off the overlying retroperitoneum. This should be done cephalad and caudad, as it will make subsequent dissection easier.
The white line of Toldt is divided along the sigmoid and descending colon. If the medial to lateral dissection has been carried far enough lateral, there should be only a thin layer of tissue remaining. The previous dissection plane is visualized from above and entered. The ureter can be injured during this step, especially if it was not swept posteriorly at the level of the pelvic brim as it descends into the pelvis. For low pelvic anastomoses, the dissection is carried all the way up the lateral sidewall to the level of the splenic flexure.
Mobilization of the Descending Colon and Splenic Flexure with Identification and Ligation of the Inferior Mesenteric Vein
Release of the splenic flexure is almost always required for sufficient mobilization of the left colon for construction of a tension-free low colorectal or coloanal anastomosis. This is facilitated by complete mobilization of the retroperitoneum at this stage of the operation and high ligation of the IMV near the level of the pancreas. This will also prevent medial mobilization of the kidney when the lateral dissection is performed. Right side down positioning and reversed Trendelenburg can aid in keeping the small bowel out of the way.
Techniques for obtaining additional length include full mobilization of the splenic flexure, division of the inferior mesenteric vein at the inferior border of the pancreas, and successive division of branches of the descending colon mesentery. An important component is preservation of the marginal artery, which allows collateral blood flow to reach the level of the anastomosis. To completely mobilize the splenic flexure, the surgeon must also enter the lesser sac. This can be done either by retracting the colon and omentum caudally and dividing the gastrocolic ligament or by retracting the omentum cephalad and going through the avascular plane at the attachment of the omentum to the transverse mesocolon. This portion of the dissection is connected to the previously completed portion on top of the pancreas. When complete, the entire splenic flexure should be mobile and able to be retracted medially. Overly zealous traction on the colon during this portion of the procedure is the most common reason for splenic flexure injury. Once the colon is completely free of the retroperitoneum, attention can be turned to mobilization of the rectum.
Rectal Mobilization
In open surgery, this rectal mobilization may be aided by cephalad division of the sigmoid colon after progressive ligation of the mesentery along the divided pedicle to allow better visualization of the pelvis. In minimally invasive procedures, keeping the sigmoid intact helps with retraction of the specimen up and out of the pelvis.
A posterior dissection is performed first and should proceed all the way to the pelvic floor or to the level of rectal transection (Box 17.4). Early division of the peritoneal reflection circumferentially around the rectum will aid in appropriate retraction of the rectum out of the pelvis as one proceeds with mesorectal excision. With appropriate anterior retraction on the rectum, the thin areolar layer of tissue dividing the fascia propria of the rectum from the presacral (or Toldt’s) fascia is progressively taken sharply or with monopolar energy (see Fig. 17.4 and Video 17.1). The hypogastric nerves should be identified and preserved. This requires continued readjustment of rectal retraction. An additional retractor may need to be placed to assist with this process. Appropriate tension and counter-tension allows clear visualization of the mesorectal envelope, which guides the dissection. Of note, the mesorectum will curve slightly anterior at the level of the coccyx and requires division of Waldeyer’s fascia to visualize the pelvic floor musculature.
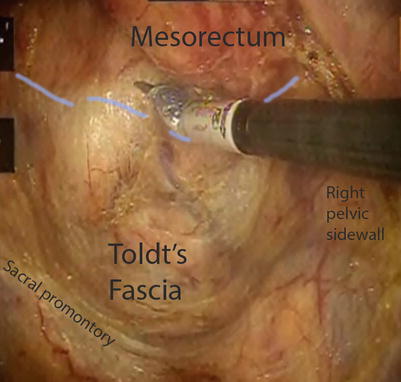
Fig. 17.4
Areolar plane is seen with proper mesorectal dissection. This depicts the posterior mobilization, which should be done along the dotted line
Box 17.4 Tip
Avoid dissection of the rectum and mesorectum completely on one side only even if it is tempting to just follow the easier posterior plane to the pelvic floor first. Dissect the mesorectal plane circumferentially going from posterior to anterior to lateral in a progressive fashion.
Lateral dissection is perhaps the most difficult and poorly understood component of the operation. The plane between the mesorectum and endopelvic fascia is not as clear here. The ureters may again be injured and must be identified. Again, a recurring theme is that proper dissection in this phase requires minimal diathermy and depends on adequate medial retraction of the rectum. The use of both sides of the table and/or a qualified assistant operating from the right of the patient can aid in completing the dissection, especially in a narrow male pelvis. The surgeon can then switch positions with the assistant utilizing the LLQ port for the right dissection plane.
In thinner patients, the surgeon can visualize the nervi erigentes coursing laterally (see Fig. 17.5). These may be swept out of the way. The nerves are again seen running at the back of the lateral edge of the seminal vesicles, bladder neck, and prostate. Bleeding encountered here means one is too medial in the mesorectum or too lateral along the pelvic sidewall, and the plane should be reassessed. The lateral “ligaments” in fact represent only a minimal amount of connective tissue and do not contain the middle rectal artery, which courses much lower and out of reach of most dissections [12].
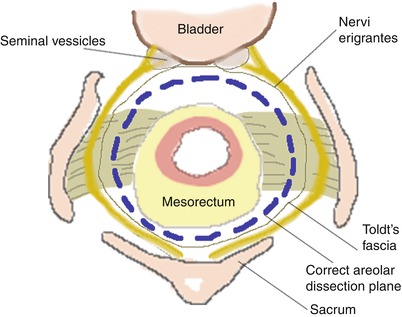
Fig. 17.5
Schematic depicting proper dissection plane along lateral ligaments and anteriorly
Japanese surgeons commonly include a lateral lymph node dissection with their LAR specimens. Their experience suggests an 8.6–16.4 % risk of positive lymph nodes within the obturator space, with higher positivity rates in lower tumors [13]. The extended resection significantly increases surgical morbidity, and the approach is not as common in western nations.
Anterior dissection begins at the peritoneal reflection and should proceed along Denonvilliers fascia. This runs along the rectovaginal septum or just posterior to the seminal vesicles. Again, progressive retraction of the rectum out of the rectum is the key to identification of the proper plane, which usually represents a layer of avascular areolar tissue (Box 17.5). A grasper with open jaws placed just below the peritoneal reflection or a fan retractor is helpful to obtain proper counter retraction in laparoscopic surgery. This simulates use of a St. Mark’s retractor in open surgery.
Box 17.5 Tip
When the mesorectum curves anteriorly at the level of the coccyx, dissection from anteriorly downwards is easier rather than trying to further lift up the rectum and mesorectum as done with a St. Marks retractor in open surgery.
Depending on the location of tumors, varying amounts of Denonvilliers fascia may be taken. The three layers that have been previously defined are close rectal (peri-muscular), mesorectal, and extramesorectal. The close rectal plane runs within the fascia propria of the rectum directly along the rectal wall. It is not an anatomic layer, so bleeding may be encountered within this layer. Its use is recommended by some in surgery for benign disease, such as inflammatory bowel disease, as it may decrease the risk of nerve injury. The mesorectal plane will leave Denonvilliers fascia intact anteriorly and is the most commonly used approach. The extramesorectal plane includes taking Denonvilliers fascia with the specimen, carrying the dissection more anteriorly. This exposes the prostate and seminal vesicles or includes the posterior wall of the vagina (see Fig. 17.6). The risk of nerve damage is high, but may be necessary for oncologic clearance of an anterior tumor. This plane is not as clearly defined, and meticulous dissection is required to preserve relevant structures [14].

Fig. 17.6
Mesorectal plane along the areolar tissue of the rectovaginal septum. Proper tension and counter tension is essential to identify this plane correctly
Transection of the Rectum
After completion of the rectal dissection, a rectal stapler may be fired across the distal aspect of the specimen. Maneuvering the stapler deep in the pelvis is often difficult, so a small reticulating stapler through the RLQ port is often used (Box 17.6). Frequently multiple loads are needed, and it is particularly challenging to achieve a perpendicular transection line. Alternatively, the rectum may be stapled through a suprapubic port with downward angulation of the Endo-GIA stapler. After confirmation that the tumor is adequately above the level of division, the staple is fired and the rectum removed. More than two fires of the stapler to complete transection increase the risk of leak [15]. If a significant amount of mesorectum remains at this level, blunt dissection should be used to make a tunnel immediately posterior to the rectal wall. The stapler is fired and the mesorectum is divided subsequently with an energy device or another stapler load. If there is any concern about the integrity of the rectal stump, a stump leak test may be performed, whereby it is insufflated underwater prior to performing any anastomosis.
Box 17.6 Tip
A bulky tumor rarely prevents placement of an endoscopic stapler through an RLQ or suprapubic port. A curved open stapler can be then placed through a Pfannenstiel incision. If this is also not possible, be prepared for a sharp transection and coloanal handsewn anastomosis.
Frozen section is not required to evaluate the distal margin, as it is often unreliable. Gross inspection should be performed at the time of surgery to ensure adequate margins. The mesorectum is subsequently divided to complete specimen removal. The specimen may be exteriorized through any number of methods as described above. A port site in the left lower quadrant or suprapubic location may be enlarged to allow placement of a wound protector. The specimen is then extracted and the proximal portion divided.
Anastomosis with Leak Test
The sigmoid colon is a poor functional substitute for the rectum, as it is the smallest caliber of any part of the colon. In choosing a point for proximal transection, the divided vascular pedicle is followed along the superior hemorrhoidal artery out to the proximal sigmoid. One will come across the marginal artery, which should be pulsatile if divided sharply. This ensures adequate blood supply to the remaining colon, maximum length on the remaining colon, and adequate lymphovascular clearance of the specimen.
For double-stapled anastomosis, a purse string is placed in the proximal colon and the anvil of the stapling device inserted. It is important to ensure enough serosa is elevated onto the anvil, as gaps can cause areas of weakness in the staple line. This will manifest as a defect in the anastomotic doughnut. This may be done using a purse string device, “baseball stitch,” or in and out technique. In order to ensure the suture slips down to tighten around the anvil, larger bites with some distance traveled between the bites work better. When passing the stapling device through the anus, the spike is advanced through the midportion of the rectal staple line. Some surgeons prefer to advance the spike through a side anteriorly, to remove an area prone to ischemia. In any case, the ends are joined and the stapler fired. Care should be taken to avoid involvement of any other structures in the staple line. The posterior wall of the vagina can be caught and may result in a fistula. After closing and before firing the device, an examining finger should be placed into the vagina and the stapler twisted to ensure the rectovaginal septum remains free of tethering. After firing, a leak test is performed by insufflating air with a proctoscope or flexible endoscope. The flexible endoscope has the additional advantage in that it can be used to confirm removal of the lesion, may be performed by a relatively inexperienced provider, and the anastomosis can be seen clearly on a video monitor. If the tattoo is not clearly seen, it may be helpful to use the endoscope prior to distal stapling to ensure an adequate margin.
Related posts:
 Right Hemicolectomy and Ileocecectomy: Robotic Intracorporeal Anastomosis
 Right Hemicolectomy and Ileocecectomy: Single-Port Laparoscopic Approach
 Right Hemicolectomy and Ileocecectomy: Robotic Approach
 Transanal Endoscopic Surgery (TES)
 Proctectomy: Total Robotic Approach
 Sigmoid Colectomy and Left Hemicolectomy: Single-Port Laparoscopic Approach
Stay updated, free articles. Join our Telegram channel

Full access? Get Clinical Tree


