Chapter 39 Minimally Invasive Pediatric Procedures
List of Minimally Invasive Pediatric Procedures
![]() The videos associated with this chapter are listed in the Video Contents and can be found on the accompanying DVDs and on Expertconsult.com.
The videos associated with this chapter are listed in the Video Contents and can be found on the accompanying DVDs and on Expertconsult.com.
I Pectus excavatum
Preoperative Considerations
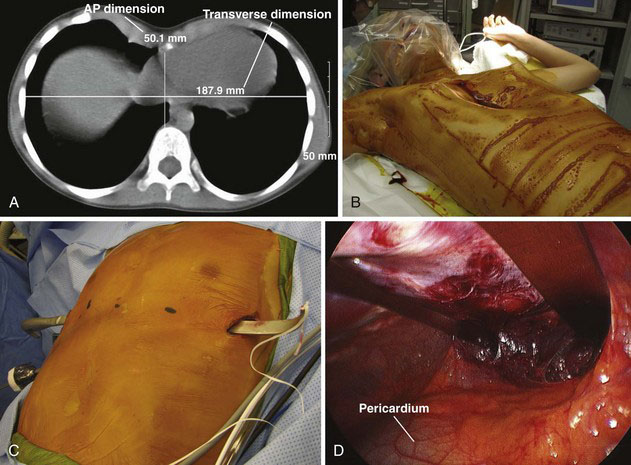
Because of the lack of consistent, reproducible, postoperative improvements in pulmonary function, and the perception by some that this defect is only a cosmetic one, there have been efforts to define which patients will benefit from operative correction. Preoperative evaluation should include a chest radiograph, computed tomography (CT) of the chest, pulmonary function studies, and echocardiography. The CT scan can demonstrate the defect, including morphology of the cartilaginous component, and cardiac or pulmonary compression. It also allows for accurate measurement of the Haller index, a ratio between the anteroposterior and transverse dimensions of the chest (Fig. 39-1A). An index of greater than 3.25 is considered severe. Echocardiography can demonstrate mitral valve prolapse or other pathology that results from cardiac compression.
Operative Technique
The patient is positioned supine on the operating room table, with the shoulders abducted, elbows flexed, and arm slightly rotated externally (Fig. 39-1B). Great care should be taken to properly pad the arms and avoid a stretch injury to the brachial plexus. Antibiotics are administered and continued for 24 hours after the procedure. After a sterile preparation and draping, appropriate sites are chosen for skin incisions, as well as for the entry and exit sites of the thoracic cavity. The thoracoscope is introduced through a port placed two interspaces below the lowermost skin incision on the right side in the midaxillary line. We use an insufflation pressure of 4 to 6 mm Hg. This provides good visualization when the pectus tunneler is passed across the mediastinum, anterior to the pericardium, exiting on the opposite side in a predetermined location (Fig. 39-1C).
We make a subxiphoid incision to remove the xiphoid, and then use blunt finger dissection to help create the plane between the sternum and pericardium, as well as to guide the tunneler across the mediastinum. At completion of placement of the bar or bars (Fig. 39-1D), a stabilizer is placed on the left side, while on the right side, the thoracoscope is used to guide placement of a 0-0 PDS suture around the bar to secure it to two separate ribs. The pneumothorax then is evacuated out the insufflation tubing, which is held under water as the anesthesiologist gives positive-pressure breaths. A small postoperative pneumothorax is to be expected but rarely requires placement of a chest tube.
II Mediastinal cysts
Operative Technique
Many lesions can be excised with two working ports and one camera port. Sometimes, a third working port is necessary to help with retraction by an assistant. Port positioning is individualized for each operation, depending on the specific location and dimensions of the lesion. When possible, the ports should be triangulated, and the camera should be placed between the two working ports. Once the mass is identified within the mediastinum (Fig. 39-2A), the next step is to incise the mediastinal pleura that overlies it. The cyst then is mobilized off adjacent structures, using blunt dissection and cautery when necessary (Fig. 39-2B). Most benign mediastinal cysts have little collateral circulation and can be removed with little risk for blood loss.
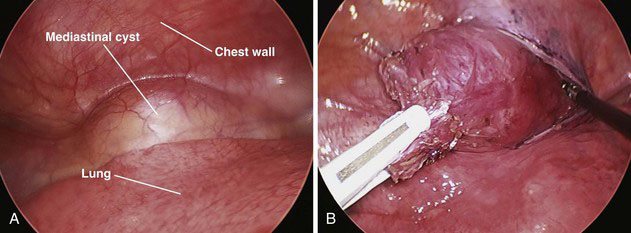
FIGURE 39-2 Mediastinal cysts. A, Thoracoscopic appearance. B, Incision of overlying pleura and cyst dissection.
III Congenital lung lesions
Operative Technique
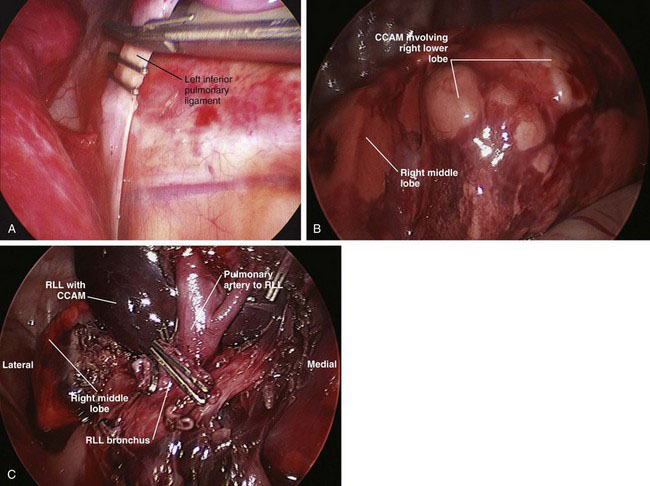
For a sequestration, the inferior pulmonary ligament should be divided first with a clip applier to control any aberrant vessels (Fig. 39-3A). This will be the extent of dissection for an extralobar sequestration; the lesion then can be removed after placement into a 10-cm retrieval bag. If the lesion is large, then the port site may need to be extended 1 to 2 cm. For CCAMs (Fig. 39-3B) and intralobar sequestrations, a lobectomy is the preferred treatment to ensure complete removal.
To ensure that the bronchus is supplying only the involved lobe, the stapler is clamped down, and large sustained breaths are given to ensure that the remaining lobes are not supplied by the bronchus that is about to be divided. The stapler is fired (Fig. 39-3C), and the lobe is placed into a 10-cm retrieval bag, which then is brought out through the 12-mm port site (extended as needed). The chest is filled with saline to cover the bronchial stump, and another sustained breath (to about 30 cm H2O pressure) is given to ensure that there is no leak. A chest tube is inserted through one of the port sites, and the remaining port sites are closed.
IV Congenital diaphragmatic hernia and diaphragmatic eventration
Preoperative Considerations
Congenital diaphragmatic hernia results from the lack of fusion of the diaphragmatic musculature. This defect typically occurs in two distinct areas: (1) a posterolateral location, either left (85%) or right (15%); or (2) a central-anterior location. A posterior-lateral hernia commonly is referred to as a Bochdalek hernia, and the central-anterior defect is referred to as a foramen of Morgagni hernia (Fig. 39-4A).
Operative Technique
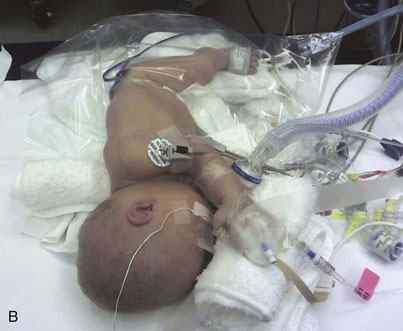
The minimally invasive repair of a Bochdalek hernia is best approached with a thoracoscope. The neonatal patient is placed transversely across the operating table, with bumps placed beneath the patient to elevate the body another 4 to 6 inches off the table. The patient then is placed in the lateral decubitus position with the hernia side facing up (Fig. 39-4B). For an older patient who will not fit transversely across the table, the head is positioned at the top of the bed, and the bed is turned 90 degrees. The goal is to position the surgeon at the patient’s head, facing the feet.
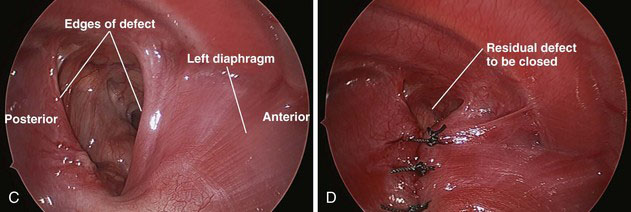
The remainder of the hernia contents are pushed through the defect under direct vision, including the liver and spleen, if present. After the contents have been reduced, they should stay in the abdomen secondary to the insufflation pressure (Fig. 39-4C). If the contents are not retained in the abdomen, then a fourth port can be inserted just above the diaphragm for additional retraction. Cautery then is used to mobilize the posterior leaflet of the diaphragm from the retroperitoneum as much as possible.
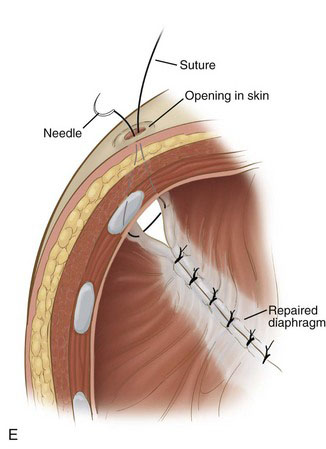
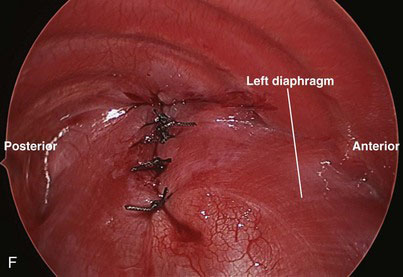
Braided nonabsorbable sutures (0-0 or 2-0) are used to close the defect from a medial to lateral direction. For the most lateral suture, we have found that diaphragmatic tissue typically is lacking (Fig. 39-4D). Because this is the most likely site for recurrence, we now employ an external suture to secure this corner (Fig. 39-4E). A stab incision is made in the skin just under the rib at the corner of the diaphragm. The suture is brought through the skin and under the rib, and then grasped inside the chest using the thoracoscopic needle drivers. Next, the suture is placed through the upper rim of the diaphragm and the lower rim of the diaphragm, and then back out through the chest wall above the rib where it originally came under, in a triangular configuration. The suture is tied down with the knot just under the skin (Fig. 39-4F). For right-sided defects, care must be taken to avoid injury to the hepatic veins along the medial aspect of the defect.
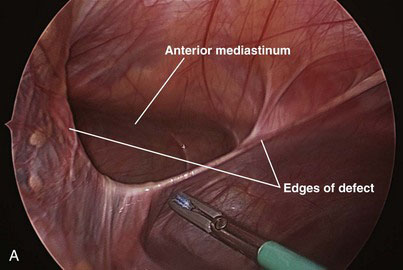
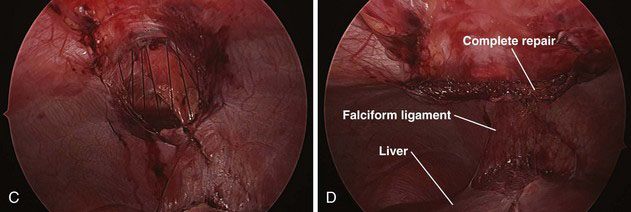
The contents of the hernia are reduced into the abdomen (Fig. 39-5A). The falciform ligament is mobilized with cautery all the way to the lower edge of the hernia defect so that the entire defect can be visualized. The hernia sac is grasped at the apex and inverted into the abdomen. The sac then is removed circumferentially from the edges of the diaphragm with a tissue sealing device or cautery.
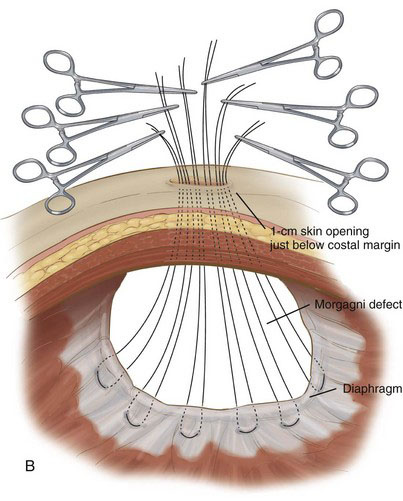
The abdominal wall is palpated just below the xiphoid, visualizing with the laparoscope until the probing finger is centered over the defect. A 1-cm incision is made transversely in the skin. Braided, nonabsorbable 0-0 or 2-0 sutures then are placed full thickness through the abdominal wall and grasped with the laparoscopic needle drivers. We generally start on the right side of the defect and proceed sequentially to the left, placing five or six sutures to close the entire defect (Fig. 39-5B and C). Each suture is placed in a U-type fashion through the posterior aspect of the diaphragmatic defect. The needle then is directed back out through the anterior abdominal wall. All sutures are placed before tying the knots.
After the sutures have been placed, the air is released from the abdomen, and all the knots are tied while the assistant holds the untied sutures under tension. After all the knots have been tied, the abdomen is reinsufflated (but only to 10 mm Hg), and the repair is inspected (Fig. 39-5D). The ports are removed, and the sites are closed with absorbable sutures.
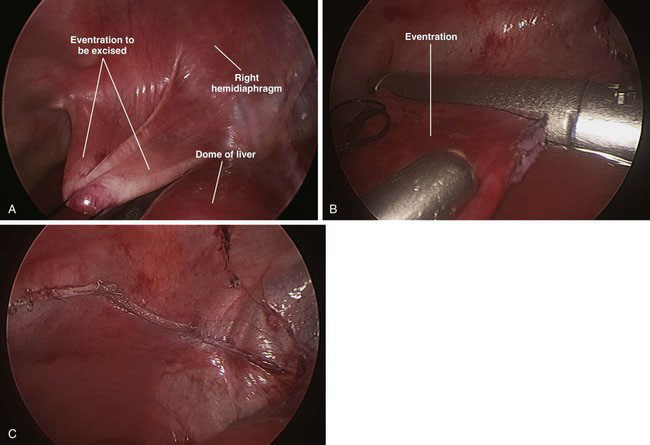
The apex of the eventration is visualized easily because it is nearly transparent. A 2-0 suture is advanced through the 5-mm lower quadrant port and grasped inside the abdomen. The suture is placed through the apex of the eventration and then extracted through the same 5-mm port. This is repeated with an additional 2-0 suture to help disperse the tension on the thin tissue. Tension is applied to the sutures to invert the diaphragm into the abdomen (Fig. 39-6A). An endostapler then is inserted through the 12-mm port in the upper lateral abdomen, and the redundant diaphragm is divided from medial to lateral (Fig. 39-6B). The plication typically requires three or four stapler loads to transect the atrophied muscle (Fig. 39-6C). The ports are removed, and the sites are closed with absorbable sutures.
V Feeding difficulties
< div class='tao-gold-member'>
Stay updated, free articles. Join our Telegram channel

Full access? Get Clinical Tree


