(1)
Department of Endoscopy, Fukuoka University Chikushi Hospital, Fukuoka, Chikushino, Japan
2.5 Endoscopic Techniques (2): Approach to Examination of Different Parts of the Stomach Using a Hood
Summary
1.
Use of a soft magnifying endoscopy hood
2.
Appropriate settings for the video processor
3.
Adjustment of the intragastric air volume through insufflation and suction
4.
Water immersion technique
Keywords
Image-enhanced endoscopy (IEE)Magnifying endoscopyNarrow-band imaging (NBI)StomachTechniqueExplanation
Technique was, is, and will be the most important thing in performing endoscopy. If the findings obtained through that technique are scientific, that is ideal.
I have never considered the zoom gastroscopy method I presently employ to be particularly difficult. For example, when I taught overseas colleagues to attach a magnifying endoscopy hood before commencing ME, they readily obtained endoscopic images in focus at the maximal magnifying ratio. However, when I have opportunity to speak to my colleagues from other Japanese medical institutions, they tell me that my observation methods are difficult. After mature consideration of the differences between my methods and traditional techniques, I reached the conclusion that a certain degree of skill is required to steadily visualize under magnification the mucosa of the stomach with its broad lumen [1].
It is not possible to cover all the different visualization methods in these pages, but I will present an overview of technical pointers for obtaining magnified endoscopic images of the necessary and sufficient resolution.
2.1 ME of the Upper Gastrointestinal Tract
I presently use the Olympus upper gastrointestinal tract magnifying endoscopes, the GIF-Q240Z (Fig. 2.1) and the GIF-H260Z. Both endoscopes are designed to immediately follow non-magnifying conventional endoscopic examination with magnified examination at up to 80× magnification. Pressing down on the zoom lever on the control section on the scope handle part (Fig. 2.1) causes the lens in the endoscope tip to move, allowing optically magnified visualization. Pushing up on the zoom lever in the opposite direction reduces the magnification. Unlike the electrical zoom function using micro-actuator incorporated into the endoscope tip in most lower gastrointestinal tract magnifying endoscopes, in this endoscope we directly manipulate the movable lens in the tip of the scope, allowing continuous non-stepped adjustment of the magnifying ratio. With practice, we can make very fine adjustments to the magnifying ratio and come to prefer the manual controls.
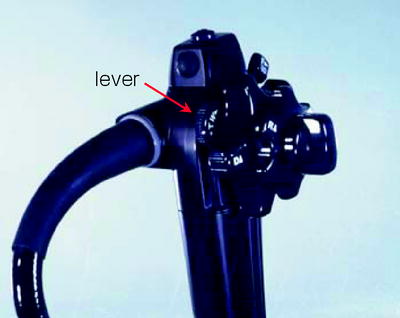
Fig. 2.1
Control section on the scope handle part of the GIF-Q240Z upper gastrointestinal tract magnifying endoscope
The GIF-Q240Z can be used with the EVIS 240 or later electronic endoscopy system, whereas the GIF-H260Z can only be used with a high-definition signal-compatible system, the EVIS 260 or later.
The outer diameter of the insertion tube is 9.8 mm for the GIF-Q240Z and 10.5 mm for the GIF-H260Z. The GIF-Q240Z has the same diameter as the GIF-Q240 conventional endoscope. The GIF-H260Z has a slightly larger insertion tube diameter than the GIF-H260 high-definition conventional endoscope, but it does boast a water jet function.
2.2 Setting Up an Electronic Endoscopy System: Video Processor Settings and Allocation of User-Selectable Switches on Control Section
Although we make optical magnifying examinations to achieve magnified endoscopic images of sufficient resolution, it is also important to have the right settings on the electronic endoscopy system. As I use an Olympus electronic endoscopy system (EVIS Spectrum), here I will describe the settings I use on the video processor (CV 260). In recent times, the addition of narrow-band imaging (NBI) allows us to readily observe the microvasculature with a high degree of contrast. However, it is important to first set the image processing functions appropriately, beginning with the structure enhancement function already incorporated into the video processor (Fig. 2.2).
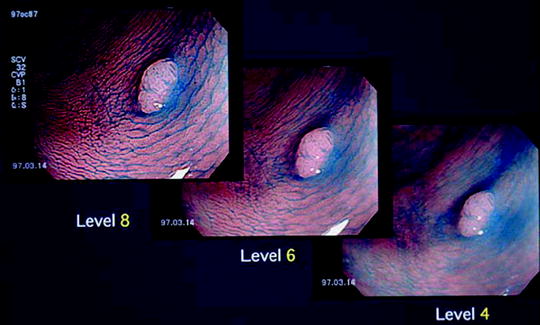
Fig. 2.2
Structure enhancement function already incorporated into the processor. This shows a dye-stained colorectal adenoma. We can see that as we raise the level of structure enhancement, the microsurface structure becomes clearer
2.2.1 Structure Enhancement Function [2] and NBI
The structure enhancement function has two modalities, an A mode and a B mode. Independent settings can also be made for white-light imaging (WLI) and NBI. Because blood vessel diameters increase as the level is raised with the A mode, I use the B mode. Using the user-selectable functions on the video processor, I preset the structure enhancement function to B mode levels 4, 6, and 8. In actual procedures, I begin with level 4 or 6 non-magnifying examination and then switch over to magnified examination at level 8 (Fig. 2.3).
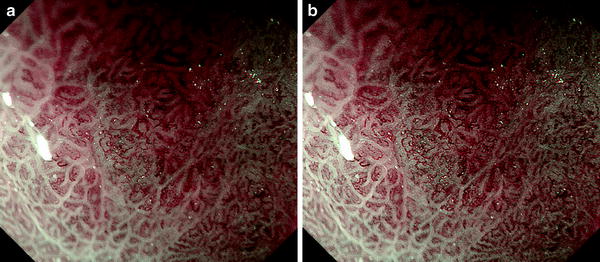
Fig. 2.3
Structure enhancement function in magnifying endoscopy (ME) with narrow-band imaging (NBI). Level 8 structure enhancement delineates the microvascular architecture more clearly than level 4
I use the upper gastrointestinal NBI color mode 1, with the B mode levels 4, 6, and 8 structure enhancement function settings. As I only use NBI in conjunction with magnifying endoscopy, in practice I only use level 8 structure enhancement with NBI.
2.2.2 Adaptive Index of Hemoglobin (IHb) Color Enhancement Function and White-Light Imaging (WLI)
At the same time, I preset the IHb color enhancement function at levels 0, 2, or 4, changing between them using the video processor switch. In practice, I rarely use the IHb color enhancement function and usually leave it at level 0. I would like to emphasize that IHb color enhancement function is particularly useful in magnified examinations with WLI in the case of lesions with a high microvascular density.
2.2.3 Allocation of User-Selectable Switches on the Control Section
I allocate the user-selectable switches on the control section as follows: (1) freeze, (2) switching between the three preset levels of structure enhancement, (3) switching between WLI and NBI, and (4) shutter.
2.3 Use of Soft Black Hood
2.3.1 Why a Distal Attachment (Hood) Is Needed for ME Examinations
To obtain steady ME images of the gastric mucosa at the maximal magnifying ratio, a soft black rubber hood (MB 162/MAJ-1989 for use with the GIF-Q240Z, MB 46/MAJ-1990 with the GIF-H260Z; both Olympus) should be attached to the endoscope tip (Fig. 2.4). The depth of the hood is the same as the observation depth for the endoscope at the maximal magnifying ratio, so placing the hood perpendicularly right up against the mucosal surface enables us to readily obtain images at maximum magnification and in focus. In other words, we can steadily observe down to the capillary level at the maximal magnifying ratio (7.9 μm [1] with the GIF-Q240Z). Without a hood, it is impossible to quickly and easily obtain properly focused images, no matter how high the resolution of the magnifying endoscope, in the stomach with its broad lumen, as well as interference from respiratory movements and aortic pulsations. On other words, as long as we do use a hood, we can easily obtain magnified images of the required resolution.
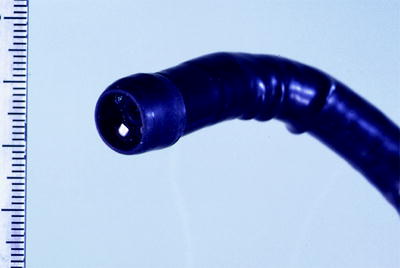
Fig. 2.4
Soft black hood (MB 162/MAJ-1989, Olympus) attached to the tip of the GIF-Q240Z endoscope
2.3.2 Why We Use a Soft Black Hood
Although I used a transparent plastic hood when I commenced zoom gastroscopy, in 2000 I changed over to a soft black hood designed for use with ME. The reasons I prefer a soft black hood to a clear plastic hood are as follows: (1) as the rubber is softer than plastic, it is less likely to damage the lesion or surrounding mucosa, thereby avoiding hemorrhage; (2) the depth of the hood is such that it only enters the very small part of field of vision even during non-magnifying examinations, so there is no need for it to be transparent; and (3) during non-magnifying examinations, reflections from within the plastic hood are more likely to interfere with observations, and less reflection occurs from a black surface. I perform all endoscopies, screening as well as detailed examinations, with a soft black hood in place. If a lesion is detected during a non-magnifying screening examination, this can be followed immediately by a magnified examination at the maximal magnifying ratio.
2.3.3 Pre-procedure Checks
Before each procedure, I check that the endoscope’s optical magnification function is working normally and that the hood is attached in the correct position. In practice, I use a 1 cm2 piece of graph paper attached to the instrument trolley with adhesive tape. After mounting the hood on the endoscope tip, I place the end of the hood perpendicularly onto the graph paper and press down on the zoom lever on the control section to provide maximum magnification. If the width of the field of view as shown on the monitor screen agrees with the graph paper gradations at 3.2 mm, we have confirmed that the optical zoom function is working normally, and the hood is mounted correctly (Fig. 2.5).
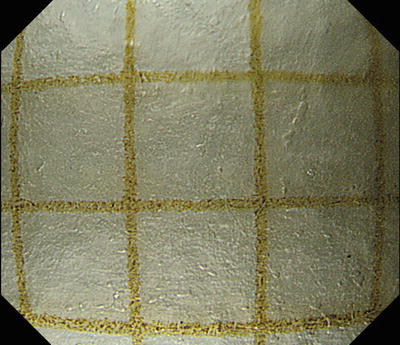
Fig. 2.5
Image taken at maximal magnifying ratio with hood tip placed vertically on graph paper. If the width of the horizontal field of view is approximately 3.2 mm, we can see that the hood is mounted in the correct position and the endoscope’s optical magnification function is working normally
2.4 Endoscopic Techniques (1): Changing from Non-magnifying to Magnifying Endoscopic Observation
2.4.1 Premedication
We prepare a solution mixing Pronase® (Roche Applied Science) 20,000 U, sodium bicarbonate (NaHCO2) 1 g, and Baros® antifoaming agent (20 mg/mL polydimethylsiloxane, Horii Pharmaceutical Ind., Ltd) 10 mL in 100 mL of water and ask the patient to drink this solution 30 min before their procedure. Pronase, however, is not available for use in all countries. An alternative mixture comprises 100 mL of water mixed with 2 mL of acetylcysteine (200 mg/mL Parvolex, Celltech, UK; or Mucomyst, Bristol-Myers Squibb, USA) and 0.5 mL (40 mg/mL) activated dimethicone (Infacol, Forest Laboratories, UK).
The indications for sedation prior to a screening endoscopy procedure are the same as for non-magnifying gastroscopy. I only employ sedation when the patient wishes it or we have prior warning of a strong gag reflex. Sedation should be used prior to detailed examinations. I administer an intramuscular antispasmodic injection such as Buscopan® or Glucagon® before commencing the procedure.
2.4.2 Endoscopic Examination
Insertion of the endoscope is the same as for conventional gastroscopy. After examining the middle and lower pharynx, larynx, and esophagus, the scope is introduced into the stomach. As described below, I aspirate as much of the gastric juices as possible in advance so they do not get in the way when the air is removed and the scope applied to the gastric mucosa. If a lesion is detected, I rinse the lesion and surrounding mucosa with Gascon® (polydimethylsiloxane, Kissei Pharmaceuticals Co., Ltd) solution and conduct a non-magnified examination.
< div class='tao-gold-member'>
Only gold members can continue reading. Log In or Register to continue
Related posts:
 Basic Principles for the Interpretation of Magnified Endoscopic (ME) Findings: Vessels (V) Plus Surface (S) Classification System
The Proposed Vessels Plus Surface (VS) Classification System: Principles for Interpretation of Magnifying Endoscopy with Narrow-Band Imaging (M-NBI) Findings
Basic Principles for the Interpretation of Magnified Endoscopic (ME) Findings: Vessels (V) Plus Surface (S) Classification System
The Proposed Vessels Plus Surface (VS) Classification System: Principles for Interpretation of Magnifying Endoscopy with Narrow-Band Imaging (M-NBI) Findings
 Clinical Applications of Magnifying Endoscopy with Narrow-Band Imaging (M-NBI) of the Stomach
 Microanatomies as Visualized Using Magnifying Endoscopy with Narrow Band Imaging in the Stomach: Which Microanatomical Structures Can We Visualize in the Glandular Epithelium Using Narrow Band Imaging, and How Is This Achieved?
 Light Blue Crests (LBCs) and White Opaque Substance (WOS)
 Analysis and Interpretation of Magnifying Endoscopy with Narrow Band Imaging (M-NBI) Findings in Gastric Epithelial Tumors (Early Gastric Cancer and Adenoma) Stratified for Paris Classification of Macroscopic Appearance
Stay updated, free articles. Join our Telegram channel

Full access? Get Clinical Tree


