| 5 | Inserting the Endoscope and Advancing It in the Colon |
Inspection and Palpation
Inspection. The examination begins with an inspection of the perianal region. The patient should be in the left lateral position with his knees bent and pulled up. A simple inspection can detect skin changes, scars, anal skin tags, hemorrhoids, anal fissures, anal venous thromboses, fistula, injuries, or prolapse (anal or rectal prolapse). Any findings must be noted later in the examination report. Figures 5.1, 5.2 show examples of pathologies detected during inspection. The diagnostic report should include exact localization: for example, distance from the anus or a description of location as if the patient were in the dorsal recumbent position (at the 12-o’clock position ventral to the anus).
Palpation. Following inspection, a digital examination of the anal canal and distal rectum must be completed before the actual endoscopic examination begins. Attention should be paid to palpable endoluminal abnormalities (polyps, tumors, foreign objects) as well as to extraluminal appearances. Male patients can also undergo a prostate check. An assessment of sphincter tonus as well as any noticeable discomfort during the examination (inflammation, fissures) should be included in the palpation findings. Patients who have been prepared for routine endoscopy will have an empty rectal ampulla. Emergency patients are another matter, however. Especially in the event of acute gastrointestinal bleeding, in addition to endoluminal inspection, characterization of stool contents can provide important additional information (melena, fresh blood, coagulum, stool), helping to infer the source and intensity of bleeding and making the rest of the diagnostic procedure easier. Figure 5.3 provides some examples of endoscopic pathological findings that can be detected during digital palpation.
Table 5.1 provides a summary of possible findings from inspection and palpation prior to endoscopy.
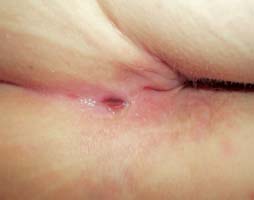
Fig. 5.1 Examining the perianal region in the left lateral position: patient with Crohn disease; reddened fistula opening at about the 6-o’clock position.
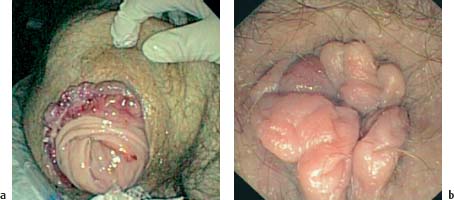
Fig. 5.2 Inspecting the perianal region.
a Total rectal prolapse. b Pronounced circular anal skin tags.
Inspection | Palpation |
|---|---|
|
|


Passing the Anal Sphincter
After completing inspection and palpation and, if necessary, administering an analgesic, the actual endoscopic examination can begin. A local anaesthetic lubricating jelly, such as a lubricant containing Lidocain, should be applied liberally. The endoscope tip is then inserted in the rectum and guided digitally without visualization. The examiner should explain to the patient the steps being taken and inform the patient that he may experience the urge to evacuate his bowels. The endoscope tip is inserted in the direction indicated by preceding palpation; as a rough guide, the direction of the anal canal runs in a line between the anus and the navel. After “blindly” inserting the endoscope 4-5 cm, air is insufflated and the endoscope tip is pulled back until the lumen of the distal rectum can be seen (Fig. 5.4). The rectal lumen is then centered in the middle of the monitor screen (Fig. 5.5) and the endoscope is advanced under visualization of the lumen to the rectosigmoid junction.
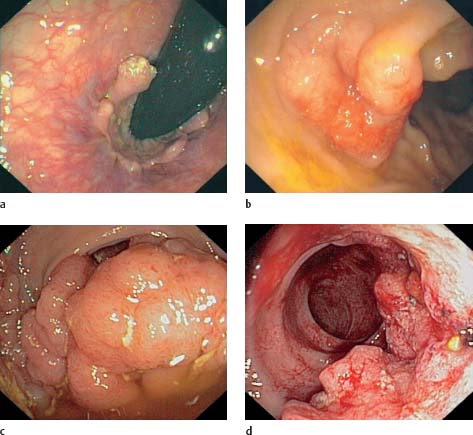
Fig. 5.3 Endoluminally palpable obstructions.
a Soft, stalklike obstructions with smooth surface in the anal canal (hypertrophied anal papilla on the dentate line, endoscope inverted in rectum).
b Sessile, submucosal obstruction with indentation in the center, 6 cm above the anus (histology: lymphoma).
c Large, endoluminal obstruction 5 cm above the anus (luminal obstruction due to polyp; histological adenoma with severe intraepithelial neoplasia).
d Hardened semicircular obstruction in distal rectum (broadbased growing carcinoma with spontaneous bleeding).
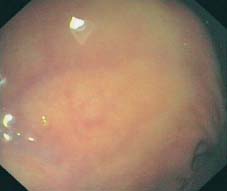
Fig. 5.4 After “blindly” advancing the endoscope in the rectum, the instrument is withdrawn. Direct view of the rectal wall. After withdrawal and air insufflation the lumen can be seen (lower right).
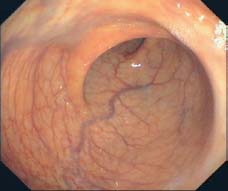
Fig. 5.5 Centering the rectal lumen before continuing colonoscopy.
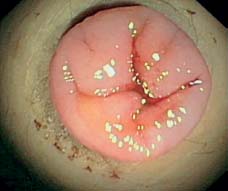
Fig. 5.6 Colostomy (appositional streaks of blood due to acute lower gastrointestinal bleeding).
At this point in the examination there has not yet been sufficient inspection of the distal rectum or anal canal, which will be more closely examined on withdrawal of the endoscope later (possibly also using retroflexion of the endoscope in the rectum; see below).
Endoscope Insertion in Postoperative Patients (Colostomy/Ileostomy)
Examination options. If the patient has a colostomy/ileostomy as a result of an operation with lost intestinal continuity, endoscopy of the colon via the anus and ileum is often impossible and must be performed through the stoma (Fig. 5.6). Before the examination, the examiner should know the extent of the operation(s), the type of stoma, and its location. In the case of an end ileostomy, only the anastomosed small intestine can be examined endoscopically; the remaining colon, if there is any, is not reachable via the stoma. If the patient has a colostomy, the proximal colon and terminal ileum can normally be examined without a problem. If the patient has a double-barreled ileostomy or a colostomy, the intestinal segments proximal and distal to the stoma can be examined (Fig. 5.7).
Inspection and palpation. Before the actual endoscopy, a thorough inspection of the area surrounding the stoma and digital palpation of the anastomosed intestinal segment should be performed. Special attention should be paid during inspection to signs of prolapse and mucosal abnormalities involving the visible intestinal mucosa as well as irregularities on the surrounding skin. Along with detecting endoluminal irregularities, the purpose of palpation is to ascertain the width of the lumen and the direction of the anastomosed intestinal segment. Knowing the width of the stoma and insertion direction is essential for inserting the endoscope and choice of instrument used is determined in part by the palpated diameter of the lumen.
Inserting and advancing the endoscope. Insertion of the instrument is eased by the examiner’s finger and the use of air insufflation; it is inserted until the intestinal lumen comes into view. The lumen is then centered on the monitor screen before further advancing the endoscope. The rest of the examination ultimately depends on remaining intestine. Colonoscopy through the stoma can be made more difficult by loss of original intestine, increased postoperative mobility of the remaining intestine, or angulation as a result of postoperative adhesions.
Advancing the Endoscope in the Sigmoid Colon (Sigmoidoscopy)
Normal procedure. After reaching the rectosigmoid junction about ca. 16 cm proximal to the anocutaneous line, the endoscopy of the sigmoid colon begins. The sigmoid colon is situated intraperitoneally and is highly variable in length. The junction between rectum and sigmoid colon often appears as an acute bend in the lumen. The sigmoid colon can also be recognized by its prominent, circular folds. Passing the sigmoid colon with the patient lying in the left lateral position is unproblematic in simple cases where the sigmoid colon shortens itself, enabling easier passage through curves. Passing the sigmoid-descending junction is often more difficult in this position, especially for more slender patients, as the sigmoid colon is forced into the left abdomen, narrowing the angle of the junction with the descending colon. Changing position to the supine position—or, especially for slender patients, to the right lateral position—allows the sigmoid colon to fall more into the middle and right lower abdomen, thereby straightening the angle and making passage of the endoscope tip into the descending colon significantly easier.
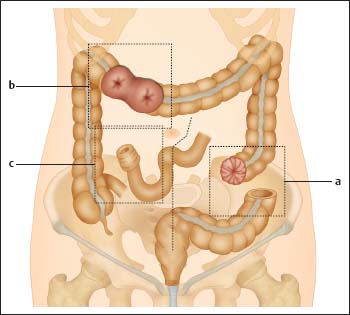
Fig. 5.7 Schematic illustration of various stomas. a: end colostomy, b: double-barreled colostomy, c: end ileostomy.
Constant visualization of the lumen is desirable for passing the sigmoid colon. The instrument should be kept as straight as possible, without significant bowing or looping. However, individual differences in length and course of the sigmoid colon can make viewing the lumen more difficult and in some patients, looping cannot be avoided.
“Blind” advancement of the endoscope and changing patient position. If the view of the colonic lumen is obstructed or prevented by sharp angling, the examiner can attempt to ascertain luminal direction and briefly point the instrument tip without visualization in the presumed direction of the lumen, using gentle pressure to advance the endoscope in this direction. The presumed direction of the lumen is often indicated by shadowing (Fig. 5.8). Such maneuvers, which are performed only in exceptional cases, require experience, a light touch, and extreme concentration. The procedure must be stopped if macroscopic changes to the nearby mucosal surface (blanching, bloodless- ness of mucosal vessels) are observed, or if there is increased resistance to advancement of the instrument and discomfort to the patient as these are signs of increased danger of perforation. Sharp kinks of the lumen can often be minimized or even eliminated by changing the position of the patient; the in-traperitoneal location of the mobile sigmoid colon makes this easier. In addition to the supine position, the right lateral position can also be helpful in some situations. Changing the patient’s position does not increase risk and thus must always be attempted first before resorting to “blind” advancement of the instrument.
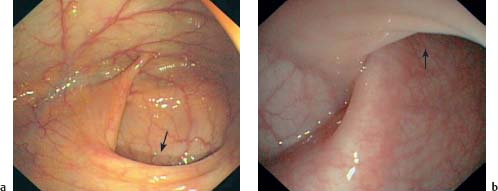
Fig. 5.8 a, b Acute angling of the lumen (example shown: sigmoid-descending junction). The direction of the lumen cannot be seen either at about the 7-o’clock position (a) or at the 12-o’clock position (b), but it can be presumed, in part due to shadowing (arrows). In exceptional situations, the endoscope tip can be very carefully advanced in the presumed direction without visualization.
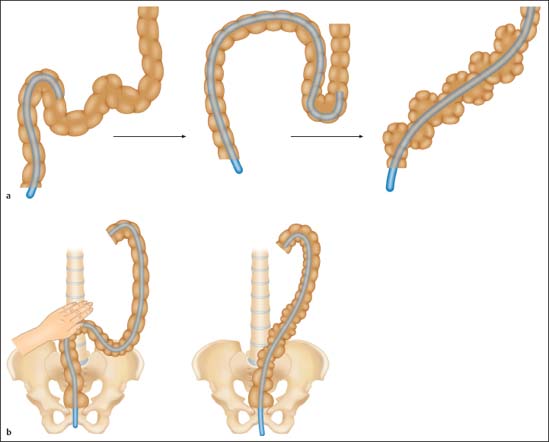
Fig. 5.9 Looping in the sigmoid colon.
a Straightening the loop by withdrawing the instrument and desufflating air (or suctioning insufflated air).
b Straightening the loop using external hand pressure and withdrawing the instrument.
Bowing and Looping. An additional problem in passing the flexible sigmoid colon is bowing and looping of the endoscope. Disparity between the amount of colonoscope introduced into the rectum and the amount of advancement of the tip in the lumen is a sign that a loop is forming. In extreme cases, the instrument tip no longer moves proximally in the colon when advanced or even moves “paradoxically” in the direction of the anus. Pronounced looping in the sigmoid colon can result in the entire instrument being “used up” before reaching the descending colon; it can also create discomfort for the patient and increase risk of perforation, and, ultimately, make it impossible to complete the colonoscopy.
To counteract looping, the examiner can withdraw the instrument prematurely, and, if necessary, repeatedly, to the beginning of the loop. This can straighten the already intubated colon segment and allow gradual advancement proximally. Suctioning air when withdrawing the instrument can also be helpful (Fig. 5.9a).
If looping still cannot be entirely prevented or counteracted, and is impeding the continuation of the procedure, the use of external hand pressure can be helpful in fixing or “splinting” the sigmoid colon (Fig. 5.9b; see below). Using external compression preventively can often counteract looping (prophylactically). The optimal localization for applying pressure can be found by palpation. In rare cases of pronounced or atypical looping, brief use of radiography may be necessary for orientation.
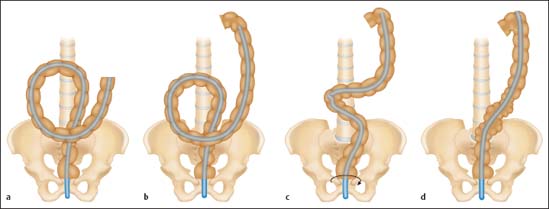
Fig. 5.10 Alpha loop technique.
a Alpha loop.
b-d Straightening the loop by pulling the endoscope back and rotating the shaft clockwise.
A further option for straightening the lumen and making it easier to pass the proximal sigmoid colon and the sigmoid-descending junction is the so-called alpha-loop maneuver. Rotating the endoscope 180° counterclockwise in the sigmoid colon creates a loop (similar in shape to the Greek letter alpha; Fig. 5.10a
Related posts:


Stay updated, free articles. Join our Telegram channel

Full access? Get Clinical Tree


