Foundation
We begin abdominal training by establishing core stability and learning precise control of the lumbo-pelvis, the junction between the lower back and the pelvic region. The reason for this foundation is two-fold. Firstly, poorly controlled movements are always risky from the point of view of injuries; poorly controlled movements performed on an unstable spine are almost guaranteed to lead to injury sooner or later. Secondly, by performing abdominal exercise in an imprecise way we are rehearsing poor movement patterns which will be very hard to ‘un-learn’ later. It’s a little like walking before you can run. If you start walking with a limp, by the time you begin running everything will be sore!
Let’s start by mastering two essential movements which form the cornerstones of good abdominal training: pelvic tilting and abdominal hollowing.
Pelvic tilting
We saw on page 11 that the tilt of the pelvis determines the position of the lower back. Tilting the pelvis forwards increases the hollow in the small of the back (lumbar extension), while tilting the pelvis backwards flattens the back, reducing the lumbar hollow (lumbar flexion). Pelvic tilting is important because it teaches control of the lumbar spine during exercise. An incorrect pelvic tilt during exercise can lead to excessive movement in the lower spine. We must be able to identify this happening, by feeling the action taking place, so that we can correct it before an injury occurs.
Some people find this movement difficult because their spine is quite stiff. We saw in chapter 4 that posture affects the curve in the base of the spine and the angle of the pelvis. If someone has a hollow back (lordotic) posture, their pelvis is already in anterior tilt. When they try to practise pelvic tilting exercises they will find it very difficult to tilt the pelvis posteriorly and flatten their back. Similarly, someone with a flatback posture has lost their normal lumbar curve (lordosis). They, in turn, will find it very difficult to increase the lumbar curve by tilting the pelvis forwards. Keep going with the exercise, however, because mobility will increase with practice.
Because accurate control of this action is so vital, we will practise the movement from two different starting positions.
Keypoint
Developing accurate control of pelvic tilt is an essential foundation for good abdominal training.
 Ex 10 Pelvic tilting, lying |
Starting position
Begin lying on your back with your knees bent. Place your feet and knees shoulder-width apart. Your arms should rest on the floor slightly away from your body.
Action
Tighten your abdominal muscles to tip your pelvis backwards, and flatten the small of your back against the floor. Pause and then reverse the action, tightening your back muscles to hollow the small of your back away from the floor. Repeat this action and try to stop the movement when you are halfway between the two extremes. Note: This mid-point is your neutral position and we will use it later in the programme.
Points to note
Keeping the knees apart allows the pelvis to move unhindered. If the knees are too close together, free movement of the pelvis will be restricted.
Training tip
The action must be smooth and controlled rather than jerky. A jerking action will stress the lower spine.
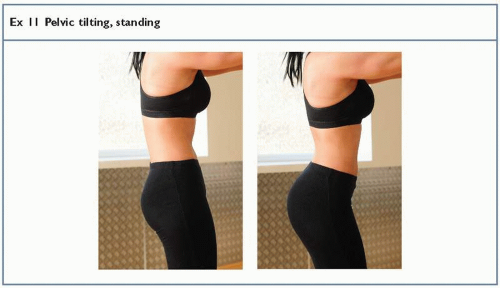 Ex 11 Pelvic tilting, standing |
Starting position
Begin standing with your feet shoulder-width apart, arms by your sides. Stand tall. Do not slouch.
Action
Tighten your abdominal muscles and your buttock muscles together to tilt your pelvis backwards and flatten your lower spine. Pause and then tighten your hips and spinal muscles to increase the hollow in the small of your back.
Points to note
The action should be isolated to your lower back. Your shoulders should stay square, and your knees should remain still. Avoid any body sway.
Training tip
Placing your hands out to the side in a ‘T’ shape will help with the balance of this exercise, and make any unwanted body sway more obvious. If you find it difficult to control body sway, place your hands on a wall in front of you.
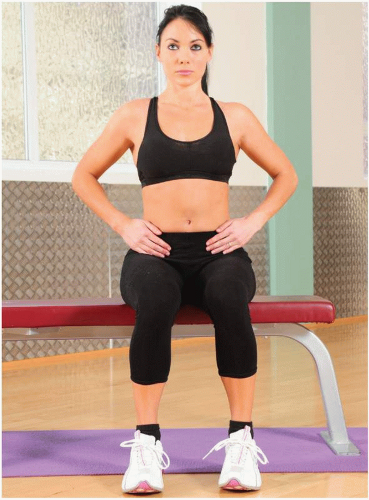
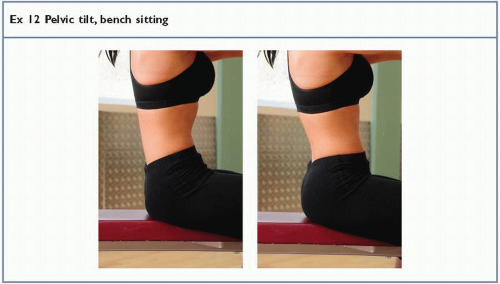 Ex 12 Pelvic tilt, bench sitting |
Starting position
Sit on a gym bench or dining chair with your knees bent and slightly apart. Your knees should be positioned slightly lower than your hips. Keep your back straight but not rigid, and your feet flat on the floor.
Action
Sit tall and tilt your pelvis forwards to press your pubic bone towards the bench and hollow your lower back. Pause, and then tilt your pelvis backwards pressing your tailbone (coccyx) onto the bench and flattening your lower back.
Points to note
The movement must be isolated to the pelvis. Do not allow your body to sway and do not round or brace your shoulders.
Training tip
Make sure you keep your knees apart to allow unhindered motion of the pelvis.
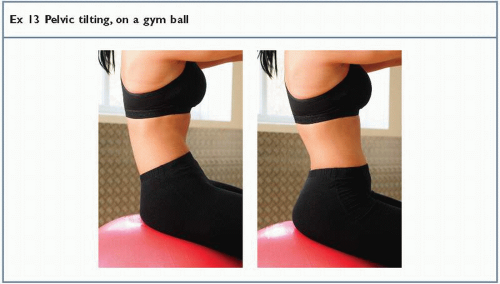 Ex 13 Pelvic tilting, on a gym ball |
Starting position
Sit on a large 60 cm (24 inch) gym ball with your knees bent to 90 degrees. Your back should be straight but not rigid, and your feet should be flat on the floor.
Action
Sit tall on the ball and tilt your pelvis backwards to decrease the hollow in the small of your back, and then forwards to increase it.
Points to note
The movement must be isolated to the pelvis. Do not allow any body sway and do not round or brace your shoulders.
Training tip
To prevent body sway to begin with, place a dining chair at each side of the ball. Put each hand flat on the chair surfaces to monitor shoulder movement.
Abdominal hollowing
We saw in chapter 2 that the deep abdominal muscles (transversus abdominis and internal oblique) are important muscles to maintain stability of the lower spine. These muscles are often not used in exercise programmes, but it is vital that we work them before we move on to further abdominal training. The muscles work hard during the abdominal hollowing actions described below. Even if you have been training for many years, practise this movement; you may be surprised at just how little control you have in this body area.
General principles with abdominal hollowing
It is important to get the deep corset muscles working. However, sometimes this can be very difficult if the muscles have not worked for a long time or have been damaged. If you have not exercised for a long time, have recently given birth, or had abdominal surgery, this section is especially important for you. Also spend some time reading chapters 14 and 16.
• Starting position
The position that you chose to start your training is important. If you have had back pain, kneeling positions will probably be more comfortable for you. However, if you are very overweight, standing positions are better, because your abdominal muscle movement is more noticeable (and so easier to learn). Sitting and standing positions are both easy to use throughout the day and so are most suitable for home exercise and building your exercise into your daily activities.
Related posts:


Stay updated, free articles. Join our Telegram channel

Full access? Get Clinical Tree


