Abdominal Training in Sport and Exercise Classes
The principles which make up this abdominal training programme may be used in sport in two ways. Firstly, the exercises described in the earlier chapters may be incorporated into a general training programme. This will have the effect of making the trunk section of any training programme far safer and more effective. In addition, because the arms and legs depend on the stability of the trunk as the core against which they push and pull, the function of the limbs may well improve. Finally, the programme can contribute by using the underlying principle of enhanced trunk stability to provide the foundation for movements in all sports actions. The following exercises demonstrate a few examples of how commonly used exercises can be modified using core stability principles to improve both safety and effectiveness.
Keypoint
Using core stability principles can make your sport both safer and more effective.
Weight training
We have seen that the neutral position of the spine should be maintained as often as possible to reduce stress acting on the lumbar region. One way to achieve this, and stabilise the spine is to practise the abdominal hollowing action. By pulling abdominal muscles in tightly, the trunk becomes more stable and body alignment is improved. In fig. 13.1a, the athlete is performing a shoulder press action. The pelvis has tipped forwards and the lumbar curve has become excessive. By tightening the abdominal muscles (see fig. 13.1b), the pelvis will remain level and the lumbar spine is correctly aligned. In addition, the athlete in fig. 13.1b has widened the base of support and is therefore more stable. The combination of stable spine and stable base makes the exercise far safer.
The same applies to fig. 13.2. Initially, the athlete performing the arm curl has allowed the pelvis to tip forwards and is dangerously overextending (hyperextending) the spine to swing the weight upwards. In fig. 13.2b, by modifying the exercise using the programme’s principles, the exercise is far safer. Firstly, posture modification and abdominal hollowing has been used to correct the pelvic tilt and give the athlete a stable trunk to work from. Secondly, the base of support has been widened by placing the feet one in front of the other, and the knees are bent so that the legs, rather than the spine, give the spring to the action.
Keypoint
When using weights, focus on good body alignment throughout each movement.
 Fig. 13.1 Shoulder press: (a) stress on lower spine – unstable position (see *); (b) spine correctly aligned – more stable position |
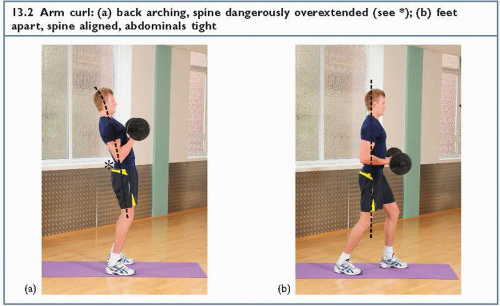 13.2 Arm curl: (a) back arching, spine dangerously overextended (see *); (b) feet apart, spine aligned, abdominals tight |
In fig. 13.3, the athlete is performing a squat exercise. There are a number of errors in technique here, which are making the exercise quite dangerous to the spine. Firstly, the pelvis has tipped right forwards, allowing the abdominal muscles to lengthen and protrude. This increases the lumbar curve and fails to stabilise the spine. In addition, the knees are not bent sufficiently to lower the weight. Instead the athlete has tipped the trunk forwards on the hip and allowed the spine to move forwards of the ideal posture line. The weight has been pulled forwards, and the leverage (measured as the distance between the weight and the posture line) has increased dramatically.
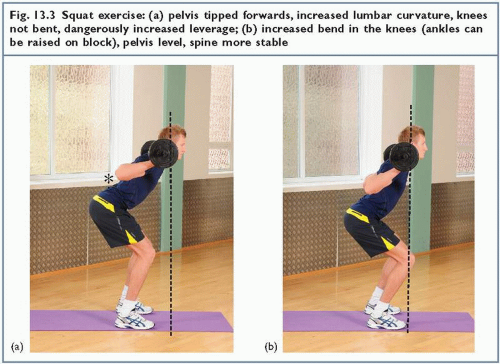 Fig. 13.3 Squat exercise: (a) pelvis tipped forwards, increased lumbar curvature, knees not bent, dangerously increased leverage; (b) increased bend in the knees (ankles can be raised on block), pelvis level, spine more stable |
By applying core stability and posture control principles, the exercise has been modified in fig. 13.3b. The athlete has corrected his posture by bending the knees more (the ankles are raised on a block). This has lowered the weight while keeping the spine and weight close to the posture line. The pelvis is level and the abdominal muscles have been pulled tight by performing the abdominal hollowing action. The spine is therefore more stable and less likely to be injured through excessive joint movement.
Abdominal exercise with weights
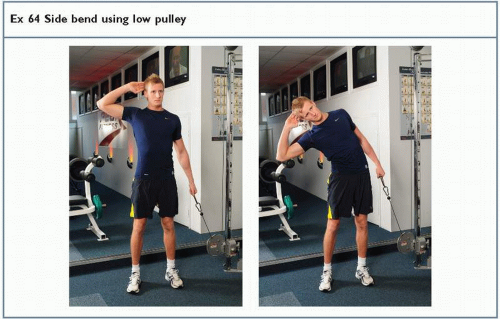 Ex 64 Side bend using low pulley |
Starting position
Begin standing side-on to a pulley machine. Your feet should be shoulder-width apart and facing forwards. Grip the handle of a low pulley unit in your left hand, taking up any slack in the machine cord. Maintain an optimal posture.
Action
Side-bend your trunk to the right, reaching down the side of your right leg to try to touch the outside of your knee. Pause and then slowly lower the weight to stand upright again.
Points to note
Make sure that you do not lean forwards or backwards as you perform the side-bend. Keep your shoulders and hips square throughout the movement, and do not allow your knees to bend.
Training tip
Focus your attention on the side of your trunk just above the hip. Do not swing the action; bend under control.
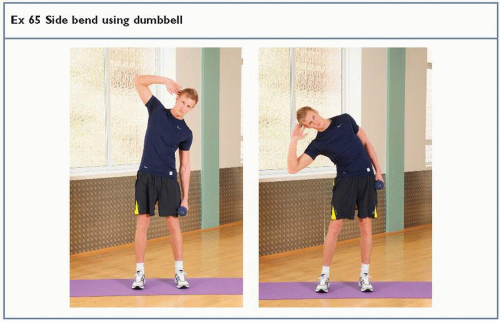 Ex 65 Side bend using dumbbell |
Starting position
Begin standing holding a dumbbell in your left hand. Your feet should be shoulder-width apart and facing forwards. Place your right hand behind your head.
Action
Slowly side-bend your trunk to the left, reaching down the side of your left leg to try to touch the outside of your knee. Pause and then side-bend to the right pulling the dumbbell up to hip level. Once you have finished your set, repeat the action with the dumbbell in your right hand.
Points to note
Make sure that you do not lean forwards or backwards as you perform the side-bend. As you reach downwards, control the descent of the dumbbell, don’t allow it to pull you quickly.
Training tip
As you lower the dumbbell your sideflexor muscles of the opposite side of the body (contralateral) are working eccentrically, as you lift they work concentrically. Note: If you use a dumbbell in each hand, the weight of one lowering assists the other to lift and they effectively cancel each other out.
 Ex 66 Knee rolling |
Starting position
Begin lying on your back with one knee bent, the other leg straight. Either attach a sling from a low pulley machine around your bent knee or, if you are working with a partner, use a resistance band. Place your arms out in a ‘T’ shape to aid stability.
Action
Perform a knee rolling action, lowering your bent knee to the ground away from the pulley or band. As you do this, the weight will lift or the band stretch. Pause and then bring your knee back to the upright position by lowering the weight or releasing the band.
Points to note
Control the movement; do not allow the weight or band to pull you. Once you have performed ten repetitions to one side, change your position to face the other way and perform ten repetitions to this side.
Training tip
If you find the sling from the weight pulley or the band digs into your knee, wrap a towel around your knee beneath the sling/band before you start.
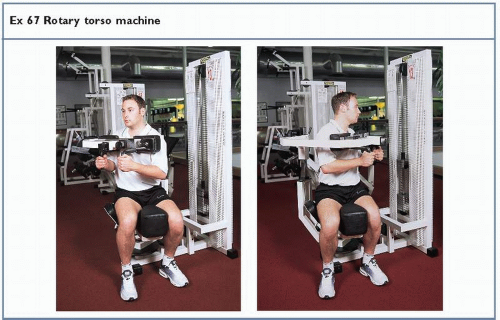 Ex 67 Rotary torso machine |
Starting position
Sit on the machine with your knees blocked against the pads. Rest your forearms on the chest bar and grip the handles. Adjust the range of motion limiter so that it allows you to fully twist your spine but not to overstretch it.
Action
Twist to the right then the left, lifting the weight as you do so. Make sure you control the movement in each direction; do not allow the machine to ‘run away with you’.
Points to note
The rotary torso action is important as it works the oblique abdominal muscles which are essential to maintain a controlled movement of the spine. However, the range of motion limiter must be set correctly to avoid the risk of the machine twisting you too far. For this reason, set the limiter to stop the machine movement just short of your full degree of spinal twist (full range motion). In this way you will avoid the possibility of overstretching.
Training tip
It is common to be able to move in one direction more easily than the other. This simply represents unequal muscle development (muscular asymmetry) and will correct itself over time.
 Ex 68 Abdominal curl machine |
Starting position
Sit on the machine, adjusting the seat height and pads for comfort.
Action
Bend (flex) your trunk reaching your head towards your knees, in a curling action. Hold the inner position and then return.
Points to note
This movement should be a curling action, keeping the lower spine on the seatback and drawing the ribcage down to the pelvis. This will fully tighten (shorten) the muscle. If you simply lean forwards, allowing your lower spine to leave the seatback, the additional movement has occurred at the hip and not the spine.
Training tip
Try to imagine pressing your nose towards your tummy button (umbilicus) rather than towards your knees.
 Ex 69 Back extension machine |
Starting position
Adjust the seat and roller of the back extensor machine for comfort, and fasten the seat belt to hold your pelvis against the machine. Cross your arms across your chest.
Action
Tighten your abdominal muscles and push backwards to lift the weight. Hold the extended position and then lower the weight under careful control.
Related posts:


Stay updated, free articles. Join our Telegram channel

Full access? Get Clinical Tree


