Monitoring devices are attached and supplemental oxygen is given, usually via nasal prongs. Necessary sedation and/or pharyngeal anesthesia is applied. A biteguard is placed.
Endoscope handling
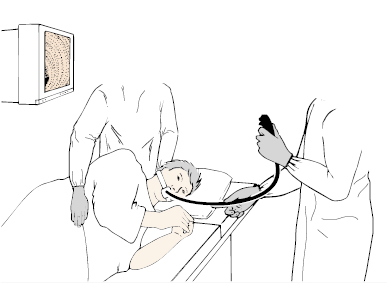
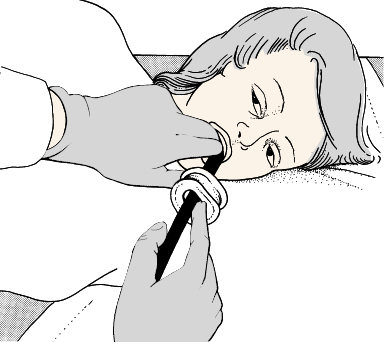
The endoscopist should stand comfortably facing the patient, holding the instrument so that it runs in a gentle curve to the patient’s mouth (Fig 4.2).
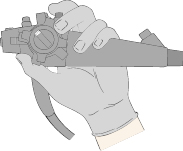
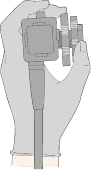
The control head of the endoscope should be placed in the palm of the left hand and held between the fourth and fifth fingers and the base of the thumb, with the tip of the thumb resting on the up/down control (Fig 4.3). This grip leaves the first finger free to activate the air/water and suction buttons. The second finger assists the thumb as a helper or “ratchet” during major movements of the up/down control. Some people can also manage the left/right control with the left thumb (Fig 4.4). Twisting the control body applies torque to the straightened shaft and is an important part of steering.
Fig 4.3 The thumb rests on the up/down angulation control with the forefinger on the air/water valve; the middle finger can also assist.
The right hand is used to push and pull the instrument, to apply torque rotation and to control accessories such as biopsy forceps.
Passing the endoscope
Select a standard forward-viewing endoscope and check it. Perform a white-light balance (where necessary), lubricate the distal tip and double check the critical functions:
- tip angulation
- air and water
- suction
- image quality.
Check that the patient is stable and comfortable and that the assisting nurse is ready. Sedated, patients may slump into positions in which swallowing anything is a challenge. The patient should be facing directly in front, with the neck slightly flexed. Most endoscopists pass instruments under direct vision. Sometimes it may be necessary to insert the endoscope blindly, or with finger-guidance.
Direct vision insertion
Insertion under direct vision is the best and standard method.
- be gentle, feel the tube slide in
- coordinate gentle onward pressure with the patient’s attempts to swallow
- encourage the patient, e.g. “swallow, swallow again, well done … now take deep breaths.” This is best done by the endoscopist alone. Too many voices may confuse the patient and may suggest a degree of panic.
 ).
).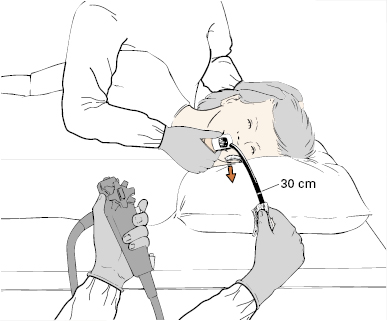
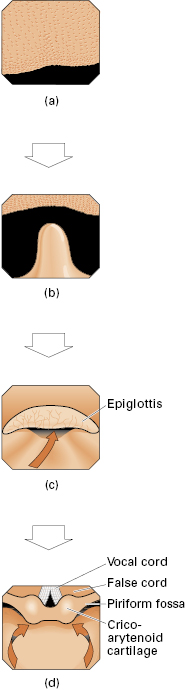
Fig 4.6 (a) Follow the centre of the tongue … (b) … past the uvula … (c) … and the epiglottis … (d) … to pass below the cricoarytenoid on either side.
Blind insertion
This technique (originating from the time when most gastroscopes were side-viewing and were still used for endoscopic retrograde cholangiopancreatography (ERCP) insertions) is a slight variation of the better direct vision method but is done mainly by feel and by watching the patient, rather than looking at the endoscopic view on the monitor. The assistant maintains the patient’s neck slightly flexed. The endoscopist passes the instrument tip through the biteguard and over the tongue to the back of the mouth; using the left thumb on the control knob, the tip is then actively deflected “upward” so that it curls in the midline over the back of the tongue and into the midline of the pharynx. The tip is advanced slightly and angled down a little, and the thumb is then removed from the tip control. Slight forward pressure is maintained, and the patient is asked to swallow as the 20 cm mark approaches the biteguard. There is an obvious feeling of “give” as the tip passes the cricopharyngeal sphincter and then slides easily into the esophagus.
Insertion with tubes in place
Endotracheal tubes present no problem for the endoscopist inserting under direct vision, the scope being angled down posterior to the tube and gently pushed through the sphincter. Deflating the cuff of the tube may be necessary occasionally to allow easier passage, especially with larger instruments. An existing nasogastric tube may be a useful guide to the lumen. Withdrawing the endoscope may displace a nasogastric or nasoenteric tube. This risk can be minimized by stiffening the tube with a guidewire.
Finger-assisted insertion
This method is inelegant, and is needed only rarely when standard methods fail. The control head of the instrument is held by an assistant (avoiding contact with the angulation controls). The biteguard is fitted over the shaft before insertion. The endoscopist puts the second and third fingers of the left hand over the back of the tongue. With the right hand, the tip of the instrument is passed over the tongue, and the inserted fingers of the left hand are used to guide it into the midline of the pharynx (Fig 4.7). The fingers are withdrawn, the biteguard is slid into place, and the patient is asked to swallow. If swallowing is not effective, the tip of the instrument has probably fallen into the left pyriform fossa.
Routine diagnostic survey
Whatever the precise indication, it is usually appropriate to examine the entire esophagus, stomach, and proximal duodenum, wherever possible. A complete survey may sometimes be prevented by stricturing from disease or previous surgery, or can be curtailed for other reasons.
It is important to develop a systematic routine to reduce the possibility of missing any area.
- Always advance the instrument under direct vision, using air insufflation and suction as required, and slowing as necessary during active peristalsis.
- Mucosal views are often optimal during instrument withdrawal, when the organs are fully distended with air, but inspection during insertion is also important, as minor trauma by the instrument tip (or excessive suction) may produce small mucosal lesions with consequent diagnostic confusion.
- Lesions noted during insertion are best examined in detail (and sampled for histology or cytology) following a complete routine survey of other areas.
- As well as being systematic in survey, be precise in movements and decisive in making a “mental map” of what is being seen. A careful and complete examination can be achieved in less than 5–10 minutes by avoiding unnecessary movements and repeated examinations of the same area.
Golden rules for endoscopic safety:
- do not push if you cannot see
- if in doubt, inflate and pull back.
Esophagus
The esophagus (Fig 4.8) extends:
- from the cricopharyngeal sphinctert
- behind the left main bronchus, the left atrium and aorta
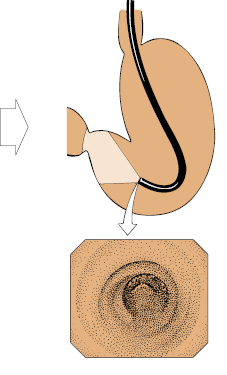
- to the esophagogastric mucosal junction, which is usually easy to see at 38–40 cm from the incisor teeth (in adults) as the point where pale pink squamous esophageal mucosa abuts darker red columnar gastric mucosa. This squamocolumnar junction is often irregular and therefore can also be called the “Z-line.” The esophagogastric junction should be situated at the top of the gastric folds in a semi-inflated esophagus. Pink mucosa extending cephalad from the top of the gastric folds suggests Barrett’s esophagus, biopsies being required to establish the diagnosis and exclude dysplasia.
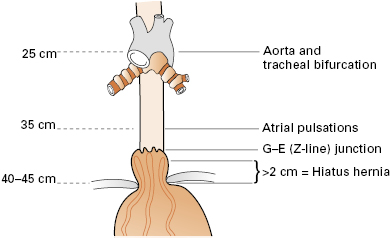
The diaphragmatic hiatus normally clasps the esophagus at or just below the esophagogastric junction. The position of the hiatus can be highlighted by asking the patient to sniff or to take deep breaths, and is recorded as the distance from the incisors. In any patient, the precise relationship of the Z-line to the diaphragmatic hiatus varies somewhat during an endoscopy (depending on the patient position, respiration, and gastric distension). In normal patients, the gastric mucosa is often seen up to 1 cm above the diaphragm. A hiatus hernia is diagnosed if the Z-line remains more than 2 cm above the hiatus. From the clinical point of view, however, the presence or degree of herniation may be less important than any resulting esophageal lesions (e.g. esophagitis or the columnar transformation of Barrett’s).
Stomach
In the absence of stenosis, the endoscope can be advanced easily through the cardia and into the stomach under direct vision. The distal esophagus usually angles to the patient’s left as it passes through the diaphragm, so it may be necessary to turn the instrument tip slightly to remain in the correct axis (Fig 4.9). Unless the cardia is unduly lax, the mucosal view is lost momentarily as the tip passes through, passage being felt by the advancing hand as a slight “give.” If the tip is further advanced in the same plane, it will abut on the posterior wall of the lesser curvature of the stomach, so that pushing in blindly risks retroflexing toward the cardia. Thus:
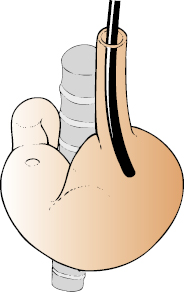
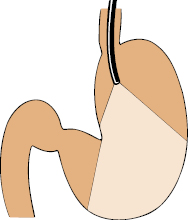
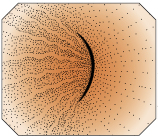
Fig 4.11 … the view is of the angulus in the distance, with the greater curve longitudinal folds. A fluid pool is often on the left.
The four walls of the stomach are examined sequentially by a combination of tip deflection, instrument rotation and advance/withdrawal. The field of view during the advance of a four-way angling endoscope can be represented as a cylinder angulated over the vertebral bodies. The distended stomach takes up an exaggerated J-shape with the axis of the advancing instrument corkscrewing clockwise up and over the spine, following the greater curvature (Fig 4.12).
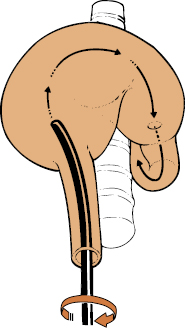
Thus, to advance through the stomach and into the antrum:
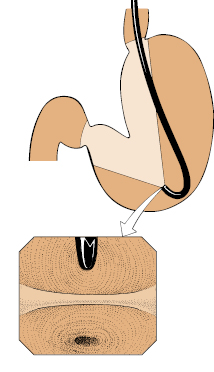
This clockwise corkscrew rotation through approximately 90° during insertion brings the angulus and antrum into end-on view (Fig 4.13). It may be necessary now to deflect the tip a little downward to bring it into the axis of the antrum (Fig 4.14), so that it runs smoothly along its greater curve. The motor activity of the antrum, pyloric canal, and pyloric ring should be carefully observed. Asymmetry during a peristaltic wave is a useful indicator of present or previous disease.
Through the pylorus into the duodenum
The pyloric ring is approached directly for passage into the duodenum. During the maneuver it is convenient to use only the left-hand for tip angulation and torque to maintain the instrument tip in the correct axis.


